Temperature Grid
The Temperature Grid option allows you to model the thermal distribution by defining the temperature at a grid of discrete x,y locations. From the grid point data, temperature at any location in the model is calculated using the specified interpolation method.
The Temperature Grid option is available only when the Thermal Analysis is enabled from the Project Settings menu. When Static Temperature method is enabled, the temperature grid data can be inputted as the Static Temperature of the model in Define Thermal Properties dialog. When Steady or Transient Thermal FEA method is enabled, the temperature grid data can be inputted as the Initial Temperature of the model in Define Material Properties dialog, under Initial Condition tab.
The grid data could be based on field measurements, or could be the output from a finite element thermal analysis in RS2.
To define the Temperature Grid(s):
- Ensure Thermal Analysis is enabled in the Project Settings dialog.
- Select Temperature Grid from the Thermal menu, and you will see the Temperature Grid dialog.

- By default, one (blank) grid is initially defined. You can type or paste data into the spreadsheet at the right of the dialog, or you can import data into the spreadsheet by selecting the Import button (see below for details). Each grid point is defined by x and y coordinates, and a value.
- Multiple Grids - if you require more than one grid, select the Add button to create the desired number of grids. A list of default grid names will appear. You can customize the name for each grid (e.g. Stage 1, Stage 2 ...) by clicking on the grid name and selecting the Rename button. To enter data for each grid, click on the grid name and enter the data as described in Step 3.
- When finished entering or editing data select [OK].
After the Temperature Grid(s) have been defined, you can assign the Temperature Grid(s) to materials and stages in the Initial Condition or Thermal Properties tab and the Stage Factors tab from the Material Properties dialog respectively (see below). The location of each grid point will be marked by a yellow triangle and displayed on the model.
Importing Temperature Grid Files
The Import button in the Temperature Grid dialog allows you to import temperature grid data from a file into the current RS2 model. The following file formats can be imported:
- .DAT files – a .DAT file is a space delimited text file, where each row of the file has the format (x y value). The unit of the temperature value must correspond to the Units in Project Settings (Celsius, Kelvin, Fahrenheit)
- Text files - you can import temperature grid data from comma, tab or space delimited text files, with .CSV, .PRN or .TXT extensions. Each row of the file must be in the format (x y value), where the data is separated by the appropriate delimiter.
Exporting Temperature Grid Files
The Export button in the Temperature Grid dialog allows you to export the current data in the Temperature Grid dialog, to a .DAT file (see above for the definition of a .DAT file). This is useful if you wish to later import the same Temperature Grid into another RS2 model.
Assignment of Temperature Grid – Material(s)
After the Temperature Grid(s) are defined, depending on the thermal method, they can be assigned to material(s) for correspondent use.
Static Thermal Method
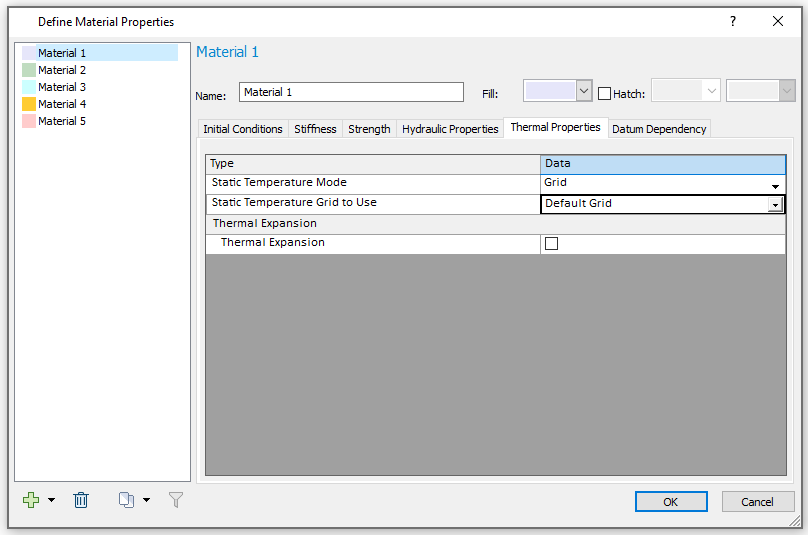
When Thermal Method = Static Temperature, the Temperature Grid can be applied as static temperature of the model with following steps:
- Select Define Thermal from the Properties menu, and select one material
- Set Static Temperature Mode = Grid, and select a Temperature Grid to use from the Static Temperature Grid to Use dropdown list.
FEA Thermal Method
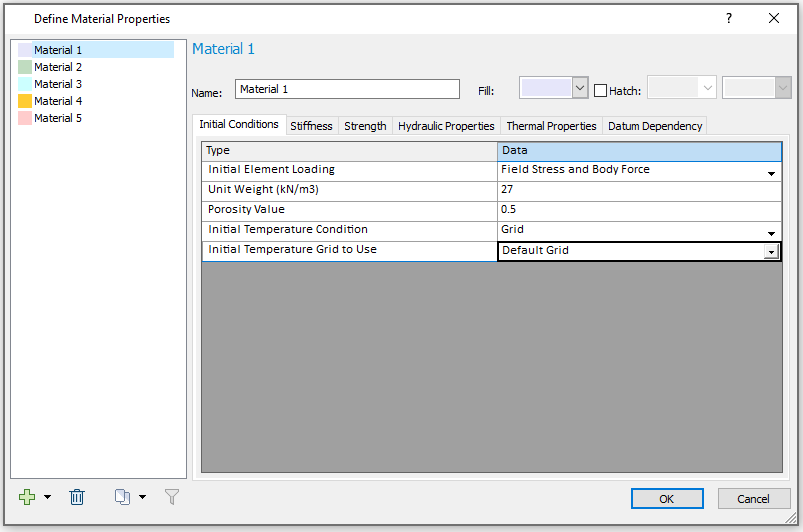
When Thermal Method = Steady Thermal FEA or Transient Thermal FEA, the Temperature Grid can be applied as the Initial Temperature Condition with following steps:
- Select Define Material from the Properties menu, and select one material
- Select the Initial Conditions tab, set Initial Temperature Condition = Grid, and choose the Initial temperature Grid to Use from the dropdown list. The temperature grid will be applied to the material as the initial temperature condition at the first stage.
Assignment of Temperature Grid – Stages
When the Static Temperature method is in use, the Temperature Grid can be applied by stages. This option is under the Stage Factors tab from the Define Material Properties dialog, with the following steps:
- After a Temperature Grid has been defined, select Define Thermal from the Properties menu.
- Select the Stage Factors tab, and select the checkbox for the Stage Thermal Properties option.
- A table with Stage number and Thermal Grid to Use status will display. By default, the first stage will display, as shown below:
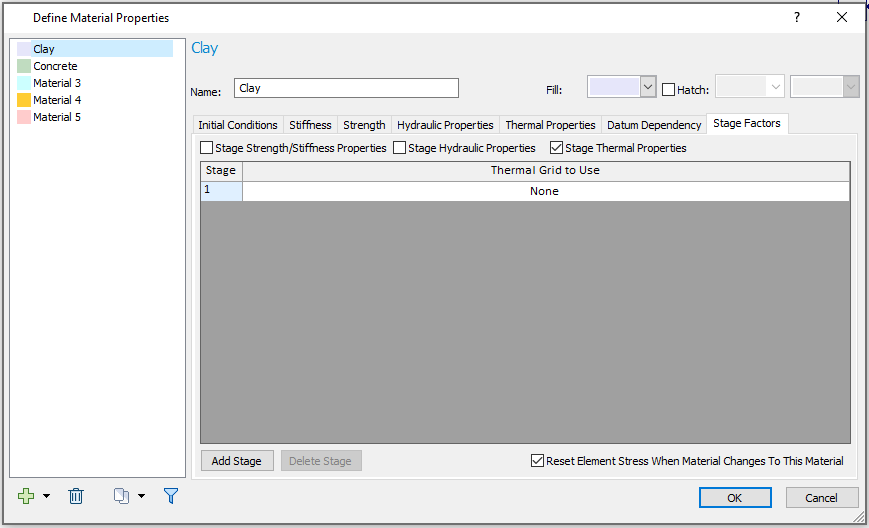
Note that staging Temperature Grid(s) is only applicable to Static thermal stages. It is not applicable to stages with other method, thus the associated stages in the table will be greyed out.
- Choose a Temperature Grid to apply to the stage using the Thermal Grid to Use dropdown menu.
- Select the Add Stage button to modify Thermal Grid to Use in other stages.
- If you accidentally add too many rows with the Add Stage button, click the mouse in a row and select the Delete Stage button, to delete the row.
- Click OK in the dialog to apply.
- This option is available only when the Static Temperature method is active, which means AT LEAST one stage with Static Thermal method exists in the model. If the Static Temperature method is not in use, the Stage Thermal Properties option will NOT be available.
- For details about staging other properties, please see the Stage Factors topic.