Selection Filter
The Selection Filter ![]() allows the user to choose which boundary types can be selected for editing.
allows the user to choose which boundary types can be selected for editing.
The Selection Filter is available in:
- the right-click menu for all applicable options (e.g. Delete Boundary, Move Boundary etc)
- the Edit sub-menu of the Boundaries menu
- the toolbar
To use the Selection Filter:
- First, select the desired editing option (e.g. Delete Boundary, Move Boundary, Delete Vertices etc).
- The Selection Filter
 option will now be enabled (while you are in the editing mode). The easiest way to access the Selection Filter is from the right-click menu or the toolbar.
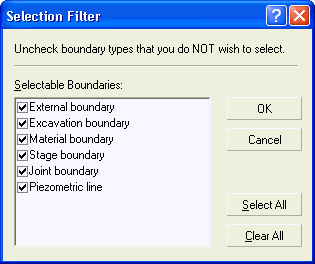
 - You will see the following dialog. By default, all boundaries are initially selectable in the Selection Filter dialog.
- Use the checkboxes in the dialog to specify which boundaries can be selected. If you do NOT want a boundary type to be selectable, then clear the corresponding check box.
- Select OK in the dialog. You can then proceed with the editing option you selected in Step 1, and only the desired boundaries will be selectable for editing.
Selection Filter dialog

Typical Uses
The Selection Filter is useful when you need to edit certain boundaries, without selecting or editing other boundaries which may be adjacent or overlapping. For example, typical uses of the Selection Filter are:
- If a Piezometric Line exactly overlaps another boundary (e.g. Material boundary), and you need to edit one of the boundaries without affecting the other (e.g. move or delete the boundary), then you may need to use the Selection Filter to specify which boundary can be selected for editing, and which boundary(s) cannot be selected.
- If you are selecting boundaries with a selection window (e.g. to delete boundaries), then the selection filter can be used to specify which types of boundaries will be selected within the window, as described in the following example.
Example
Let’s say a model had numerous Stage boundaries that you wanted to delete, without deleting any Excavations. You could turn "off" all boundary types in the Selection Filter except for Stage boundaries, and then select all Excavations with a window while using the Delete Boundaries option, and only the Stage boundaries would be selected and deleted.
NOTE:
- The Selection Filter is automatically reset after each use, so that all boundaries are selectable, once the current operation has been completed.
- In addition to the boundary editing options, the Selection Filter is also applicable to other RS2 options. For example, while Custom Discretizing, Adding / Deleting Distributed Loads, Adding / Deleting Liners, etc, the Selection Filter is available in the right-click menu.
- The Selection Filter can be used at any time during the selection process. For example, if you accidentally select boundaries that you did not intend to select, you can use the Selection Filter to un-select any given boundary type, even after boundaries have been selected.
See the Selecting topic for more tips and information on selecting entities in RS2.