Drawing Arc Segments
Boundaries which include arc segments can be easily modeled in RS2. NOTE:
- Arcs can be used with any boundary type in RS2.
- You can include any number of arcs in a single boundary.
- An arc in RS2 is actually made up of straight line segments which approximate a circular arc.
- To define a complete circle use the Circle option rather than the Arc option.
The following instructions assume that you have already selected one of the Add Boundary options (e.g. Add Excavation, Add Material, etc), and are in the mode for entering vertices.
To create an arc:
- Enter the starting point of the arc, graphically with the mouse, or through the keyboard.
- Select Arc
 from the right-click menu, or type a followed by Enter in the prompt line.
 - You will see the Arc Options dialog, in which you can choose:
- Arc Definition Method (3 options available)
- Arc to polyline conversion method (2 options available)
See below for details. Make your selections in the dialog, and select OK.
- As you move the mouse, you will see an interactive arc drawn on the screen, which follows the cursor position. Enter the arc according to the Arc Definition Method you have chosen. You may use the keyboard or the mouse to enter the required points.
NOTE: Once a boundary has been added to a model, arc segments no longer exist as modeling entities (i.e. the vertices and line segments which make up an arc are independent of each other).
Arc Definition Method
In the Arc Options dialog, there are three different methods available for defining the arc - 3 points on arc; start, center, end point; start, center, angle.
3 POINTS ON ARC
The arc is defined by entering 3 points which are on the arc.
- The first point is the starting vertex of the arc entered in Step 1 (above).
- The second point can be any intermediate point on the arc (e.g. the midpoint between the beginning and end points of the arc).
- The third point is the end vertex of the arc.
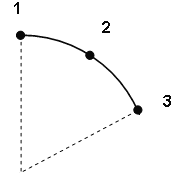
3 points on arc option
START, CENTER AND END POINT
The arc is defined by entering a start point, center and end point.
- The first point is the starting vertex of the arc entered in Step 1 (above).
- The "center" is the center of rotation of the arc.
- The third point is the end vertex of the arc.
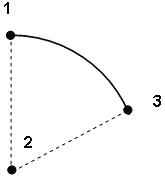
Start, center, end point arc option
NOTE: If the arc is formed in the wrong direction, you can select Reverse Arc Direction from the right-click menu (or enter r in the prompt line) to reverse the direction in which the arc is formed between the start point and the current cursor location.
START, CENTER AND ANGLE
The arc is defined by entering a start point, center and angle.
- The start point is the starting vertex of the arc entered in Step 1 (above).
- The "center" is the center of rotation of the arc.
- The angle is the included angle of the arc (entered in the Arc Options dialog).
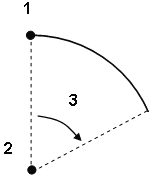
Start, center, angle arc option
Arc to Polyline Conversion Method
An arc in RS2 is actually made up of straight line segments which approximate a circular arc. In the Arc Options dialog, you may select one of two options for converting the arc into a polyline:
- Number of segments - you can specify the number of segments in the arc. In this case, the exact number of segments will be used. All segments are of equal length.
- Approximate segment length - you can specify an approximate segment length. RS2 will automatically determine the number of equal segments which gives (approximately) the desired segment length. The actual segment length may be different from the approximate value you have entered.
Defining a Tunnel Boundary with the Arc Option
The Arc options in RS2 allow you to easily define tunnel cross-sections which are based on arc segments. You can include any number of Arcs in a single boundary, by repeating the above steps as required.
TIP: In conjunction with the Mirror and Close option, you can easily define complex tunnel cross-sections which are based on arcs. The Mirror and Close option allows you to define half of a boundary, and then close it with a mirror image of the existing vertices.