Add Line Load
Concentrated loads can be modeled with the Line Load option in RS2. A line load magnitude represents a FORCE per UNIT LENGTH (e.g. kN/m) when considering the out-of-plane dimension of the model.
Line loads can only be applied after the finite element mesh has been generated.
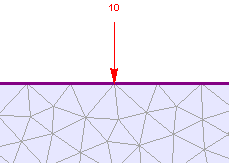
Vertical line load added to external boundary
To add a line load:
- Select Add Line Load
 from the Line Loads sub-menu of the Loading menu.
 - You will see the Add Line Load dialog. In this dialog:
- select the load orientation and enter the load magnitude
- in a multi-stage model, line loads can be staged by selecting the Stage Load check box, and entering a Factor for the load magnitude at each stage. If you do NOT stage the load on a multi-stage model, then the load will be applied with the same magnitude at all stages.
See below for details about the load magnitude, orientation and staging.
- Select OK in the dialog, and you will be prompted to select the mesh node(s) on which to apply the load.
- Use the mouse to select the desired node(s). When nodes are selected, they will be highlighted by a small circle. Note the selection mode (available in the right-click menu):
- Pick By Boundary Nodes - by default, the selection mode is Pick By Boundary Nodes (i.e. you can only select nodes on boundaries).
- Pick By Any Node - if you wish to apply a force to non-boundary nodes (i.e. internal nodes of the mesh), right-click and toggle the selection mode to Pick by Any Node in the right-click popup menu. This will allow you to select any node of the mesh (boundary nodes or internal nodes). NOTE: the Pick By Any Node option will NOT be available if the Orientation method you have selected in the Add Line Load dialog is Normal to Boundary or Angle to Boundary.
- When you are finished selecting, press Enter or right-click and select Done Selection. The line load will be applied to all selected nodes, as you will see by the red arrow and the load magnitude at each node.
- Check the direction of the arrows and the magnitude, to make sure that this is the load you wished to apply. If there is a mistake, then repeat the above steps to apply the correct load, and make sure you have selected the correct Orientation method.
The display of line loads can be turned on/off in the Display Options dialog. Whenever you add or delete line loads, all existing line loads will be automatically displayed, even if they were turned off in Display Options.
TIP: before you add a line load, you may find it useful to add a vertex to the boundary location where the force is to be applied. This will ensure that the line load is applied at the desired location, and is not dependent on the discretization of the boundaries.
Load Magnitude
A line load magnitude is generally entered as a positive value. The direction of load application is specified by selecting an appropriate Orientation method (see below) in the Add Line Load dialog. If you enter a negative load magnitude this will reverse the direction of the applied load.
Load Orientation
The load orientation may be specified using one of five options in the Add Line Load dialog:
- Normal to Boundary – loads are applied normal to boundaries
- Vertical – loads are applied vertically (default = downward)
- Horizontal – loads are applied horizontally (default = to the right)
- Angle from Horizontal – specify an angle from the horizontal. Note that a POSITIVE angle is measured counter-clockwise from the positive X-axis direction.
- Angle to Boundary – specify an angle relative to the boundary on which the load is added.
Staging Line Loads
On a multi-stage model, line loads can be staged by selecting the Stage Load check box in the Add Line Load dialog (Step 2 above), and selecting the Stage Factors button. You will see the Stage Factors dialog, in which you can enter a Factor for the load magnitude at each stage.
Stage Factor
Factor = 1 means that the load magnitude will be equal to the magnitude entered in the Add Line Load dialog.
You can increase or decrease the magnitude of the load at any stage, by entering a Factor greater than or less than 1 (e.g. a Factor = 2 would double the load magnitude).
You can remove the load at any stage, by entering a Factor = 0. The load will not exist at any stage in which the Factor = 0, and will not appear on the model.
If your load is staged, it is a good idea to select the Stage Tabs, after adding the load, to check that the load is applied at the correct stages, and that the magnitudes are correct. If not, then repeat Steps 1 to 5 (above), and make sure that the correct Factors have been applied at the correct stages.