Contiguous Mesh Check
A requirement of the finite element mesh in RS2, is that the entire mesh, at each stage, forms a single unbroken "contiguous" region. This means that each finite element is in contact with neighbouring element(s) along at least one edge, and that the mesh is not made up of multiple regions which are not connected to each other.
If the mesh is not contiguous, this will in general result in unpredictable analysis results. The solution may not converge, results may be incorrect or incomplete, or the computation may abort; therefore this situation must be avoided.
The Contiguous Mesh Check option allows you to automatically check that the mesh consists of a single unbroken region at each stage. To use this option:
- After generating the mesh, select the Contiguous Mesh Check
 option, from the toolbar or the Mesh Quality sub-menu of the Mesh menu.
 - If the mesh consists of multiple disconnected regions, you will see a warning message. Select OK in this dialog, and the multiple mesh regions will be highlighted on the model by an orange rectangle drawn around each region.
- If the Contiguous Mesh Check option indicates that there is a problem, then you will have to edit the model to ensure that the mesh is contiguous at each stage. See below for more information.
This check is also referred to as a "floating element" check (i.e. a check for elements not connected to the rest of the mesh).
Examples of Non-Contiguous Meshes
A non-contiguous mesh is caused by the assignment of Excavated regions, which create separate, disconnected material regions of the finite element mesh. Some examples are shown below.
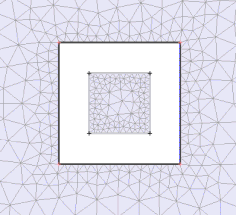 B
B 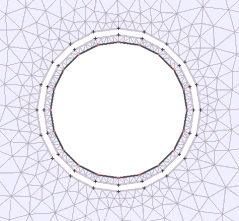
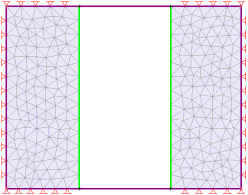 D
D 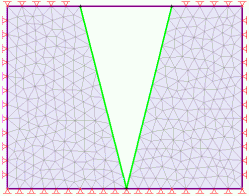
Examples of non-contiguous meshes - A: floating region inside excavation B: ring of floating elements inside staged circular excavation C: mesh completely separated by excavation D: two mesh regions only meet at one point.
Any of the above models would generate an error message when you select the Contiguous Mesh Check option. Note in example D above, that it is not recommended to have two mesh regions meet only at a point. All parts of the mesh should be connected by at least a single edge of two finite elements.
The above examples are presented mainly for illustration, and are not necessarily typical problems.
The real usefulness of the Contiguous Mesh Check option, is to detect very small regions of disconnected or "floating" elements. Such regions are sometimes just a single finite element, as shown in the figure below.
- These can be created unintentionally due to the intersection of boundaries. Such intersections may create a very small region or sliver of material which is not apparent.
- During the excavation assignment process, such tiny areas may be invisible or difficult to see (without zooming in). This can result in a disconnected sliver of material in the middle of an excavation, resulting in "floating elements" unattached to the rest of the mesh.
- It is important to note that even a single "floating element" can cause problems with the finite element analysis. It may cause non-convergence problems or other unpredictable results, and invalidate the entire analysis.
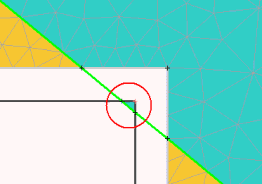
Unexcavated floating element (in circle) caused by intersection of material boundary and staged excavation boundary
Fixing a Non-Contiguous Mesh
If your analysis is not behaving as expected, you should apply the Contiguous Mesh Check to ensure that this is not the cause of the problem. If the Contiguous Mesh Check indicates a problem, then you will have to determine its cause, and edit the model appropriately so that the mesh is contiguous at all stages. This may involve re-checking your material and excavation assignments, and possibly some editing of boundaries to avoid unintended slivers of material. Remember that the problem areas of the mesh are highlighted by orange rectangles when you select Contiguous Mesh Check. You may have to zoom in to see the cause of the problem.