Add Two-Noded Spring
Two-noded springs can be connected to any two nodes of the finite element mesh using the Add Two-Noded Springs option. The location for both ends of the spring can be specified. If one end of a two-node spring was assigned to a composite liner or structural interface, it will be assigned to the liner. Similar to one-noded springs (nodal spring), two-noded springs can model the effect of struts used for support. In addition, two-noded springs can also model anchors. Using two-node spring, interaction between both ends will be accounted for.
Two-noded springs can only be applied after the finite element mesh has been generated.
To add springs:
- Select Add Two-Noded Springs
 from the Springs sub-menu of the Loading menu.
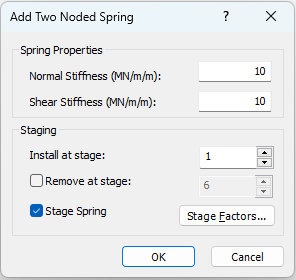
- In the Add Two Noded Spring dialog, enter the following information, and select [OK]:
- Normal Stiffness (see note below about stiffness values)
- Shear Stiffness (see note below about stiffness values)
- Staging - if your model is staged, you can specify the installation stage of the springs. You can also specify a removal stage, by selecting the Remove at stage check box and entering the stage at which the springs are to be removed (uninstalled).
Stage Spring
On a multi-stage model, stiffness of two-noded springs can be staged by selecting the Stage Spring check box, and selecting the Stage Factors button. In the Stage Factors dialog, you can enter a Factor for normal or shear stiffness at each stage.
Factor = 1 means that the stiffness will be equal to the magnitude(s) entered in the Add Two-noded Spring dialog.
You can increase or decrease the magnitude of the displacement at any stage, by entering a Factor greater than or less than 1 (e.g. a Factor = 2 would double the stiffness). Factor = 0 means that the stiffness will be 0 for the stage.
- For any end points, if a composite liner is selected, the spring will be connected to a composite liner node. Otherwise, the spring will be connected to a solid node of the mesh.
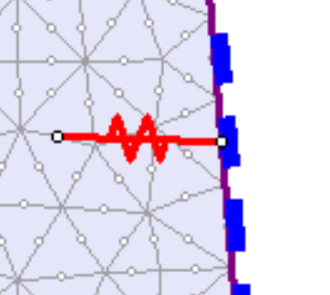
Display of two-noded spring connected to a composite beam and a node
NOTE: if you used the Staging option in the Edit Two Noded Spring dialog to specify the staging of the spring installation, the springs are only displayed at stages where they exist (i.e. a spring will be greyed out if the viewed stage is LESS THAN the installation stage or GREATER THAN OR EQUAL TO the removal stage).
Stiffness Values
When you enter the values for the spring stiffness in the Add Two-Noded Spring dialog (Step 2 above), remember that the RS2 analysis (for a Plane Strain model) assumes a unit width of material in the out-of-plane direction (perpendicular to the analysis plane). Therefore, the spring stiffness values you enter, should be normalized per unit out-of-plane distance.
For example, if struts (modeled as springs) were installed every two meters along the length of an excavation, then the stiffness values of an individual strut, should be divided by two, to obtain the average force and stiffness applied by the struts, per unit out-of-plane distance. These normalized values would be entered in the Add Two-Noded Spring dialog.
Right Click Shortcut
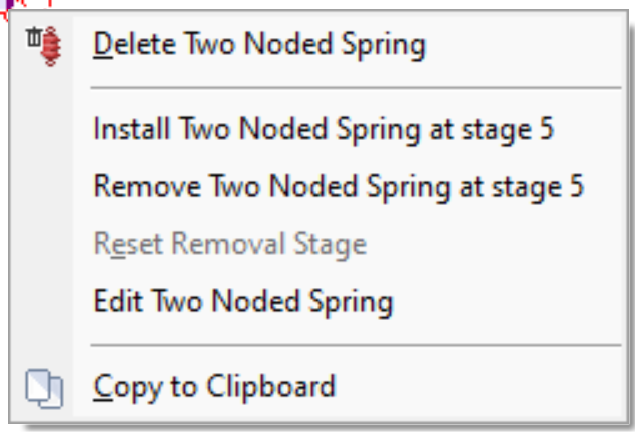
Right click on the two noded spring in the model for shortcut options as shown below.
- Delete Two Noded Spring
- Install Two Noded Spring at stage x
- Remove Two Noded Spring at stage x
- Edit the staging at the current stage
- Reset Removal Stage
- Available if the Remove at Stage option is selected. By selecting Reset Removal Stage option, the Remove at stage option will be unselected)
- Edit Two Noded Spring
- Go to the Add Two-noded Spring dialog to edit properties
- Copy to Clipboard
The two-noded spring properties (in text form) will be copied to the clipboard.
Two-noded Spring Results
The two-noded spring results will be shown in the RS2 Interpret program, after the model with two-noded spring(s) has been computed. The resultant forces at each end-node of the defined two-noded spring will be displayed, as seen in below figure. At each end-node, both the X component and Y component of reaction force can be shown.
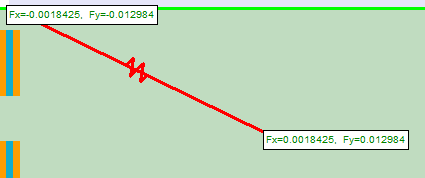
For two-noded springs, the resultant forces, Fx and Fy, are the forces exerted onto the node from the spring. For one-noded spring, the definition of Fx and Fy differs, see the Add Springs topic for details.
To modify the two-noded spring data type, you can choose from the Show Value dialog in RS2 Interpret. Steps are described below:
- Select Show Values option
 from the toolbar or the Show Values sub-menu of the Analysis menu. You will be prompted to a dialog.
 - In the dialog, select the checkbox for Springs
under Data section. You can choose the two-noded spring reaction force type to be displayed: Horizontal Force, Vertical Force, or Horizontal & Vertical Force.
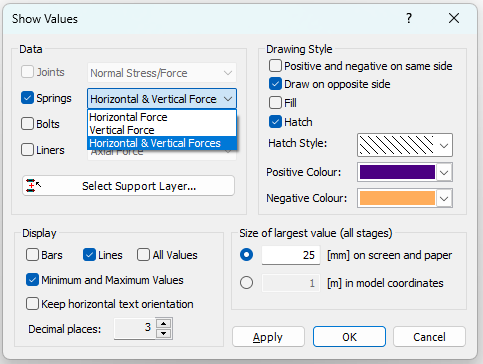
- Select Apply to preview data. Select OK to update data in RS2 Interpret and exit the dialog.