Add Bolt Pattern
The Add Bolt Pattern option allows you to add a uniformly spaced pattern of bolts to a boundary. Bolt patterns can be applied to any boundary type in RS2.
To add a bolt pattern to a boundary:
- Select Add Bolt Pattern
 from the toolbar or the Support menu.
 - You will see the Add Bolt Pattern dialog. Enter the following information and select OK.
- Bolt Property
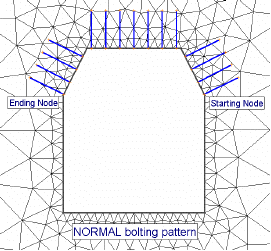
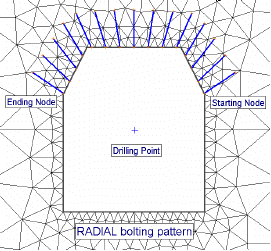
- Pattern Orientation
- Bolt Length
- In-Plane Spacing
- Staging if your model is staged, you can specify the installation (and removal) stage of the bolt(s).
Install at stage - by default the installation stage will be set to the stage that you are currently viewing (i.e. the currently selected stage tab). You can enter a different stage if necessary.
Remove at stage - (optional) you can also specify a removal stage, by selecting the Remove at stage check box and entering the stage at which the bolt(s) are to be removed (uninstalled).
- Drilling Point - if you selected the Radial pattern orientation option (in the Add Bolt Pattern dialog), you will first be prompted to enter the x,y coordinates of the origin of a radial drilling pattern. You can enter the point graphically with the mouse, or you can type the coordinates in the prompt line. (NOTE: for Normal or Angle pattern orientations, you will not see this prompt, proceed directly to Step 4).
- Start Point of Pattern - use the mouse to graphically select the start vertex of the bolt pattern on a boundary. NOTE:
- Bolt patterns can be applied to any boundary type in RS2 (e.g. Excavation, External, Stage or Material boundaries).
- Only vertices of boundaries can be selected as the start / end points. If a vertex does not exist at the point where you wish to start or end the bolt pattern, then you will have to reset the mesh, add the required vertex or vertices to the boundary, and re-mesh, before you can add the bolt pattern.
- Now move the mouse along the desired boundary. As you track the mouse along the boundary, a dotted line will highlight the boundary, and the bolt pattern will be drawn on the screen. The bolts will be oriented according to the Pattern Orientation you have selected. NOTE:
- A bolt pattern can only be added along a single boundary (e.g. you cannot begin a bolt pattern on an Excavation boundary, and then switch to a Stage boundary). If you need to define a bolt pattern along different connecting boundaries, then you will have to add separate bolt patterns to each boundary.
- Flip Angle - in some cases, it is possible that the bolt pattern may appear on the wrong side of the boundary. This may occur for example, on Stage boundaries, if you are using the Normal pattern orientation option, because the Normal orientation depends on the ordering of the vertices in the boundary when it was originally added to the model. If the bolt pattern is pointing in the wrong direction, then use the Flip Angle option to reverse the direction of the bolts. You can right-click the mouse and select Flip Angle from the popup menu, or type "f" in the prompt line followed by Enter. Flip Angle is only applicable for a Normal pattern orientation, it cannot be used with the Radial or Angle pattern orientation options.
- End Point of Pattern - when you have reached the desired endpoint vertex on the boundary, click the mouse and the bolt pattern will be added to the model. You must click the mouse when the cross-hair icon is ON a vertex of the boundary, in order to add the bolt pattern. If you click the mouse at an intermediate location along the boundary (not a vertex location), then nothing will happen (you will remain in the Add Bolt Pattern mode).
- Notes:
- The bolt pattern will always begin exactly at the Start vertex you have entered.
- The distance between each bolt along the boundary, is determined by the In-Plane Spacing you entered in the Add Bolt Pattern dialog. Remember that the In-Plane Spacing is always measured along the line segments of the boundary.
- The pattern will not necessarily end exactly at the End vertex you have entered, unless the distance along the boundary between the Start and the End points is an exact multiple of the In-Plane Spacing.
Note: the Bolt Property type and Staging information can be changed or modified at any time after bolts have been added, with the Assign option.
If you are not happy with the pattern, you can delete the pattern or select Undo.


Examples of Normal and Radial pattern bolting options