Edit Bolts
Bolts added using Add Bolt  are treated as individual entities, while bolts added using Add Bolt Pattern
  are grouped and edited as a single pattern. This allows the geometric and mechanical properties of the pattern to be controlled collectively.
To modify an individual bolt within a pattern, the pattern must first be ungrouped.
Edit Single Bolts
The Edit Bolt option allows you to view and modify the installed bolt(s). Both properties and staging can be edited.
To edit bolts,
- Make sure one or more bolt(s) are created in the model with the Add Bolt
 .
. - Select the Edit Bolt option from the Support menu (proceed to Step 2), or right click to select a bolt in the model, and select the Edit Bolt option from the popup menu (proceed to Step 3).
- You will first be prompted to pick the bolt(s). Use the mouse to select the bolt(s) you would like to edit. You can drag select multiple bolts. Hit Enter key, or right click and select Done Selection, to complete selection.
- The Edit Bolt dialog will show as below. You can view and modify the information in the dialog.
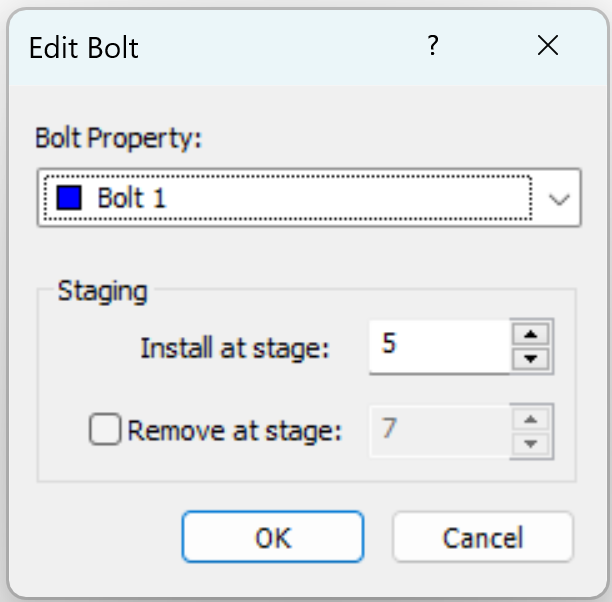
Bolt Property – The bolt properties determine the bolt type and their parameters. More details can be found in Bolt Property help topic.
Staging - if your model is staged, you can specify the installation (and removal) stage of the bolt(s).
Install at stage - by default, the installation stage will be set to the stage that you are currently viewing (i.e. the currently selected stage tab). You can enter a different stage if necessary.
Remove at stage - (optional) you can also specify a removal stage, by selecting the Remove at stage check box and entering the stage at which the bolt(s) are to be removed (uninstalled).
Bolts that are part of a bolt pattern cannot be edited using the Edit Bolt option.
Edit Multiple Bolts
You can simultaneously select and edit multiple bolts with the Edit Bolt option.
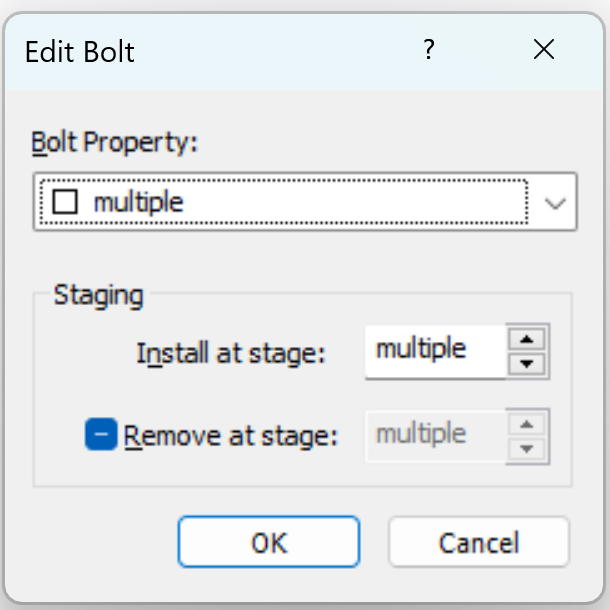
When multiple bolts are selected and they have different properties or installation settings, the value of correspondent field in the Edit Bolt dialog will be display as “multiple” (as shown below). In this case, if you edit the bolt parameters and select OK in the dialog, these parameters will be applied to all selected bolts. Therefore, if you wish to edit multiple bolts and apply different properties or installation settings to each, the bolts must be edited individually.
Edit Bolt Pattern
The Edit Bolt Pattern option allows you to view and modify the properties of an installed bolt pattern. Changes made to the bolt pattern are applied to all bolts belonging to the pattern.
To edit a bolt pattern:
- Make sure a bolt pattern is created in the model with the Add Bolt Pattern
 option.
 - Select the Edit Bolt Pattern option from the Support menu (proceed to Step 2), or right click on a bolt belonging to the pattern and select the Edit Bolt Pattern option from the popup menu (proceed to Step 3).
- You will first be prompted to pick the bolt pattern. Select any bolt belonging to the bolt pattern you would like to edit. Hit Enter key, or right click and select Done Selection, to complete selection.
The Edit Bolt Pattern dialog will appear as below. You can view and modify the information in the dialog.
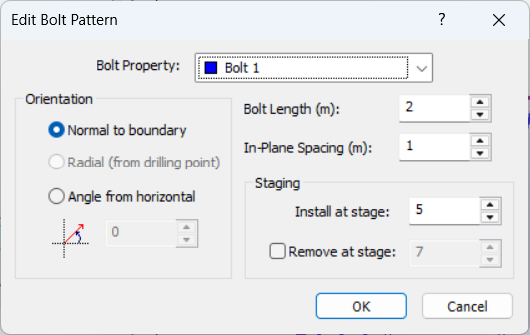
Bolt Property – The bolt properties determine the bolt type and their parameters. More details can be found in the Bolt Property help topic.
Orientation – Defines the orientation of the bolts within the pattern. The orientation can be set to Normal to boundary, Radial (from drilling point), or Angle from Horizontal, where the desired angle can be entered by the user.
Bolt Length – Defines the length of the bolts in the pattern.
In Plane Spacing – Defines the spacing between bolts within the pattern.
Staging – If your model is staged, you can specify the installation and removal stage of the bolt pattern.
Changes made to these properties are applied to all bolts belonging to the bolt pattern.
The bolt pattern placement can also be modified using the right-click shortcuts Move First Point and Move Second Point. These options allow you to reposition the bolt pattern by moving the selected point or by entering the coordinates directly.
To edit individual bolts within a bolt pattern, the bolt pattern must first be ungrouped. The Ungroup Bolt Pattern option separates the bolts into individual bolt entities. Once ungrouped, the individual bolts can be selected and edited using the Edit Bolt option.