Add Liner Hinge
The Add Liner Hinge option allows you to specify a zero bending moment condition for a point on a liner (i.e. the location of a "hinge" which is free to rotate).
If you apply a Liner Hinge, the liner (beam elements) will be free to rotate about the hinge, and a zero bending moment condition will be enforced at that point. Axial force and shear force in the liner can be transmitted across the hinge location, but the bending moment at the hinge will remain zero throughout the analysis.

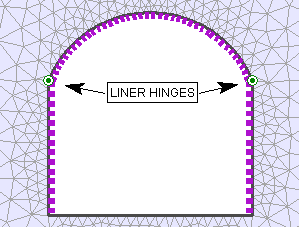
Liner with two Hinges (green circles with dot)
NOTE: Liner Hinges can only be applied if the finite element mesh exists, and at least one liner has been applied to a boundary. Otherwise the Liner Hinge option will not be available. The Liner Hinge will connect to the composite liner if present; otherwise, it will connect to the solid liner node.
To add a liner hinge:
- Select Add Liner Hinge
 from the Liner Moments sub-menu of the Loading menu.
 - Staging:
- If your model is multi-stage, you will see the Add Liner Hinge dialog, which allows you to specify the installation stage of the Liner Hinge(s). You can also specify a removal stage, by selecting the Remove at stage check box and entering the stage at which the Liner Hinge(s) are to be removed (uninstalled). Select OK when you have specified the staging information.
- If your model is single stage, you will not see the Add Liner Hinge dialog, proceed directly to Step 3.
- Use the mouse to select the node(s) on which to apply a Liner Hinge. When nodes are selected, they will be highlighted by a small circle.
- When you are finished selecting, press Enter or right-click and select Done Selection. The Liner Hinge(s) will be applied to all selected nodes, as you will see by a Hinge symbol (circle with a dot inside) at each node.
NOTE: you cannot add a Liner Hinge unless a Liner exists at that location on the boundary.
NOTE: if you specified installation and/or removal stages in the Add Liner Hinge dialog, the hinges are only displayed at stages where they exist (i.e. a Liner Hinge will NOT be displayed if the viewed stage is LESS THAN the installation stage or GREATER THAN OR EQUAL TO the removal stage).
Liner Hinge versus Liner Moment
For a discussion of Liner Hinge versus Liner Moment, as defined in RS2, see the Liner Moment Overview topic.