Radial Mesh
A third Mesh Type is available in the Mesh Setup dialog, Radial meshing. Developed mainly for testing and verification purposes, it is intended for use with circular (or elliptical) excavations – other shapes may produce unpredictable results (you can experiment and see what happens). Notice that for a Radial mesh you must enter an Expansion Factor rather than a Gradation Factor (see below). Also, there are several modeling restrictions associated with a Radial mesh, as described below.
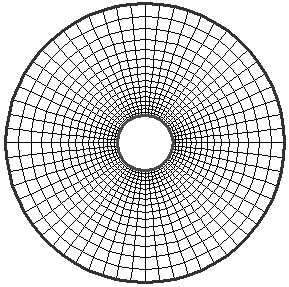
In the example below:
- Mesh Type = Radial
- Number of Excavation Nodes = 60
- Expansion Factor = 2.0
- Element Type = Quadrilaterals
Radial Mesh example
Expansion Factor
Because of the way in which a Radial mesh is generated, the Mesh Setup dialog will ask you for an Expansion Factor rather than the Gradation Factor, when you toggle the Mesh Type to Radial.
Note that the Expansion Factor for a Radial mesh in the Mesh Setup dialog is the same as the Expansion Factor which is entered for an automatically generated External Boundary . Since the External boundary generation is integrated with the Radial mesh generation, this allows the user to change the Expansion Factor for a Radial mesh without having to select the Add External option to access the Create External Boundary dialog.
Also note that the Gradation Factor for a Radial mesh is automatic, and cannot be directly altered by the user, except by changing the Number of Excavation Nodes.
Creating a Radial Mesh
Radial meshing was developed mainly for testing and verification purposes, since it gives a reproducible, symmetrical radial mesh for a single symmetrical excavation. You may want to use it in cases where you have a symmetrical (preferably circular or elliptical) excavation.
Since it is a specialized mesh generation option, there are several restrictions on the use of Radial meshing:
- Only a single excavation can be present.
- Material, Stage and Joint boundaries are not permitted.
- In general, it is intended for use with a single, convex, symmetric excavation.
To create a Radial mesh, use the following steps:
- Create your excavation.
- Instead of adding the External boundary, go to the Mesh Setup option and toggle the Mesh Type to Radial. Note that for a Radial mesh, an Expansion Factor is entered rather than a Gradation Factor. The Expansion Factor has the same effect as the Expansion Factor in the Create External Boundary dialog.
- Select Discretize to discretize the excavation.
- Select Mesh and the Radial mesh will be generated. As you will see, the External boundary will appear at the end of the Radial mesh generation.
- Although you cannot directly control the Gradation Factor for a Radial mesh, you can control the fineness and/or extent of the mesh by changing the Number of Excavation Nodes and/or the Expansion Factor in Mesh Setup.