Stages
If you are creating a multi-stage model in RS2, you need to define the number of Stages in the Project Settings dialog. To define or edit the number of stages, select the Stages page of the Project Settings dialog. The following Stage options are available, depending on the selections of other Project Settings (e.g. dynamic analysis, transient groundwater, coupled analysis).
Number of Stages
If you are creating a new model then simply enter the Number of Stages in the edit box or use the spinner control to increase or decrease the number. The grid in the dialog will be updated to reflect the number of stages. You can then enter user-defined stage names.
If you are editing an existing model, and you want to add or remove stages from the END of the current list of stages, then you can change the Number of Stages to the desired number. Stages will be added or deleted from the END of the current list of stages.
The maximum number of stages allowed is 300.
Compute Status
The Compute Status is available when the Enable file recovery during analysis is toggled ON under the Solver Options page. It presents the results status for each stage by using seven different icons, as below. Hover your mouse over the icon for status information.
-
 : stress analysis was computed and converged
 -
 : stress analysis was computed but not converged
 -
 : groundwater analysis was computed and converged
 -
 : groundwater analysis was computed but not converged
 -
 : SSR analysis was computed and finished
 -
 : SSR analysis was computed but not finished
 -
 : not computed
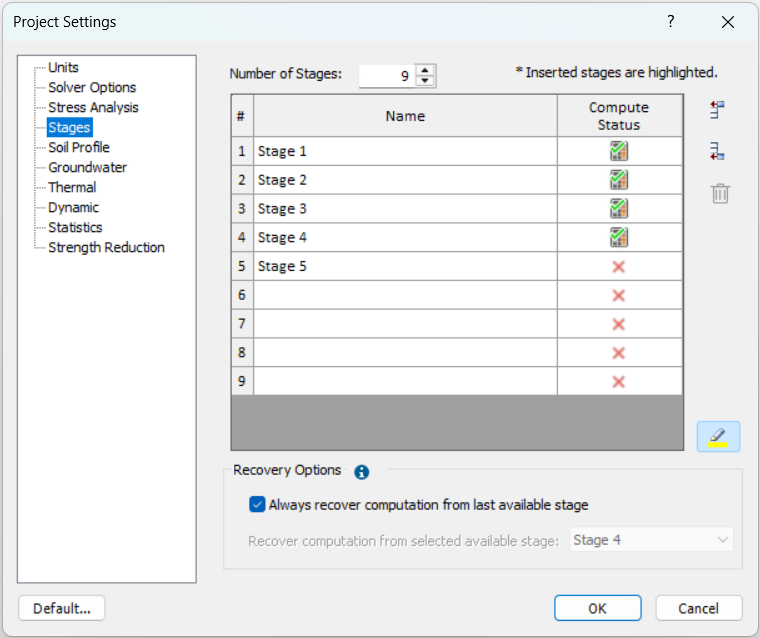
Recovery Options
The Recovery Options section is available when the Enable file recovery during analysis is turned ON under the Solver Options page.
It defines the stage from which computation will resume. This stage is referred to as the “recovery stage”, which can be set automatically or manually.
IMPORTANT: By setting a recovery stage, results are restored up to that stage (i.e., recovery files will be retrieved up to that stage), and computation resumes from the NEXT stage. For example, if the recovery stage is stage 3, computation starts from stage 4.
Always recover computation from last available stage
Automatically sets the recovery stage to the most recently completed stage.
For example, if the last computation aborted when stage 5 is complete, using this option, recovery stage will be set to stage 5, computation resumes from stage 6.
Recover computation from selected available stage
To choose a recovery stage, uncheck the Always recover computation from last available stage option. Then select a recovery stage from the dropdown list. Only stages eligible for recovery are listed.
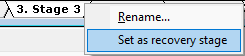
Set as recovery stage (Stage Tab)
The recovery stage can also be defined directly from the Stage Tabs by right-clicking a stage and selecting Set as recovery stage. The change is automatically updated in Recovery Options (i.e., “Always recover..” will be cleared, and selected stage is reflected in “Recover computation from..” dropdown list).
Stage Time
If you are performing Transient groundwater analysis, Transient thermal analysis or Dynamic analysis, then you must define the Time at each stage. NOTE:
- The Time Units will correspond to the Time Units selected on the General page of the Project Settings dialog. If necessary, go to the General page and choose the desired time units.
- You can also define the time by calendar date. If you select the Define by Date
 button at the right of the dialog, a date column will appear. Times will automatically be calculated according to the date.
Dynamic Analysis
If you are performing Dynamic analysis, you can turn the dynamic analysis on or off at any stage by selecting the Dynamic check box for the desired stage(s). NOTE:
- When SSR and dynamic analysis are both on - the last stage cannot be dynamic.
- Steady state or transient groundwater analysis (i.e., Groundwater Method = Steady State/Transient FEA in Project Settings dialog) won't be carried out for dynamic stages.
Thermal Analysis
If you are performing Transient Thermal analysis, AND the Define Method by Stage checkbox is selected, you can define the thermal method for each stage by using the dropdown menu and select one of Static, Steady, or Transient method.
Coupled Analysis
If you are performing Coupled Analysis (e.g. for consolidation analysis), then transient groundwater is automatically enabled, and you can define a Drainage condition for each stage (drained, undrained, fully drained). The drainage condition options are defined as follows:
- Drained – Time dependent drainage is allowed. Fluid can move into and out of the model, total volume (voids and soil skeleton) can change. Drainage is a function of time. Excess pore pressures can exist. Transient pore pressure state.
- Undrained – Fluid cannot move into or out of the model. Zero volume change. Excess pore pressure is a function of applied loads.
- Fully drained – Zero excess pore pressure. Drained analysis at infinite time. Steady-state result.
Edit Stages
If you are editing an existing model, and you want to add or remove stages starting at some INTERMEDIATE stage, then you must use the Edit Stages option.
- To add stages, click on a stage name and select the Insert Before or Insert After buttons to insert the desired number of stages before or after the selected stage.
- To delete stages, click on a stage name and select Delete.
- After stages have been created you can name them as required.
If you add or delete intermediate stages for an existing model, you should check the model carefully to make sure that all excavations, support, properties etc, are assigned at the desired stages. You may have to edit the model after adding or deleting intermediate stages to achieve the desired stage assignments.
Stage Names
The stage names can be customized at any time:
- In the Project Settings dialog
- By right-clicking on a Stage Tab and selecting Rename from the popup menu
- By double-clicking on a Stage Tab.
NOTE: If you customize a stage name, the corresponding Stage Tab still indicates the stage number, displayed before the name.