Set SSR Exclude Area
If you have enabled Shear Strength Reduction (SSR) analysis in the project settings, you can create a region and only perform SSR analysis in the material outside that region. To do this:
- Select the Compute workflow tab

- Ensure that you have enabled SSR analysis in the project settings.
- Define a SSR Exclude Area by:
- Creating a volume.
- Selecting volume.
The SSR area can be created following the steps below:
a. Create a Volume
- Select the Set SSR Exclude Area
 option from the Compute menu. You will be prompted to a dialog.
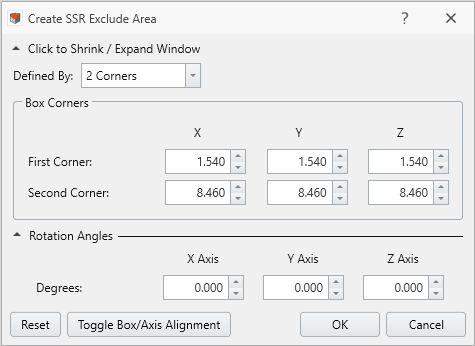
- The SSR area box dimension can be defined by using either the Create SSR Area dialog or the Freehand Manipulation tool

- From the Create SSR Exclude Area dialog, choose a box dimension definition method from the drop-down list:
- If Defined By = 2 Corners, the XYZ coordinates for the two corner vertices of the box need to be specified.
- If Defined By = Dimensions, the XYZ coordinates for the center point of the box, as well as the length, width, and height dimensions of the box need to be specified.
- A Freehand Manipulation tool will appear in the viewport. It is placed at the center of the box by default. You can hover the mouse to place the tool at any corner. When the Freehand Manipulator is at the center, you can drag the tool to translate the box, or drag the curve to rotate the box. When the tool is at a corner, you can drag the arrow to resize the box dimension along the corresponded axis.
- The dimension and rotation angle will be updated in the Create SSR Exclude Area dialog.
- From the Create SSR Exclude Area dialog, choose a box dimension definition method from the drop-down list:
- The Reset (N) button can reset the box to its original form. The Cancel button can close the dialog disregarding all changes made.
- When shape manipulation is completed, select OK to apply and exit the dialog. The SSR exclude area will be added to the model. Repeat steps 1-4 to add more.
- The entity will be added to the Visibility Tree named "SSR Exclude Area #", with box boundary displayed in the model.
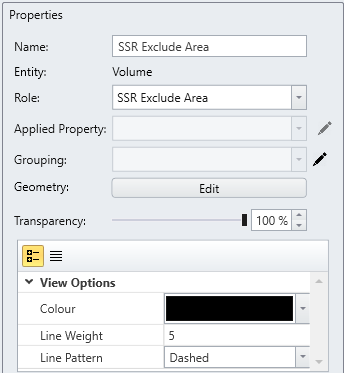
- To edit the area, you can use the Edit button from the Properties pane. See the section for details.
- The View Options for the box boundaries are also available in the Properties pane.
- Now when you select the compute option, SSR analysis will only be conducted on the material outside that region.
b. Select an Existing Volume
- Select one or more desired volume entity(s) from the Visibility Tree or with the Entity Selection
 from the toolbar.
 - Select the Set SSR Exclude Area option from the Compute menu.
- A SSR exclude area will be created for each selected volume.
- The entity will be added to the Visibility Tree named: "SSR Exclude Area #", with box boundary displayed in the model.
- Now when you select the compute option, SSR analysis will only be conducted on the material outside that region.
Edit SSR Exclude Area
The locations of SSR exclude areas can be modified after defined. To do this:
Edit location is only available for the regions defined with created volumes, rather than existing volumes.
- Select the SSR exclude area from the Visibility Tree or in the model (with the Entity Selection tool).
- A Properties pane as shown below will appear below visibility tree.
- Select the Edit
 button beside Geometry.
 - You will be prompted to a dialog, as shown below. Modify the parameters in the dialog or use the Freehand Manipulation Tool in the visibility pane to relocate.
The Reset (N) button can reset the box to its original form. The Cancel button can close the dialog disregarding all changes made.
- When completed, select OK to apply changes and exit the dialog