Repair
The Repair option can help users to repair five (5) categories of geometry defects:
- Near-Degenerate
- Holes
- Near-Folding
- Self-Intersections
- Non-Manifold
The Geometry Repair tool is the last step of the Import Geometry process. After selecting the entities to import on the Filter Entities step, users will see a new Repair Entities dialog displaying entities in the selected geometry with defects, organized by category. The selected entities will also be visible in the 3D view, with defects colour-coded by category.
The Repair tool is also accessible from the Geometry menu. To access it:
- Select the entity on the modelling interface that needs to be repaired.
- Select Geometry > Repair Tools > Repair
 to open the Repair Geometry dialog.
Filtered Results
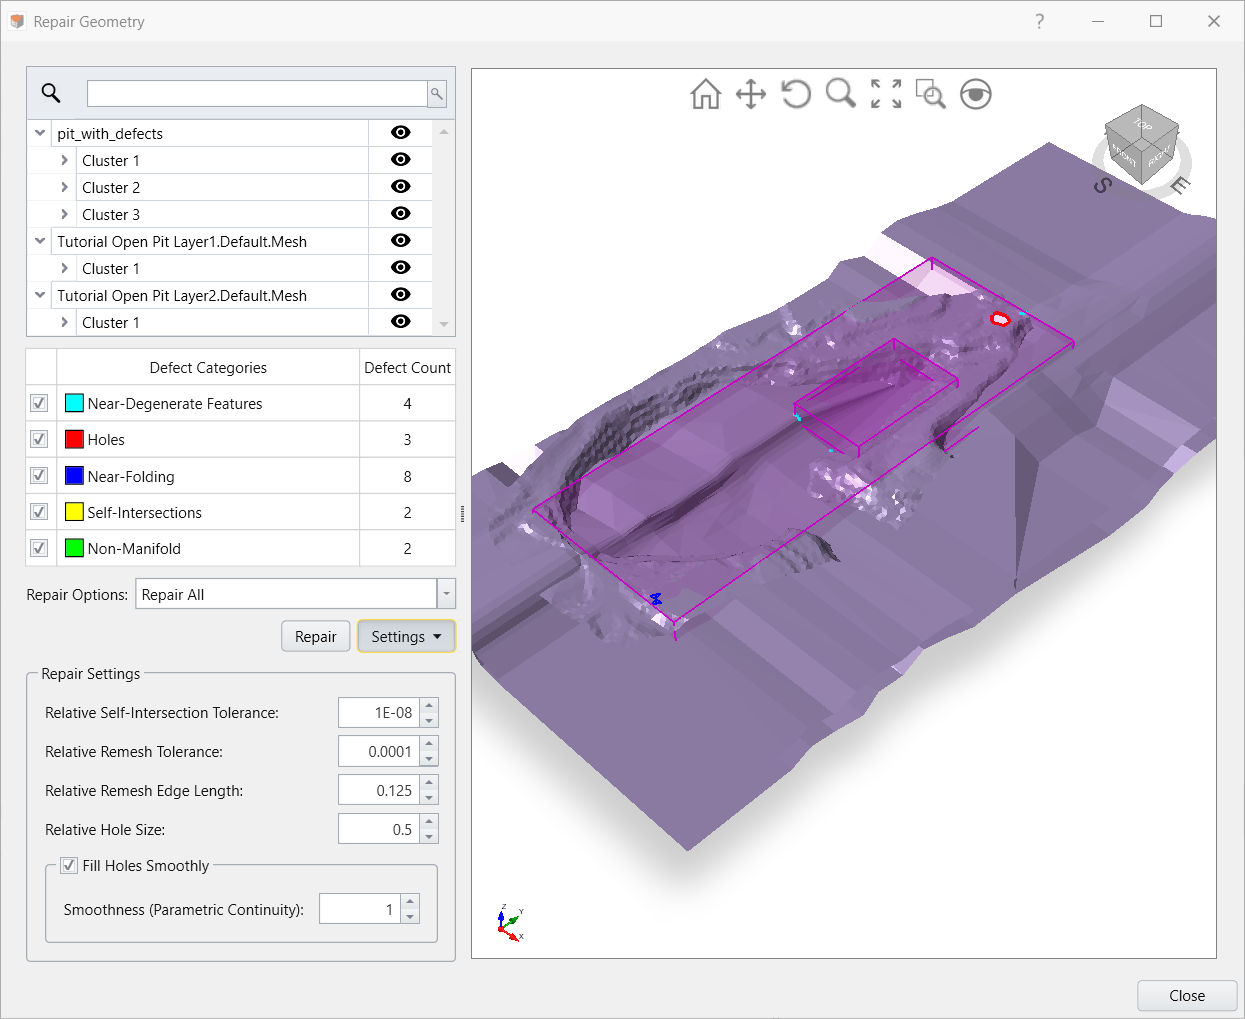
The Filtered Results panel contains:
- a list of defect categories
- the number of defects in each category
- the colour of the defects drawn in the 3D view
- the option to exclude a defect category from the Repair operation
The rightmost panel contains a 3D view of the geometry and its colour-coded defects. The colours correspond to those in the Filtered Results panel. The magenta boxes group the defects into clusters. They can highlight defects that might otherwise be too small to see.
Geometry List
The list of individual items groups the defects by entity, then cluster. The Eye icon hides or shows a given entity, cluster, or defect, in the 3D view. You can search for entities, clusters, or defects using the Search bar above this list. When the Repair Option is set to Repair Selected, this list allows you to select the specific defects that you’d like to repair.
The default Repair Option is Repair All. This is the most automatic way to repair geometry. The Repair All option first invokes the Re-Triangulate tool on the entirety of each entity; this is a global operation that often fixes many defects just by itself. Then it iteratively fixes the remaining defects, up to a maximum number of iterations.
The repair tool stops after a maximum number of iterations to avoid modifying the geometry too much. If defects are still present, you can continue repairing the geometry. If you don’t mind further modifying the geometry, you can use the Repair button again. Otherwise, you can select the Repair Selected option to address individual defects, without modifying the rest of the geometry.
The Repair Selected option is useful if you want to modify the geometry as little as possible. You can select and repair only the defects you find most problematic, and leave the rest of the geometry untouched.
Repair Settings
The optional settings area allows you to modify the default values used to repair geometry.
Relative Self-Intersection Tolerance
If two objects overlap by at least this much, then they are defined to be self-intersecting. The larger this value is, the more self-intersections the tool will find. Use a smaller value if you don't want to modify the geometry very much; use a larger value if the geometry is particularly bad.
Relative Remesh Tolerance
This is the degree to which repairing will move the geometry. Use a smaller value if you don't want to modify the geometry very much; use a larger value if the geometry is particularly bad.
Relative Remesh Edge Length
This is the target edge length. The repair tool will attempt to generate edges of this length. Use smaller values for entities with tighter curves, and larger values for entities with large, flat faces.
Relative Hole Size
If the size (as defined above) of a gap is smaller than this, then the gap is considered a hole; otherwise, the gap is considered a feature to preserve.
A geological surface that separates two materials may have gaps where one or both of those surfaces don't exist; these gaps shouldn't be considered defects, so the Relative Hole Size parameter should be set smaller than these gaps.
Fill Holes Smoothly
A non-smooth filling will generate a simple patch, with no attempt to match the shape at the boundary; this setting will optimize the shape of the new triangles and the area of the new patch. Smooth hole filling attempts to match the shape of the geometry at the boundary of the hole.
Smoothness (Parametric Continuity)
This tool is only available when smoothly filling holes. It attempts to preserve the derivatives of the surface around the boundary of the hole.
- 0: The filled patch will touch the hole boundary.
- 1: The filled patch will match the first derivative at the hole boundary.
- 2: The filled patch will match the second derivative at the hole boundary.