Tunnel Loads
In RS3 Tunnel Designer, the Loads can be added to the tunnel after Tunnel Profile, Tunnel Path, and Tunnel Excavations are defined. In general, loads can be applied to the tunnel during excavation to account for external effects such as loads applied to the tunnel from TBM machine.
Steps to add loads:
- Make sure the Profile, Path, and Excavation are specified for the design.
- Select the Add Loads
 button in the top middle of the Tunnel Designer dialog. Alternatively, select a tunnel design from the tree, click the “…” icon to its right, and select Add Loads from the dropdown list. A Loads item will appear under the tunnel design.
 - Select the Loads item, click the “..” icon to its right, and select a load type to add from the dropdown menu.
- Add Load on Face
- Add Load on Perimeter
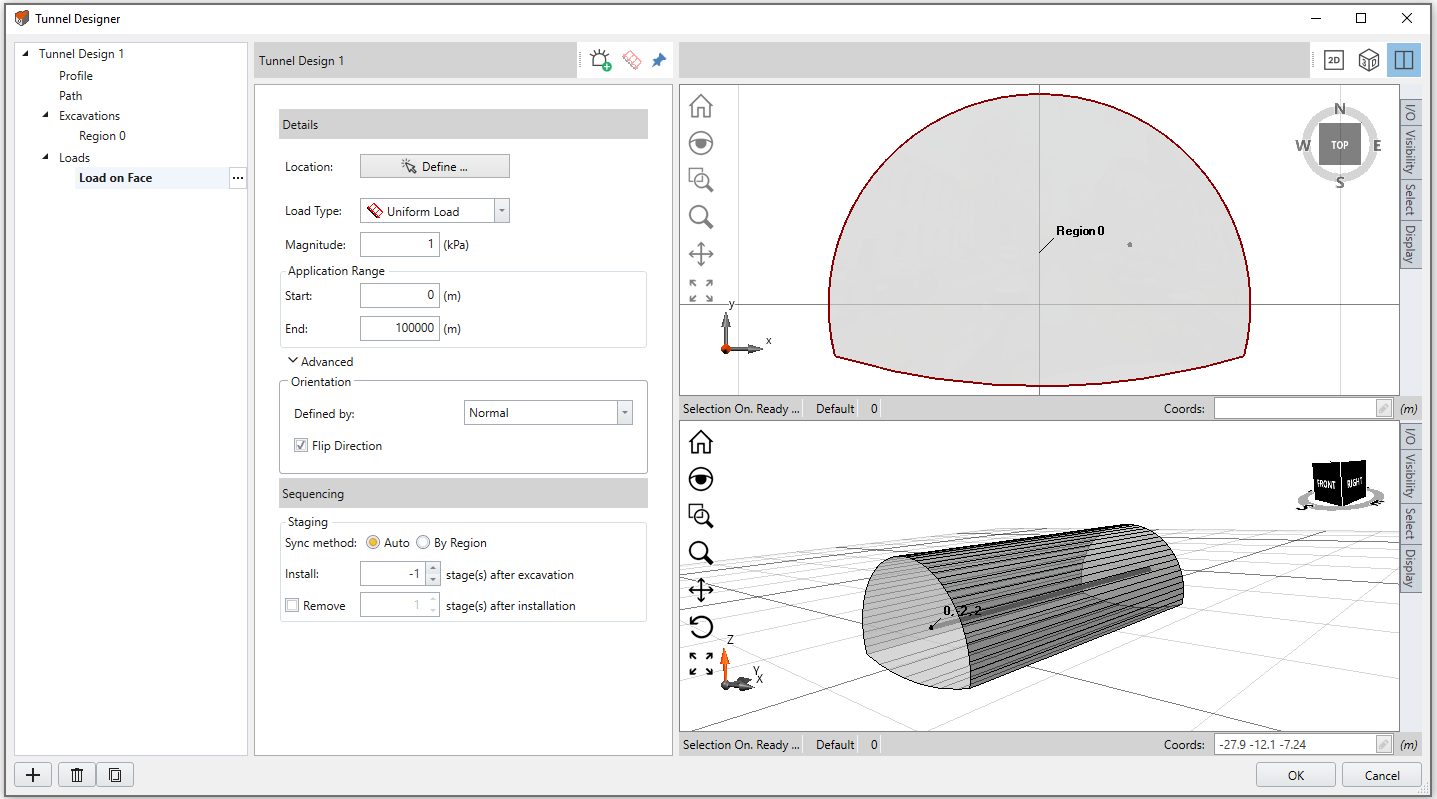
- Select a load item to set properties (see figure below). The load location, load type, magnitude, application range (Load on Face only), sequencing, and orientation can be customized, as described in detail below.
Details
The load location, load type, magnitude, and application range (for Loads on Face only) can be defined.
To define the Location, select “Define” button,
- For Load on Face, in the 2D viewport, use the mouse to select a region to apply loads on the face.
- For Load on Side, in the 2D viewport, use the mouse to select at least three to four points along the perimeter you would like to apply loads on. See figure below.
Press Enter or right click and hit Done. The load will be highlighted in 2D and 3D viewports.

The Load Type is Uniform Load. The Magnitude can be defined. Note that for Loads on Face, you can modify the Start and End points of the Application Range, which the load will be applied within the range measured along the path.
Sequencing
The tunnel load is corelated to excavation staging only. To account for this characteristic, the Sequencing section is designed to synchronize the tunnel load with excavation staging of a region.
To stage a tunnel load:
- Select a region for the load to synchronize with. Using the Auto option, the tunnel load will be synchronized with its region. However, with the By Region option, you can select a region from the dropdown list.
- Specify the timing to install a load with the Install: # stage(s) after excavation. The installation stage is correspondent to the excavation stage of the REGION.
- Select the checkbox to enable the Remove # stage(s) after installation option, and you can specify the duration of the load in the unit of stages. If this option is disabled, the load will be kept till the last stage.
Advanced
Expand the Advanced section to define the load orientation with available methods:
- Vector
- specify a vector with XYZ components. The normalized vector will be shown below in blue text.
- Trend/Plunge
- specify a trend angle and a plunge angle. See the help page Sign Convention - Trend/Plunge for trend/plunge sign convention in RS3.
- Normal
- The load will be normal to the selected face or perimeter.
- Local +x
- The load will be pointing to the local positive x axis direction.
- Local +y
- The load will be pointing to the local positive y axis direction.
- Local +z
- The load will be pointing to the local positive z axis direction.
The Flip Direction option is available for Normal, Local +x, Local +y, and Local +z methods. When it is enabled, the load will point to the opposite direction.
By default, the load orientation is Normal to the face/perimeter, and Flip Direction check