Add Water by Location
The Add Water by Location option allows you to model the groundwater pore pressure distribution by defining XYZ coordinates to generate a surface that represents the water table or an actual Piezometric surface obtained from piezometer measurements. Sysdam data can be imported to create a water surface (see the Import Sysdam Data section below).
There are three ways to Add Water by Location:
- Manual enter a table of (X,Y, Elevation) data.
- Import a text data file that contains (X, Y, Elevation) data.
- Import a Sysdam data file.
Project Settings
You must first set the Groundwater Method = Phreatic Surfaces in the Groundwater Tab of the Project Settings  dialog.
Add Water by Location
To add water by location to your model:
- Select the Groundwater workflow tab

- Select Add Water by Location
 option from the toolbar or the Groundwater menu.
 - In the Water by Location dialog, you can change the name and colour of your generated water surface.
- To create a new Water Surface, select the Add
 button, or choose an existing water surface from the list at the left of the dialog to edit its properties.
 - Select the desired Surface Reconstruction parameters used to generate the surface. Review the RS3 Theory Manual: Surface Reconstruction from the RS3 Verification and Theory page for more detail. The user may use any of the following Interpolation methods:
- Inverse Distance
- Thin-Plate Spline
- Chugh
- Local Thin-Plate Spline
- Linear/Triangulation
- Gaussian
- Multi Quadratic
- Polyharmonic Spline
- Compactly Supported
- Select the Extrapolate checkbox to extend the generated surface to the limits of your model in the x and y direction. This will ensure that the water surface affects all the elements without explicitly defining location points at the edges of your model in the XY plane.
- Input water surface data with one of the three methods:
- Manual enter a table of x,y coordinates and water surface elevations.
- Import a text data file that contains x,y coordinates and water surface elevations.
- Import a Sysdam data file (see the Import Sysdam Data section below).
- Select Ok to generate the water surface(s).
- Review the surfaces by selecting the water surface entity in the Visibility pane. The water surfaces are hidden by default until you assign them to a material (see next step).
- To use a water surface in the calculations, you must assign it to the material properties using the Define Hydraulic Properties
 option.
Import Sysdam Data
Sysdam is a computational system to support dam safety management for organizing safety information, supporting assessments and aiding dam operation. Sysdam, let it's user to track the water level at anytime inside the dam based on the located piezometers in the hydraulic structures. In RS3 Add Water by Location dialog, you can import the Sysdam data to create a water surface on your model and perform the analysis accordingly. These data would include the information of each piezometer to track the water level over a range of dates. To use the feature, follow the steps described below.
- Follow step 1 to 6 in the Add Water by Location section above.
- Select the Import button
 from the Add Water by Location dialog.
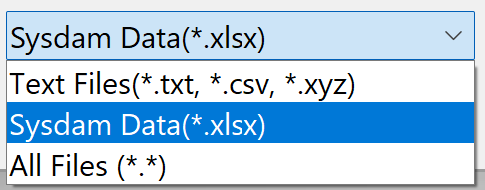
 - In the prompted dialog, select “Sysdam Data(*xlsx)” as the data type from the dropdown list.
- Select a Sysdam data file and click Open. You will be prompted to a dialog for further settings.
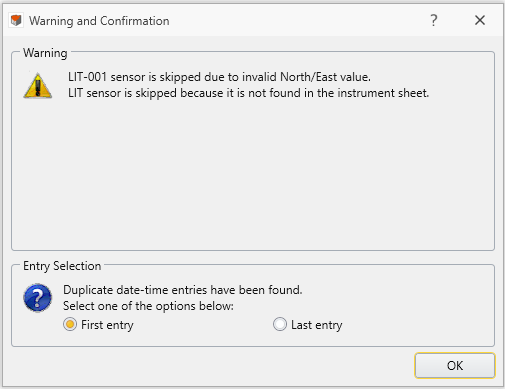
Sysdam data files that we import in RS3, are in the form of Excel files. The first tab lists out all instruments with their information, including coordinates. Each row corresponds to an instrument. The relevant columns are Identifier, North, East. For each instrument, the reading value (elevation) and recorded date and time are listed on an individual tab. A sample Sysdam data file can be downloaded from here (use Date=14/09/2020, Time=23:00:00 for a sample time set).If insufficient or invalid data are found, RS3 will skip the data for the instrument. A warning message will pop up to notify you as below. An Entry Selection section will display, if duplicate date-time entries are found in the file. You can select either the first or last entry to extract.
- In the Import Sysdam Data dialog, you need to specify a reference point and a date with time, in the order for RS3 to generate a water surface from the selected Sysdam file. Follow the steps described below.
Background
To record water surface elevations, multiple sensors were set up at different locations in the site and data were recorded at different times.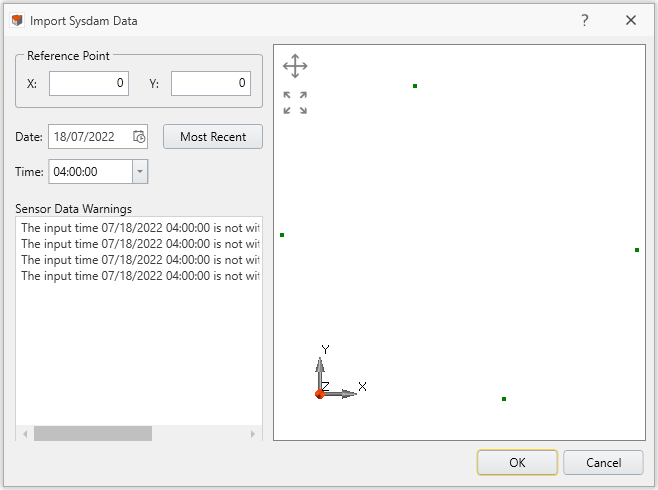
- Define a Reference Point.
The water surface will be placed according to the Reference Point. Based on your Sysdam data file (North and East columns on the first tab), enter a set of xy coordinates, which will be translated to the origin of your RS3 model. The default value is (0,0). - Define a Date and Time.
Based on your Sysdam data file, eligible data of the chosen date and time from all instruments will be extracted to RS3. - You can either manually enter a date in the field, or choose a date from the calendar by clicking the timestamp icon
 . Only valid dates are listed.
By using the Most Recent option , it automatically inputs the most recent eligible date.
 - Select a Time of the date from the dropdown list.
- In the Sensor Data Warning section, all sensors that do not have data of the input time will be listed.
- The selected data points will be plotted in the viewport on the right of the dialog.
- When completed settings, select OK to apply and exit the Import Sysdam Data dialog. The selected data will be inputted to the Water by Location dialog grid as (X, Y, Elevation) data.
- In the Water by Location dialog, check the Surface Reconstruction settings (see Add Water by Location section above for details). See below screenshot as an example.
Click OK to apply.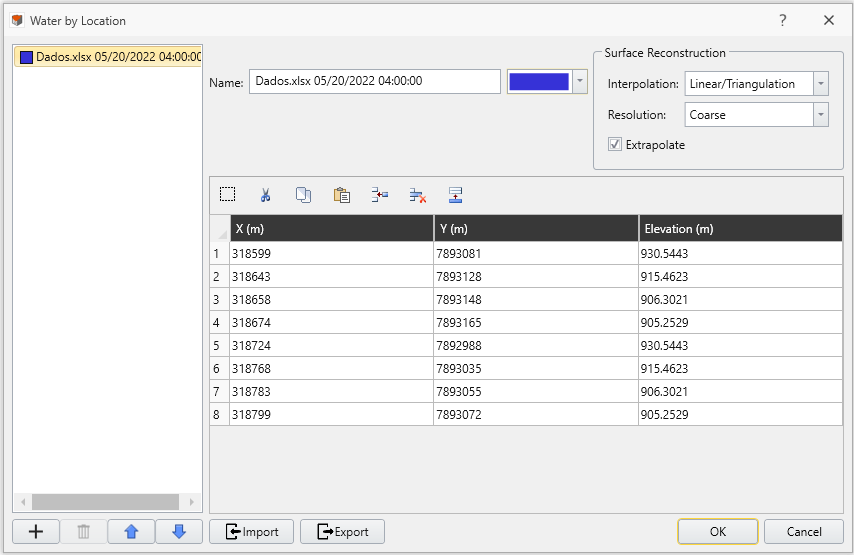
- The water surface will be applied to your model. Review the surfaces by selecting the water surface entity in the Visibility pane. The water surfaces are hidden by default until you assign them to a material (see next step).
- To use a water surface in the calculations, you must assign it to the material properties using the Define Hydraulic Properties option.