Tunnel Designer Overview
The RS3 Tunnel Designer  option under the Tunnels menu allows you to create 3D tunnels with various shapes, supports, loads, and staging excavation.
To create designs using Tunnel Designer:
- Select Tunnels > Tunnel Designer .
- Define the tunnel Profile. Create the tunnel cross-section drawing using available tools in the Toolbar:
- Tunnel: select and modify typical Tunnel Shapes provided by RS3
- Draw: draw the cross-section with polyline, circle, data tables, and etc
- Edit: move or modify the cross-section
- I/O: import, export, or print a tunnel profile
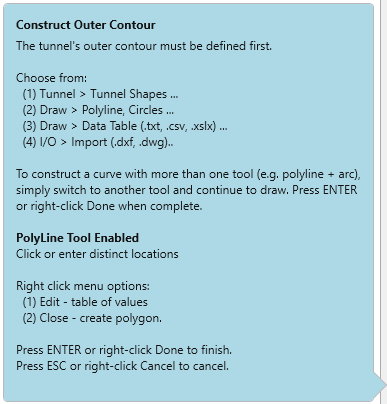
A note will display by hovering the cursor over the viewport as shown below. It shows tips for constructing the tunnel cross-section (outer contour).
After the tunnel profile is created, you can use the drawing tools and options to Edit the profile, or customize the view (Annotate, I/O, Visibility, Select, Display).
- Define the tunnel Path. Construct the depth dimension to transform the 2D tunnel profile to 3D. Available approaches include extrude, coordinates, import files, and etc.
- Define the tunnel Excavation settings. The material and excavation sequence can be customized for each tunnel region.
- (Optional) Add Supports
 and Add Loads
  to the tunnel. Available support types include bolts, liners, and beams.
Tunnel Designer Interface
The Tunnel Designer dialog is divided to three sections as seen below (List, Settings, and View panel):

List Panel
The list panel on the left of the dialog displays the defined tunnels with their framework: profile, path, excavation, supports, and loads. Use icons at the bottom to Add  , Delete
  , or Copy
  a tunnel design.
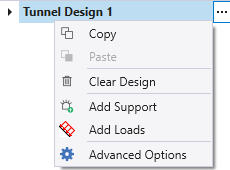
The “…” button beside the Tunnel Design item gives you more options. You can Copy , Paste  , and Clear Design . You can Add Support and Add Loads
 ![]() to a tunnel design after Profile, Path, and Excavation haven been defined. The Add Support and Add Loads options can also be found at the top middle section of the tunnel designer dialog.
to a tunnel design after Profile, Path, and Excavation haven been defined. The Add Support and Add Loads options can also be found at the top middle section of the tunnel designer dialog.
Advanced Options
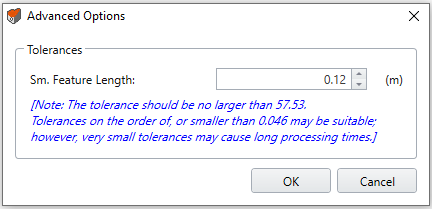
When two pieces of geometries are too close together (e.g. edge to edge distance), the default algorithm may not be able to differentiate the two pieces. In such cases, the differences between the two pieces are not recognized, the two pieces will be detected as one, which might lead to misplace or missing supports/loads in the gap. In order to differentiate these small geometry features, you can lower the tolerance in Advanced Setting.
By default, the minimum tolerance is 0.12 m in length. You can define a lower tolerance to detect smaller features. The lower tolerance, the longer processing time due to longer calculation for higher accuracy. Based on the tunnel deign geometry, a suggested maximum and minimum tolerance value are provided in the dialog in blue text.
Settings Panel
, Add Loads , or Pin the current 3D View  .
.Pin
The Pin option allows you to display multiple designs in the 3D view port at the same time. When the Pin option is selected, the current tunnel design item will be pinned in the 3D view. It means when switching to other tunnel design items, you can still see this design in the 3D viewport. This option helps to compare between designs.
When the Pin option is selected, the Pin icon will be highlighted. Click again to unselect the option.
View Panel
The view panel on the right of the dialog displays the tunnel drawing in 2D  , 3D
, 3D  or both
 by selection with viewport options. A toolbar is attached at the side. You can create the tunnel profile using Tunnel, Draw, Edit, and I/O options, and modify the view with other options. See the Tunnel Designer – Toolbar topic for more information.