Orientation
The feature allows freely placing an Orientation measurement on the 3D model showing its dip direction and dip angle instantaneously in the Structure List.
Standard operating procedure:
- Activate “Measurements” in the toolbar of the Structure tab by clicking the corresponding radio button.
- Click on the “Orientation”
 icon or use the shortcut key “O”
 - Place the Orientation on the 3D model by clicking the left mouse button. Click left on the 3D model again to set the Orientation measurement to new position.
- Finish the Orientation measurement and continue the mapping by pressing the “Space” key or finish the Orientation measurement by clicking “Enter” or by clicking the “Orientation” icon. Corresponding values are provided instantly by dip direction and dip angle in the Structure List.
Edit the Orientation measurement by a double click with the right mouse button on the item and set a new position of the Orientation measurement by clicking the left mouse button.
The figure below shows the basic properties of individual Orientation measurements. An arrow visualises the upward normal vector of the measured orientation. The provided value is the mean orientation of the model surface formed by triangles underlying the base disc. Note that the base disc determines the minimum size for an Orientation measurement. Its size depends on the point density of the 3D model. The base disc is comparable to the compass flap of a Clar or Brunton compass. If the spike of the arrow is visible, the local surface dips towards the observer while the tail indicates an overhanging surface.
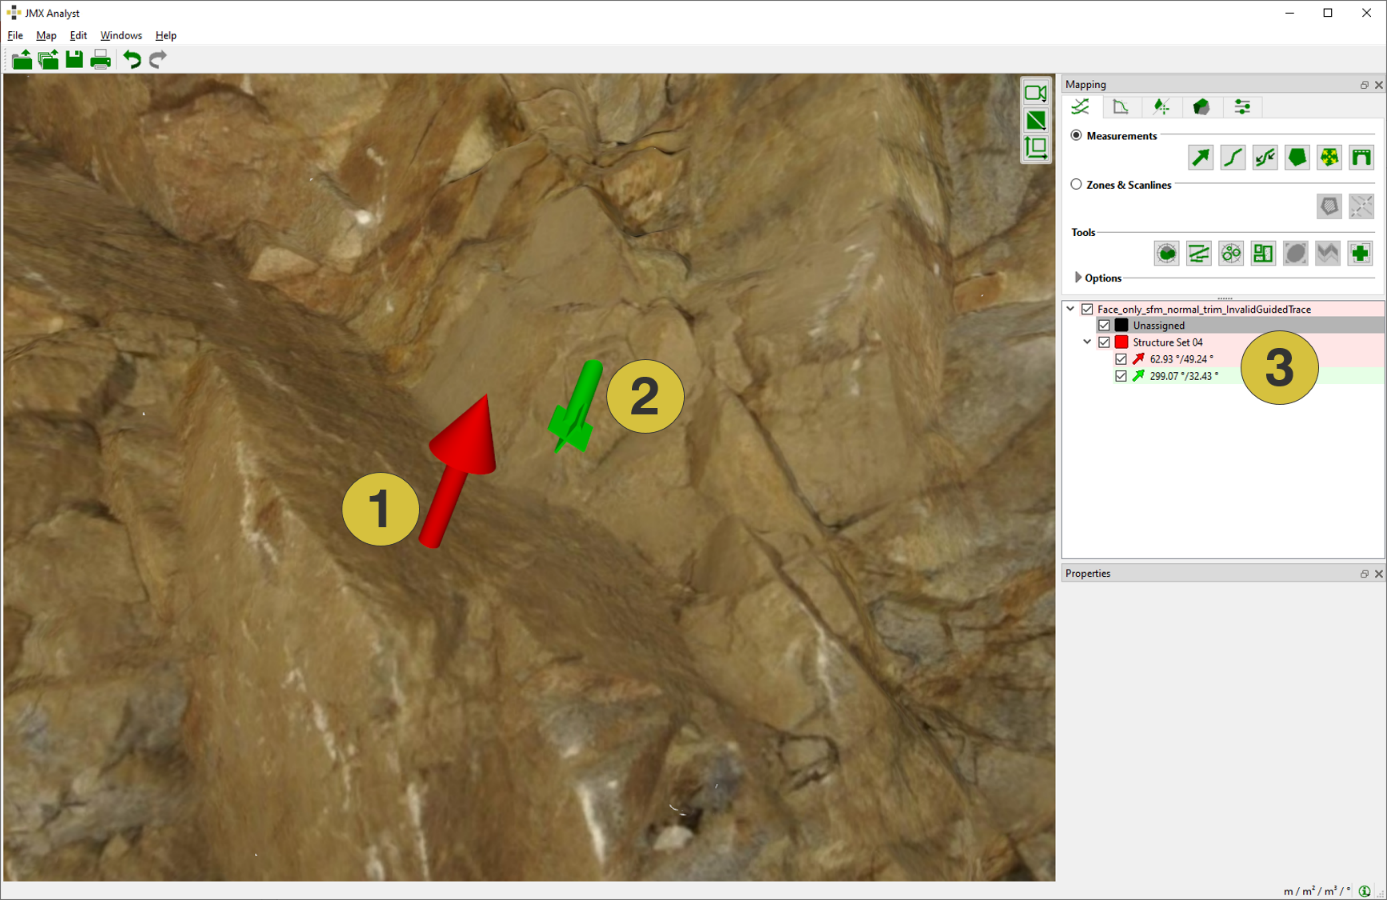
- Arrow points in the direction of the upward surface normal vector
- Tail indicates overhang
- Dip direction and dip angle in the Structure List
The figure below shows the Properties pane for individual Orientations. The pane is opened in the context menu with “Show Properties” or by a click on “Windows | Properties” in the menu bar. It comprises the name of the Orientation, information to which Structure Set the measurement belongs, the measured orientation (dip direction, dip angle) and the relative position. The name of the Orientation is editable in order to provide a descriptive name. Values corresponding to the Orientation measurement are editable in order to introduce manually determined orientations, for instance compass readings. Customized notes can be added to individual Orientations in the Notes  tab.
tab.
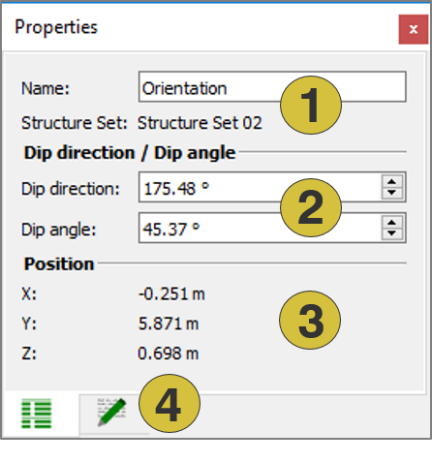
- Name of the Orientation (editable) and Structure Set
- Dip direction and dip angle (editable)
- Relative position
- Notes (editable)
Context menu
- Edit
Moves the Orientation to a new position defined by a click with the left mouse button. This function is disabled for subordinate Orientations (which are connected to Areas or Traces, see below). - Add Discontinuity Model
Models the extent of a fracture by a finite plane - Active
Activates (shows) and deactivates (hides) the selected item - Show Properties
Opens the Properties pane for the Orientation - Set Colour
Defines a new colour for the Orientation - Look at
Centers the Orientation in the 3D viewer - Look at and Zoom
Centers and zoom the Orientation in the 3D viewer - Delete
Deletes the Orientation - Move to
Moves the Orientation to another Structure Set. This function is disabled for subordinate Orientations. - Export
- Export Structural-Geologic Data as CSV Exports the measurement as “.csv” file
- Export as DXF Exports the measurement as ”.dxf” file
- Export as VRML Exports the measurement as ”.vrml” file