Tape
The Tape allows determining an arbitrary stretch on the 3D model. The Tape provides values for lengths and distances including the length along the surface, the distance between starting and end point, the vertical distance and the horizontal distance.
Standard operating procedure
- Click on the “Tape”
 icon in the toolbar of the Geometry tab or use the shortcut key “T”
 - Mark the starting point for the measurement with a left button mouse click
- Mark the end point for the measurement with a left button mouse click
- If required, change the positions of the points by clicking with the left mouse button. The action affects the point closest to the mouse cursor.
- Finish the Tape measurement and continue the mapping by pressing the “Space” key or finish the Tape measurement by clicking “Enter” or by clicking the “Tape” . The length along the surface is provided instantly in an individual list in the Geometry tab.
Edit the Tape measurement by a double click with the right mouse button on the item and set a new start and/or end position of the Tape measurement by clicking the left mouse button.
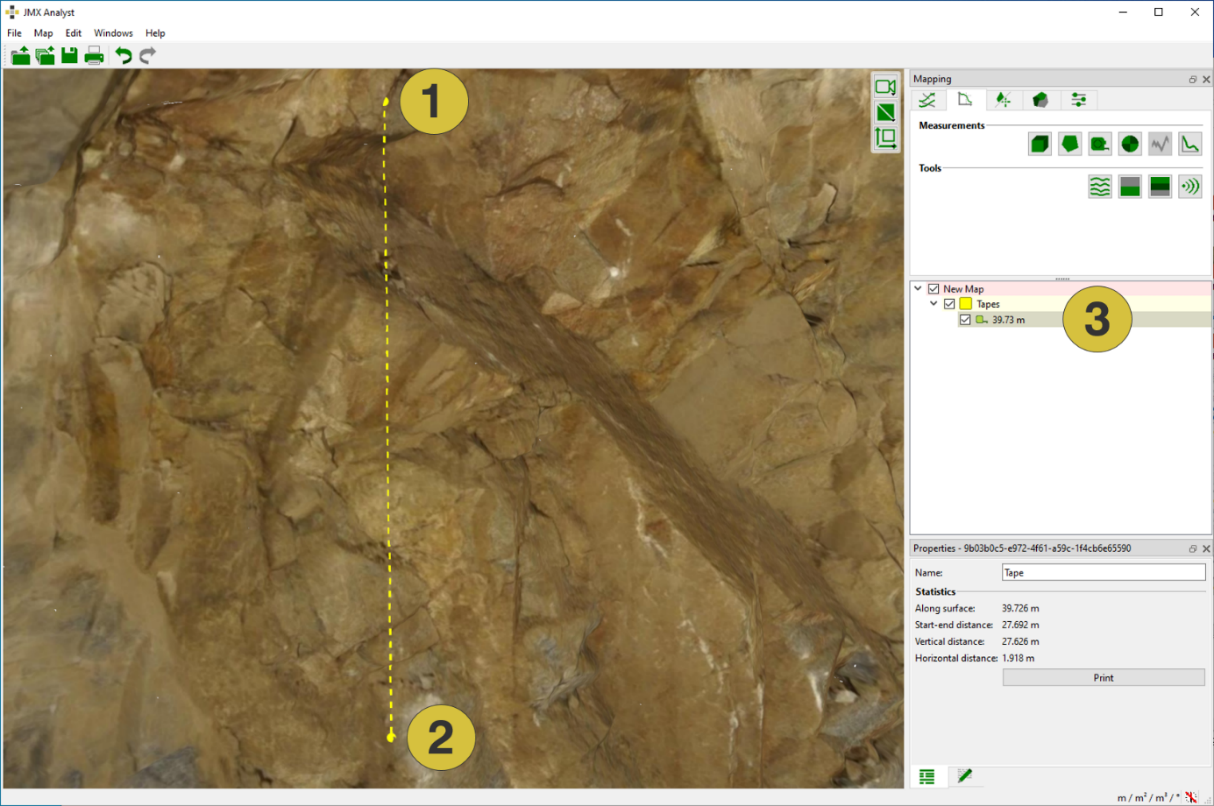
- Start point
- End point
- Length (along surface)
The below figure shows the Properties pane for the Tape. The pane is activated in the context menu with “Show Properties” or by a click on “Windows | Properties” in the menu bar. It comprises the name of the Tape, and values for the lengths and distances including the length along the surface, the distance between starting and end point, the vertical distance and the horizontal distance. The name of the Tape can be edited in order to use an intuitive name or for more detailed descriptions. Customized notes can be added to individual Tapes in the Notes  tab.
tab.
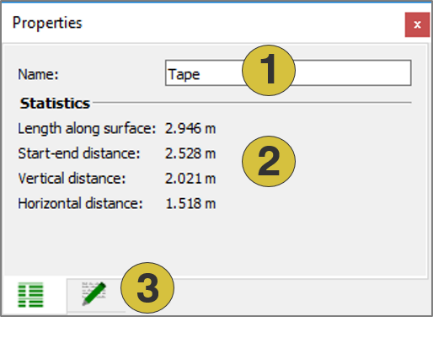
- Name of the Tape (editable)
- Statistics
- Notes (editable)
The Plot pane for Tapes contains the profile along the surface. The pane is activated in the context menu “Show Plot” or by a click on “Windows| Plot” in the menu bar. The reference line is the straight connection between the start point and end point. The profile can be shown exaggerated and not exaggerated depending on whether the scale switch is selected or unselected.

- Scale width: Enable / disable the same scale for both axes
- Export profile
- Sketch of the profile
The data of the profile can be exported by clicking the “Export” button. The export is possible in “.csv” and “.dxf” format:
- CSV 2D - Exports the plot transformed in 2D as “csv” file
- Header Row: distance; height
- Data row(s): 2 numerical values
- CSV 3D - Exports the the plot original in 3D as “.csv” file
- Header row: E, N, H
- Data row(s): 3 numerical values
- DXF 2D - Exports the plot as “.dxf” file
Context menu
- Edit
Moves one of the end points of the tape measure to a new position defined by a click with the left mouse button. The point closer to the mouse cursor is affected. - Set Colour
Defines a new colour for the Tape - Active
Activates (shows) and deactivates (hides) the selected item - Look at
Centers the Tape measurement in the 3D viewer - Look at and Zoom
Centers and zoom the Tape measurement in the 3D viewer - Delete
Deletes the selected Tape - Show Properties
Opens the Properties pane for the Tape - Show Plot
Opens the Plot pane for the Tape - Export
- Export as DXF - Exports the Tape as ”.dxf” file
- Export as VRML - Exports the Tape as ”.vrml” file