Block Search Objects
A Block Search requires at least one Block Search Object to be defined by the user. Four types of Block Search objects can be defined:
- Block Search Window (an arbitrary quadrilateral defined by four points)
- Block Search Line (a line segment defined by two points)
- Block Search Point (a single point)
- Block Search Polyline (may consist of one or more line segments)
Block Search Window, Line and Point objects are discussed below. The Block Search Polyline is discussed separately in the Block Search Polyline topic.
Notes
- Block Search objects can be located anywhere in the soil or rock mass.
- Any number of Block Search objects may be defined.
- Any combination of Window, Line and Point objects can be used, as required, and search objects are allowed to overlap (except in the case of a Block Search Polyline).
- The Multiple Groups option allows you to search separate regions of a model (e.g. multiple weak layers) with a single block search.
- Before you can create Block Search objects, you must set the Surface Type = Non-Circular and Search Method = Block Search in the Surface Options dialog.
- See the Block Search topic for an overview of how the Block Search is implemented in Slide2.
Block Search Window
A Block Search Window is an arbitrary quadrilateral (four-sided) window. Slide2 randomly generates a slip surface vertex WITHIN each Block Search Window, for each slip surface generated by a Block Search.
To create a Block Search Window:
- Select Add Block Search Window
 from the toolbar, or Add Window from the Block Search sub-menu of the Surfaces menu.
 - You will be prompted to enter four points defining the window. You can enter the points graphically with the mouse, or type the coordinates in the prompt line.
- After the fourth point is entered, the Block Search Window will be added to the model, and you will automatically exit the Add Block Search Window option.
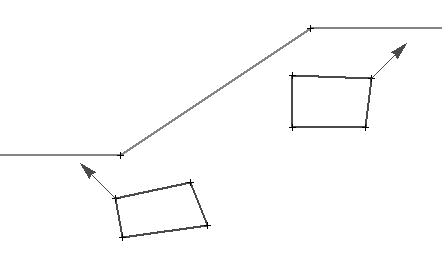
An example of a model with two Block Search Windows, is shown below. See the note below for information about how the Projection Angles are displayed with the Block Search objects.
Two Block Search Windows added to model:

Block Search Point
A Block Search Point is a SINGLE POINT, through which ALL slip surfaces generated by a Block Search, must pass (i.e. there is no random number generation involved with a Block Search Point).
To create a Block Search Point:
- Select Add Block Search Point
 from the toolbar, or Add Point from the Block Search sub-menu of the Surfaces menu.
 - Enter the single point graphically with the mouse, or type the coordinates in the prompt line.
- The Block Search Point will be added to the model, and you will automatically exit the Add Block Search Point option.
Block Search Line
A Block Search Line is a single line segment defined by two points. Slide2 randomly generates a single slip surface vertex on each Block Search Line, for each slip surface generated by a Block Search.
To create a Block Search Line:
- Select the Add Line option in the Block Search sub-menu of the Surfaces menu.
- You will be prompted to enter two points defining the line. You can enter the points graphically with the mouse, or type the coordinates in the prompt line.
- After the second point is entered, the Block Search Line will be added to the model, and you will automatically exit the Add Block Search Line option.
- It is important to realize that the Block Search Line option only generates a SINGLE slip surface vertex, at a random location along the line. Therefore, the slip surfaces which are generated, DO NOT FOLLOW THE LINE, but will simply have a vertex somewhere ON the line.
- If you wish to generate slip surfaces which follow a weak layer (for example), then you should use the Block Search Polyline option, rather than the Block Search Line option. See the Block Search Polyline topic for more information.
Multiple Groups
The Multiple Groups option allows you to simultaneously search different regions of a model (e.g. multiple weak layers) using a single Block Search. This works as follows:
- Select the Multiple Groups checkbox in the Surface Options dialog.
- When you define a Block Search object (window, line, point or polyline) you will be able to assign a Group ID number to the object.
- When the analysis is run, the Block Search will be carried out independently for EACH GROUP of Block Search objects.
- For example, if you wanted to simultaneously search two (or more) weak layers, you could define a Block Search Polyline in EACH weak layer, and assign a different Group ID to each polyline.
- A group may consist of a single block search object, or multiple block search objects with the same Group ID number.
- The total number of surfaces specified for the Block Search is divided equally among the number of groups. For example, if Number of Surfaces = 5000, and two groups have been defined, then approximately 2500 surfaces will be generated for each group during the search.
Projection Angles
The Projection Angles specified in the Surface Options dialog, are displayed on the Block Search objects as arrows. In general, these arrows will appear at the leftmost and rightmost points of the currently defined Block Search objects. If only a single Block Search object exists (for example, after you have defined the first Block Search object), then both the Left and Right Projection Angle arrows will be displayed on the same Block Search object.