Import from RSWall
The Import from RSWall option provides seamless integration between Settle3 and RSWall. After creating a wall and defining all of its properties including geometry of the wall, loads, water table and material properties, users can export one of the wall segments from RSWall, and import it into Settle3 to calculate immediate or consolidation settlement under the wall.
To import a retaining wall model:
- In the Project Settings
 , go the Soil Profile tab and ensure Extruded Section Layers is selected.
 - Go to the Loads ribbon and select Loads > Import > Import from RSWall

- Select the *.rswalltosettle3 file that you exported from RSWall.
- Click Open.Users can also launch Settle3 directly from the RSWall application. See the Export to Settle3 topic for details on the export process.
- The Import from RSWall dialog will appear after successfully importing.
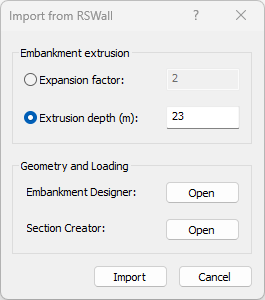
- The user must specify the following parameters:
- Extrusion Factor - A multiplier applied to the wall height to determine the out-of-plane extrusion width used in the settlement model.
- Extrusion Depth - An optional direct specification of the extrusion width used for the embankment geometry. When defined, this value overrides the extrusion factor.
These parameters control how the imported cross-section geometry is converted into the three-dimensional geometry required by Settle3.
- Click Open Embankment Designer to view or edit the embankment geometry representing the wall and retained soil
- Click Open Section Creator to view or edit the foundation profile generated from the imported coordinates
After importing the file from RSWall:
- If not already enabled, immediate settlement will be turned on for all soils used in the section creator
- A query line and field point grid will automatically be added beneath the wall
See Tutorial 26 – Import From RSWall for a step by step example of the import process.