Engine
The Settings page → Engine tab offers customization of the SPT calculation, borehole logs, lithology compiler, and other calibration.
To access the Engine tab on Settings page:
- Go to the left-hand navigation menu and select Settings page,
- Click Engine tab,
- Make desired changes as you wish,
- Click Save.
SPT Rules tab
This tab covers customizations of the following features:
Auto-Calculating Refusals
Use this section of the Settings page to specify how refusals or other special cases should be handled when calculating N-Value and N60 blow counts. RSLog follows ASTM D1586 for calculating Standard Penetration Test blow count N-Value.
The value of N60 is calculated automatically based on SPT Hammer Energy Level entered on the General tab → SPT Hammer and Sampler section.
- If the blow count data starts with the word "REF" e.g. REF 35/3", this blow count will be considered as refusal. In this case, the SPT / DCPT graph in the borehole log uses a blow count of 50 to show this data on the graph. The keyword "REF" and the refusal number for the graph (i.e. 50) can be set in the SPT Rules tab.
- For cases where the SPT sampler is driven into the soil with no effort (i.e. under the self weight of the hammer or rod), user can enter "WH" or "WR" as the test result. In this case, the SPT / DCPT graph in the borehole log users a blow count of zero to show this data on the graph. The keywords "WH" and "WR" can be set in the SPT Rules tab.
Line Breaks
The Split Character -when used in the Reporting Value column or a concatenated column during data entry- forces the data to split into multiple rows (i.e. vertical). For example, if # character is selected as the split character and user enters "7#9#13" in the Reporting Value, each of 7, 9 and 13 will be shown in a column (vertical) in the borehole log.
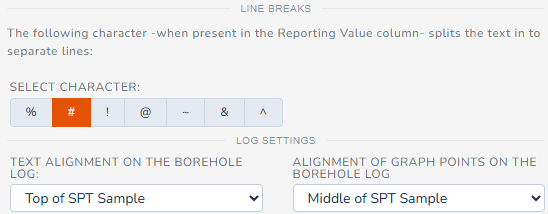
Log Presentation
Use the Text Alignment dropdown to determine whether the SPT blow counts should be aligned to the top of sample, middle of sample, or bottom of sample.
Use the Alignment of Graph Points dropdown to determine positioning (top, middle or bottom of SPT sample) of the data points on a SPT graph.
Generating SPT Samples
RSLog automatically generates an SPT sample when a SPT test record is added. Use the "Automatically generate SPT samples when an SPT record is added" checkbox to control this feature.
When "Sync relevant data between an SPT test and its sample" checkbox is selected, the following data will be automatically synced between the SPT test record and the SPT sample that is generated automatically:
- From Depth and To Depth,
- Sample Type: automatically set to SPT Split Spoon,
- Recovery Length and Recovery,
- Blow Counts.
Logs tab
The settings provided under this tab determine how the borehole logs are generated. This is outlined below:
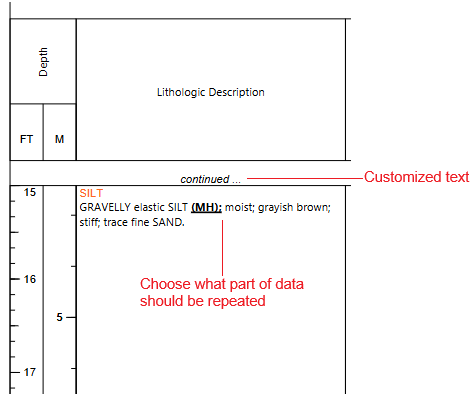
- Handling of samples or lithologic data on page breaks: When a stratum or sample description continues on the next page of the borehole log, you can choose what data should be shown at the top of the next page:
- Display continued text on page breaks: the text specified by the user e.g. "(continued)" will be shown at the top of the next page,
- Repeat lithologic data on page breaks: user can select what part of lithologic/sample description should be repeated on the next page. Options include:
- Layer Title: repeats the layer title,
- Material Classification: repeats the Group Name and Group Symbol e.g. "Silty Clay (CL)" or rock name e.g. "Gneiss",
- Lithologic Description: repeats the entire lithologic description
- Behavior of the piezometer/well log column: This determines how the piezometer/well log column is shown on the borehole log. This happens when user uses a log template that has a piezometer/well column but the borehole does not have a piezometer/well.
- Behavior of the piezometer readings element: This determines how the Piezometer Readings element is shown on the header/footer of the borehole log. This happens when a log template has Piezometer Readings element but the borehole does not have any groundwater level measurement data in Instrumentation tab.
- Clean-up of concatenated data: Removes leading or trailing symbols e.g. split character, #, ), / etc that appear when a concatenated column is processed.
- Example 1: you have a concatenated column for your SPT test formatted as {N1}#{N2}#{N3} with # being your Split Character (see the Line Breaks section above):
- you have a SPT test record with the following blow counts: N1=12, N2=50, and N3 is not entered,
- this will compile the concatenated text as 12#50#
- on the borehole log this would add an empty line after 50 in your SPT blow counts column. To prevent this, keep the Remove leading/trailing symbols checkboxes selected.
- Example 2: you have a concatenated column for your SPT test formatted as {N1},{N2},{N3}#({N-value}) with # being your Split Character:
- you have a SPT test record with the following blow counts: N1=12, N2=17, N3=50 and N-value=50/3.5" due to refusal,
- Since the output of this would be 12,17,50 on the first line followed by (50/3.5") below that, if you keep the Remove trailing symbols checkbox selected, it would remove the ") from the second line in the log.
- In this case you may want to unselect the Remove trailing symbols checkbox
- Example 1: you have a concatenated column for your SPT test formatted as {N1}#{N2}#{N3} with # being your Split Character (see the Line Breaks section above):
- Groundwater symbols: Select water symbols for each type of groundwater.
- Null groundwater data: User can choose what should be displayed on the header or footer of the borehole log in case that groundwater data is null (not entered).
Lithology Compiler tab
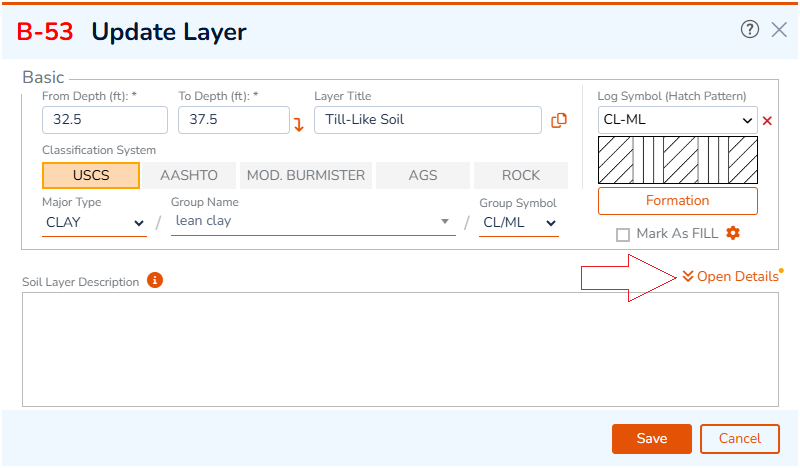
When stratigraphy data is entered in Detailed View instead of writing the lithologic description, user selects material properties from various dropdowns. RSLog will then put compiles the lithologic description by putting all input data together. User has full control on selecting which material properties should be brought to the lithologic description, as well as their formatting / sequence. To customize this, go to the Settings page → Templates tab → Layer Description Compiler tab.
The page is divided into the following sections:
- Soil Layer Description (left): allows editing the configuration of the compiler for soil layer description,
- Rock Layer Description (right): allows editing the configuration of the compiler for rock layer description,
Each section shows a list of available elements, a toolbar, compiler box, and additional settings:

Why Data Entry Using 'Detailed View'?
This feature provides consistency across your organization by automatically compiling soil and rock properties, eliminating most user errors and typos.
Elements
Each element represents a 'piece of data' (e.g. Group Name, Group Symbol etc.) that is part of input data for a stratum in RSLog. Most of these elements are entered in Detailed View of stratigraphy dialog box.
 Data related to soil classification or rock type in the Classification System area.
 Top level data entered in the General tab of the Detailed View.
 Data entered in the Components tab (fines, sand, gravel, etc.) of the Detailed View.
 Data related to cobbles and boulders in the Components tab.
 Data entered for Interbedded Soil or Rock in the General tab of the Detailed View.
To add an element to the compiler box, drag and drop it into the Compiler Box. To change the order of elements, simply drag the element to the desired location. The elements marked with * are mandatory.
Using Toolbar
The toolbar offers the following features:
- Import / Export: you can import compiler settings from another RSLog account into your account by clicking the Import button and selecting the corresponding *.json file. Use the Export button to save your compiler settings in a file and share it with other RSLog users,
- Text Alignment: select from left or right text alignment. This affects the layer description written in the Lithologic Description column of the borehole log,
- New Paragraph: allows starting a new paragraph (i.e. if you would like the layer description text to be compiled in more than one paragraph),
- Delete: this will clear the entire compiler box,
- Styling of an Element: when an element is selected, a toolbar will appear at the top-right of the Compiler Box. This toolbar allows for selecting properties of that element:
- Font Style: select the font style of the element and how it appears in the borehole log,
- Leading & Trailing: enter the text that appears just before and after the element; For example if Group Symbol of a soil layer is selected to be "GP-GC" and you specified a Leading text of "(" and a "Trailing text of ");" and italic font style, this Group Symbol value would be shown as "(GP-GC);" in the Layer Description (on Stratigraphy tab) and on the borehole log.

Compiler Box
The Compiler Box allows you to select the elements that should be part of the Layer Description text and to determine their sequence. In order to change the sequence of elements, simply drag an element and move it around as desired to update the order of elements.
- Select an element to view its styling details at the top-right of the Compiler Box.
- To delete an element, click the red x button located on the element.
Additional Settings
- Automatically Remove Extra Spaces: This will remove all extra spaces from the compiled layer description text. Any space at the beginning or end of the text will also be removed. For example, the compiler will change the "... clayey sand ..." to "... clayey sand ...".
- Automatically Remove Unused Punctuations: If punctuations were found next to each other, this feature will only keep the last punctuation. For example, the compiler will change the "... (GM),; Dry to ..." to "... (GM); Dry to ...".
- Major Soil Types in Upper Case: For example if the layer's Major Soil Type (see Stratigraphy tab) is selected as silt, it will be shown as "SILT" in Layer Description.
- Compile the Interbed Text With Major Type Instead of Group Name: If selected, the description of interbedded layer uses Major Type instead of Group Name (which is more detailed than the Major Type).
Calibration tab
The settings provided under this tab determine
- Field Test Used for SPT Blow Count: If you commonly use other penetrometer tests (i.e. not the standard SPT test) for calculating N60, You can select that field test and the column that carried the blow count data. This blow count is used for calculation of average blow count in a soil layer, used for estimation of its consistency or apparent density.
- Consistency Descriptors: this list contains the consistency descriptors (for fine-grained soils) used in RSLog. This will affect data entry in Stratigraphy tab of the borehole page (Detailed View only).
- Apparent Density Descriptors: this list contains the apparent density descriptors (for coarse-grained soils) used in RSLog. This will affect data entry in Stratigraphy tab of the borehole page (Detailed View only).
- Moisture Descriptors: this list contains the moisture levels used for data entry on borehole edit page, in Samples tab and Stratigraphy tab. The range of water contents associated with each moisture descriptor is used to check the selected Moisture Level for a soil layer against the average water content lab test results within that layer.