Click the button next to the tab headers to customize the tabs shown on this page. Use the dialog to re-arrange tabs or hide/show them as needed.
For several datasets on this page, data entry in done in tables. Please see this article for working with tables. If your data in stored in CSV files, you can directly import it to the desired table (read more).
Navigating Between Test Holes
Use the arrow buttons in the top left of the screen to easily switch between boreholes of a Project.
Quality Management Status
The badge shown next to the borehole name at the top left of the screen indicates the Quality Management status of that borehole.
Please read this article about groundwater data entry and presentation on the logs.
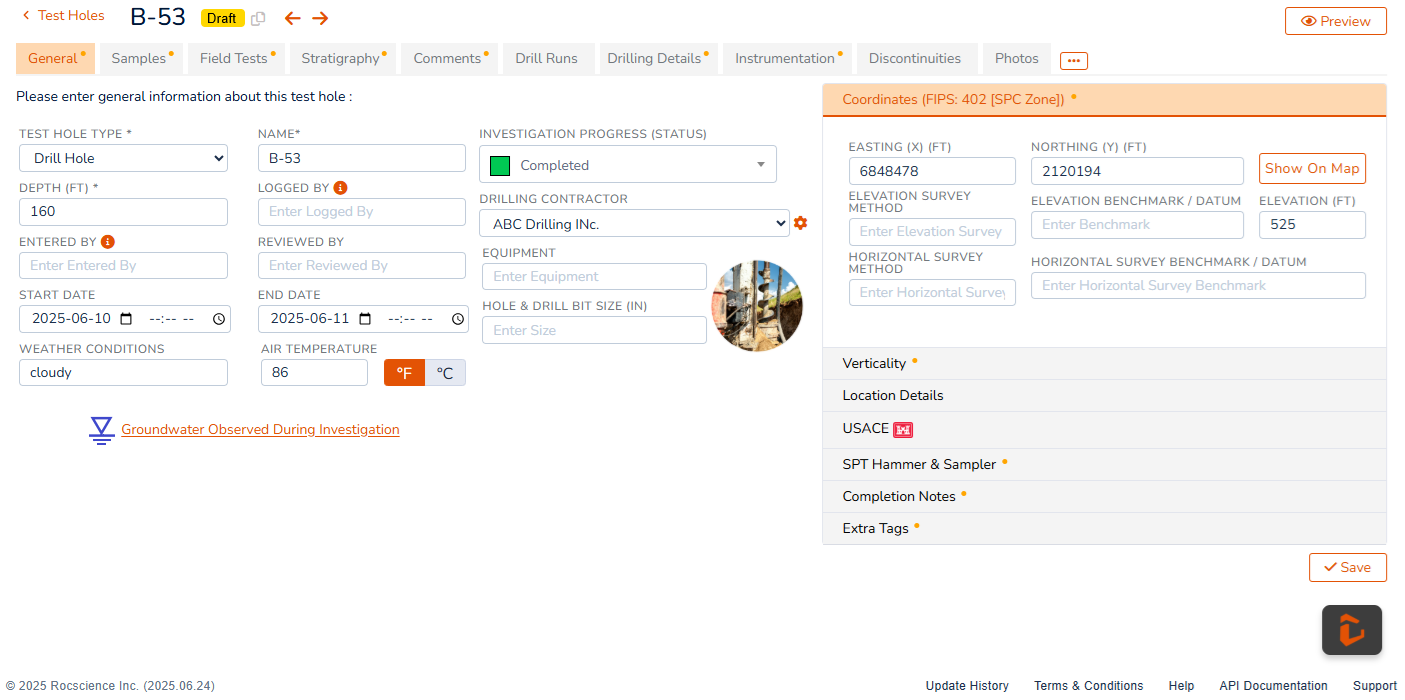
General tab
In RSLog, test hole data is entered in different tabs beginning with the General tab. This tab is where you enter general details such as test hole name, depth, etc. The following provides further details:
Test Hole Type
Generally, a test hole is made either by ‘drilling’ (e.g. a borehole) or by ‘excavating’ (e.g. a test pit, trial pit or trench). As a result, the drop down options for Test Hole Type comprise of:
Drill Hole (borehole): any type of hole drilled manually (e.g. hand auger) or by using machinery (i.e. a drill rig).
Test Pit (trial pit, trench, pit): typically implies a larger hole dug using shovel or by an excavator.
Investigation Progress Status
The field investigation status of a test hole indicates at which drilling/excavating stage it is. Once user sets this status to Completed, the program will set the Quality Management status to Draft.
Coordinates
While coordinates are not necessarily required for generating the log, to benefit from all RSLog features such as GIS system and Cross-Section Designer, we recommend that you enter coordinates and elevation for all your boreholes. Please read more about handling coordinates reference system.
If the exact coordinates of test holes are not available, we recommend that you specify their approximate location on the map by clicking Place on Map button.
Verticality
Simple Plumbness option allows entering the trend (azimuth) and plunge of the test hole. Use Verticality Log option to upload the variation of trend and plunge along the depth of the test hole (CSV format).
Location Details
More location specific data (e.g. Stationing, Offset etc.) for the test hole could be entered in this tab.
USACE
In this tab enter the data required by United States Army Corps of Engineers for presentation on the logs.
SPT Hammer & Sampler
Enter the details for the hammer and sampler used in Standard Penetration Tests (SPT).
Completion Notes
Start Notes: will be displayed in the borehole log at the top of the first page of the log, above the Lithologic Description log column.
Termination Notes: will be displayed in the borehole log at the bottom of the test hole (last page) below the Lithologic Description log column.
These data entries accept Rich Text Formatting; select a part of the text and use Ctrl+B (bold), Ctrl+I (italic), or Ctrl+U (underlined) to format the text. Please note that you can customize the default format of the Start / Termination Notes.
Extra Tags
In this section you can enter data for Extra Tags you created for test holes.
Extra Tags are additional properties that you can assign to a test hole or project. User can edit the list of Extra Tags from Settings page → Data Entry →Extra Tags tab.
Samples tab
On the Samples tab, you can enter the list of samples taken from this test hole.
Depth: You can specify From (i.e. top depth) and To (i.e. bottom depth) for a sample. If your samples are identified by one depth only, leave the To field empty.
Sample No.: enter sample number for the sample (optional).
Location / Status: use this dropdown to specify at which location or state the sample is. For example: Collected in the Field, Being Transferred to the Lab, Disposed, etc. This list may be customized on the Settings page → Field Investigation tab →Sampling & Drilling tab.
Color: enter sample color or click on the color-picker button to select from Munsell Colors.
Sample Type: select the method of sampling (required). The list of sample types may be customized on the Settings page → Field Investigation tab → Sampling & Drilling tab.
Sampler Diameter: refers to the size of the sampler used.
Moisture Level: select the sample moisture level (optional). The list of moisture descriptors may be edited on the Settings page → Field Investigation tab → Sampling & Drilling tab.
Recovery Length (mm or inch): enter the length of sample recovered (optional).
Recovery %: enter sample recovery (optional). Click the calculator button to automatically calculate the Recovery % based on sample depth and Recovery Length.
Blow Count: refers to the SPT blow count if the sample is a SPT sample. Click the orange button next to the Blow Count to update the value from the SPT test.
RQD %: enter sample RQD (optional).
Shear Vane: enter the value of shear Vane test conducted on this sample (optional).
Torvane: enter the value of torvane test conducted on this sample (optional).
Pocket Pen: enter the value of pocket penetrometer test conducted on this sample (optional).
Sample Description: enter field description of the sample (optional).
RSLog can display long sample numbers in the borehole log with word wrap effect (i.e. in a Samples log column). However, the word wrap effect is only working when the sample has both From and To input data. This reserves a box in the borehole log (with top and bottom of the box being the From and To depths) where the sample number is written.
Field Tests tab
RSLog supports various types of field tests such as Standard Penetration Test (SPT), Vane Shear Test, Manual DCP soundings and more. The list of field tests and their data columns can be customized on the Settings page → Field Investigation tab →Field Tests.
Depth Column: enter a value greater than or equal to zero.
Reporting Value Column: this is the legacy column allocated to test results. Most field tests have their own columns. Learn about customizing field tests.
Other Columns: additional columns will be available for data entry, depending on the field test selected.
The Comments tab allows you to add depth-related comments (e.g. drilling rates, boulders, equipment issues). These comments are shown in the borehole logs in the column Comments/Remarks.
Stratigraphy tab
The Stratigraphy tab is used to enter subsurface soil or rock layers that were encountered during the field investigation.
Depth: enter top and bottom depths that represent the stratum (required),
Layer Title: if you wish to give the stratum a title, enter it in the Layer Title (optional). The title is shown as the first line in the Lithologic Description in the log,
Copy Layer Data: click the copy button next to the Layer Title to start copying a stratum from another test hole,
Classification System: select the classification system (USCS, AASHTO, Mod. Burmister, AGS, ROCK) that is used for description of the soil / rock,
Soil Stratum: start with selecting the Major Soil Type from the dropdown. Depending on the category selected, other dropdowns will be populated with relevant subcategories. Once the Group Symbol is selected, its corresponding Log Symbol will be automatically selected and the hatch pattern image will be shown. See Settings → Hatch Design tab for hatch colors and default description texts.
Rock Stratum: start with selecting Rock Type and finish by Rock Name. The Log Symbol will be automatically selected and the hatch pattern image will be shown.
Log Symbol: this is the hatch pattern that will be shown for this stratum in the borehole log. In order to change the Log Symbol click the dropdown, select a category, and then select a hatch pattern from the list or search for a soil or rock type. You can customize this list by uploading your own hatch patterns.
Formation: you can assign a geologic category and a geologic unit to each stratum.
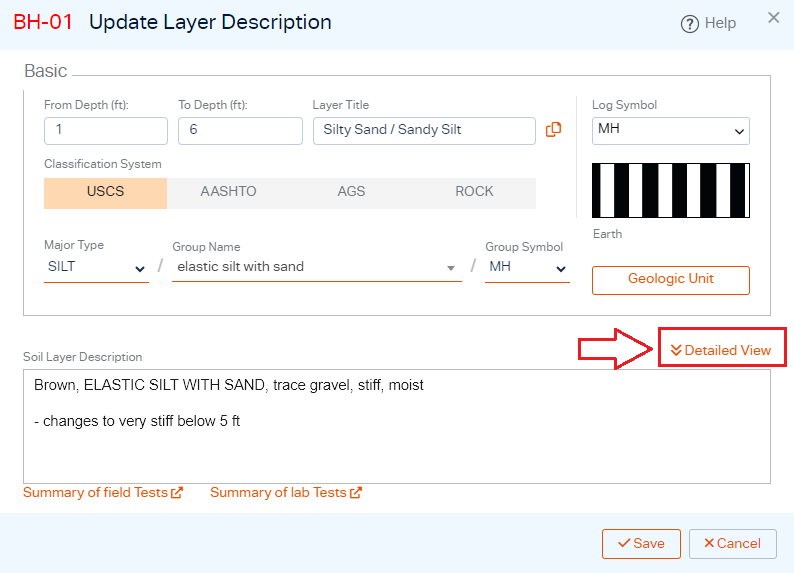
Lithologic Description: the layer description may be entered manually (Basic Mode) or be compiled by RSLog based on the data entered (Detailed Mode). This is selected using the link located at the top-right of the Layer Description box:
To format the text of the Layer Description, select part of the text and use the following shortcut keys to format the text:
Ctrl + I: makes the text Italic
Ctrl + B: makes the text Bold
Ctrl + U: makes the text Underlined
Once the depth data, classification system and log symbols are entered, you can enter Layer Description using the following options:
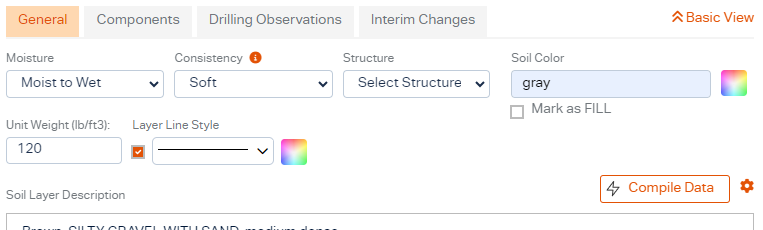
1) Basic View
Is Basic View, you can enter the soil / rock stratum description in the Layer Description textbox. When entered, click Save to close the dialog.
2) Detailed View
Select Detailed View if you would like to enter material description by selecting properties from various dropdowns (ASTM 2488). RSLog will then compile Layer Description for you. Clicking on Detailed View opens additional data entry fields. The compiler configuration may be customized on the Settings page (see how).
Detailed View
General tab
Enter moisture conditions, consistency, structure, color and more. If the stratum is fill, select the Mark as FILL checkbox (the compiler will add the phrase "(FILL)" to the end of the layer description text).
Use the Consistency (fine-grained soils) or Apparent Density (for coarse-grained soils) dropdown to describe the material: If the test hole contains Standard Penetration Test (SPT) blow counts within this stratum, the Consistency / Apparent Density will be automatically set. Hover on the info icon above this dropdown for details.
If the layer contains moisture content (lab test) data, the Moisture Level will be automatically set. Hover on the info icon above the this dropdown for details.
The list of Consistency or Apparent Density options as well as the list of Moisture Descriptors can be customized on Settings page → Field Investigation tab →Field Tests tab.
The Layer Line Style is used to specify the type, thickness, and color for the line drawn at the bottom of the stratum in the borehole log.
Components tab
Use this tab to provide detailed description of the material for fines content, sand, gravel, cobbles and bounders part of the material. For further details please refer to Section 2.5 and 2.6 of Soil and Rock Logging, Classification, and Presentation. Once various input dropdowns are set, click Compile Data button to automatically generate the layer description.
When geology is generally consistent across the site, you can duplicate test holes and just change certain data in the copied test hole (e.g. top & bottom of layers).
Detecting Conflicts
The Summary of Field Tests and Summary of Lab Tests links (below the Layer Description) open a new dialog showing the list of field or lab tests within this stratum. This allows you to compare the Layer Description with test results in order to minimize data entry errors.
Examples of the types of conflicts that could be caught using this feature are provided below:
The silt is described as 'wet' in the field whereas lab tests indicate between 6.5 to 8.3 % of moisture content, and
The sand is described as 'lose' in the field while SPT blow counts collected during site investigation show a range of 9 to 11.
Drilling Details tab
Use this tab to specify borehole construction details. This data will be presented in the test hole log in the "Drilling Details" log column. Each record represents a segment of the test hole drilled with a specific method of drilling:
Depth: enter the top and bottom depths,
Hole Diameter: enter the borehole diameter,
Drill Method: select from the list; please note this list can be customized from the Settings → Field Investigation → Drilling tab.
Drill Rod: enter the information about the drill rod (size, type, etc.),
Drill Rig: select the Type of Drill Rig from the dropdown list and enter the model of rig,
Drill Bit: select the Type of Drill Bit from the dropdown list and enter the Drill Bit Information,
Casing: select the Type of Casing from the dropdown list and enter the Casing Diameter,
Date & Time: enter the date and time when this part of drilling was completed,
Backfill Details: opens a new dialog with a list of materials used for backfill of this borehole,
Instrument Installed: indicates that an instrument is installed within this part of the borehole. This will show an instrument in the borehole log.
Drill Runs tab
Enter the list of drill runs when the borehole includes coring. This page can be used to enter the rock mass unit details instead of drill runs.
Depth: enter the top and bottom depths,
Total Core Recovered: enter the total length of core recovered in this drill run; Click on calculator button to automatically calculate the Total Core Recovery (%),
Total Lengths >4 inch: enter the total length of core pieces longer than 4 inches (100 mm) in this drill run; Click on calculator button to automatically calculate the RQD (%),
Rock Mass Ratio (RMR): enter the RMR for this drill run,
Total Core Recovery (TCR): enter the TCR for this drill run; This could be automatically calculated based on the Total Core Recovered length,
Solid Core Recovery (SCR): enter the SCR for this drill run,
Total Material Recovery (TMR): enter the TMR for this drill run,
Rock Quality Designation (RQD): enter RQD values for the entire drill run or for the rock mass units,
Joint Spacing / Conditions: enter joint spacing and joint conditions,
Fractures: enter the number of fractures present in this drill run or rock mass unit,
Rock Strength Level: select the strength level from the dropdown; Please note this list can be customized from the Settings →Rock Classification tab,
Rock Alteration Level: select the alteration level from the dropdown; Please note this list can be customized from the Settings →Rock Classification tab,
Rock Weathering Level: select the weathering from the dropdown; Please note this list can be customized from the Settings →Rock Classification tab,
Discontinuities tab
Enter the list of defects and discontinuities on this page.
Depth: enter the top and bottom depths,
Alpha / Beta: enter the alpha and beta angles for the orientation of the discontinuities:
Alpha: Refers to the angle between the discontinuity trace and the axis of the borehole (the apparent dip angle). It describes how steeply the discontinuity cuts across the core.
Beta: Represents the angle between the discontinuity and a reference direction (usually north) in the plane perpendicular to the borehole axis. It indicates the orientation (azimuth) of the discontinuity’s trace as viewed along the core.
JRC-RMR76: enter the Joint Roughness Coefficient; click on the info icon to open the JRC chart,
Defect Details: this includes defect type, shape, roughness, infill type, infill character and infill thickness; Please note this list can be customized from the Settings →Rock Classification tab,
Instrumentation tab
Use this tab to enter the details of any instrumentation installed in the test hole. This may be a piezometer / well installation, inclinometer, or any other measurement carried out along the depth of the borehole:
Piezometer / Well tab
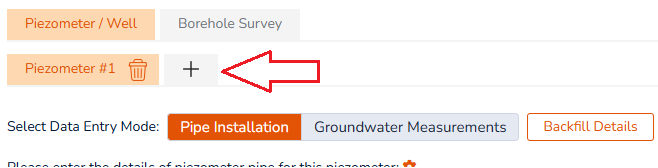
A test hole can have multiple piezometers ('nested piezometers'). To add a new piezometer / well to the test hole, click + button:
Adding Multiple Piezometers / Wells to a Test Hole
This will add new sub-tabs titled "Piezometer #1", "Piezometer #2" etc. Under each piezometer / well sub-tab the following data can be entered:
Piezometer / Well Data
This comprises general data about the piezometer:
Piezo/Well Type: select from various types of monitoring wells,
Plug Type (top): select the type of the plug at the top of the monitoring well (at the ground surface),
End Cap Type (bottom): select the type of cap installed at the bottom of the monitoring well.
Stickup: indicates if the well is installed with a stickup above the ground surface.
The type of well and list of plug types can be customized from the Settings → Field Investigation → Instrumentation tab.
Adding an Instrument to the Piezometer / Well
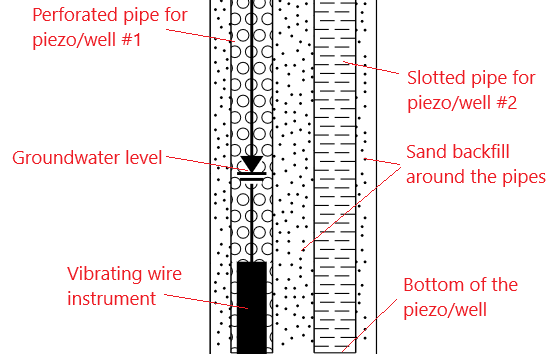
If the type of piezometer / well type is selected as Vibrating Wire, you can indicate which pipe segment contains the instrument. In the borehole log, this will be shown on that pipe segment as a box connected with a wire to the ground surface.
Pipe Installation
Most piezometers comprise a pipe with various segments comprising either 'Solid' pipe or 'perforated / slotted' pipe to allow for water ingress into the pipe. To start adding pipe segments, click + New button on the table toolbar:
From: enter the top depth for this pipe segment,
To: enter the bottom depth for this pipe segment,
Pipe Diameter: enter the diameter of the pipe,
Pipe Material: select the pipe material from the dropdown list,
Screen Type: select from the following options:
No Pipe: no pipe is installed within the specified depth range.
Perforated: this pipe segment is perforated.
Slotted: this pipe segment is slotted.
Solid: this pipe segment comprises solid pipe (i.e. no slots or perforations).
Notes: enter any notes pertaining to this pipe segment.
Show vibrating wire instrument: this indicates that the vibrating wire instrument is installed in this depth range. If selected, it shows the instrument symbol inside the subject pipe segment in the borehole log. Please note that this checkbox is only shown if the piezometer/well type is set to Vibrating Wire.
The screenshot below illustrates how installation of a monitoring well is presented in the borehole log. In this case, the borehole comprises two monitoring wells, one of which is a vibrating wire piezometer:
Piezo/well Drawing in the Borehole Log Showing Nested Piezometers
Groundwater Measurements
Use this page to enter groundwater level measurements in this piezometer / well. To enter a water level measurement click + New button:
Water Level Present in the Piezometer / Well: check this box if water level was encountered in this piezometer / well. If this is unchecked:
User cannot enter a depth for water level, and
the piezometer will be considered "DRY" for the subject measurement.
Water Depth: enter the depth (below ground surface) of the groundwater,
Water Elevation: If your test hole has a collar elevation (in General tab → Coordinates section → Elevation), the program will automatically calculate Water Elevation for each record,
Air Temperature: enter air temperature at the time of water level measurement,
Date & Time: enter the date and time of the water level measurement,
Notes (weather condition etc.): enter the weather condition or any other notes pertaining to this groundwater measurement.
In order to show well installation details and groundwater measurements on the borehole log please read this article.
Backfill Details
Use this dialog box to enter the details of the backfill used for decommissioning of the test hole. Please note that backfill details are applied to all piezometers / wells installed in that borehole:
From: enter the depth to the top of the section where this type of backfill is used,
To: enter the bottom depth,
Backfill: select the type of material used for backfill.
Borehole Survey tab
Borehole surveys are intended to collect data about the deviations in the boreholes (e.g. hole diameter), as well as the different characteristics of the rock formations. Examples of borehole surveys include inclinometer installation, sonar caliper, gyro survey and more. On this page user can add multiple borehole survey results as 'datasets'. In order to add a 'dataset' click on New Dataset button at the top-right of the page:
Type: select the type of dataset; The list of survey types may be customized from the Settings → Field Investigation → Instrumentation tab.
Title: enter a title for this borehole survey dataset.
Import Data From CSV File: the only data entry method available for a borehole survey is to import a CSV file. To do so, click + New dropdown arrow to open the menu, then select Import CSV File menu (see more about importing CSV files).
Photos tab
Use this tab to upload photos (more details on this page).
 button next to the tab headers to customize the tabs shown on this page. Use the dialog to re-arrange tabs or hide/show them as needed.
 arrow buttons in the top left of the screen to easily switch between boreholes of a Project.
 No Pipe: no pipe is installed within the specified depth range.