Projects
In RSLog, test hole data is stored under a Project. The Project details include the location, client name, coordinate system, units and other settings of your project. Watch the tutorial video and explore further details in the article below.
To access this page:
The page should appear as follows:
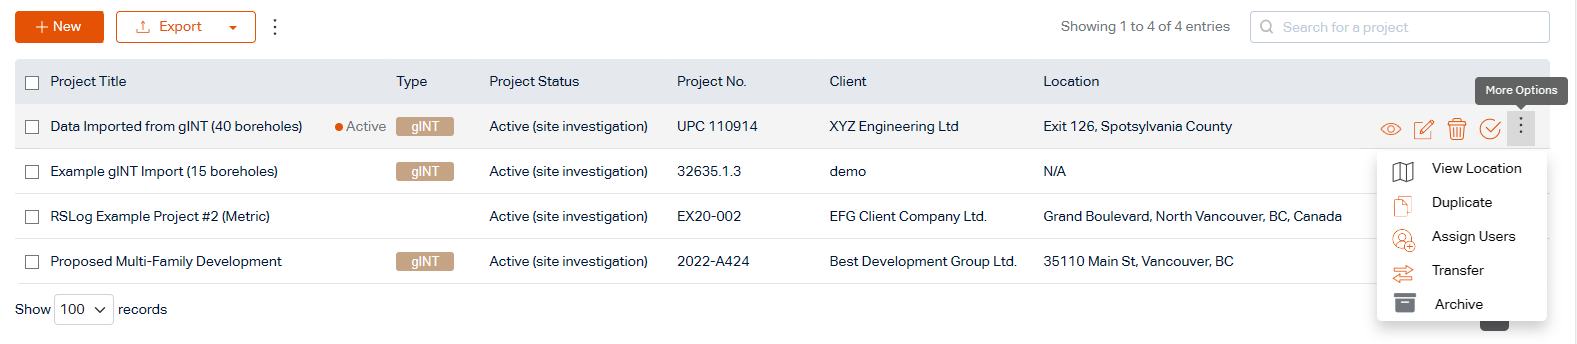
On this page you can search and find a specific project in the list of your projects, create a new project, and edit/delete a project. For a general guide on how to work with tables in RSLog, see this page. By hovering on a project in the projects list the buttons at the right end of that record provide the following features:
- Use
 and
and  to edit or delete a project,
 - Use
 to view a summary data for this project,
 - Use
 to open this project and view the list of test holes,
 - To view the location of this project on the map click the
 button to open the menu, and click View Location,
 - To duplicate this project click the button to open the menu, and click Duplicate.
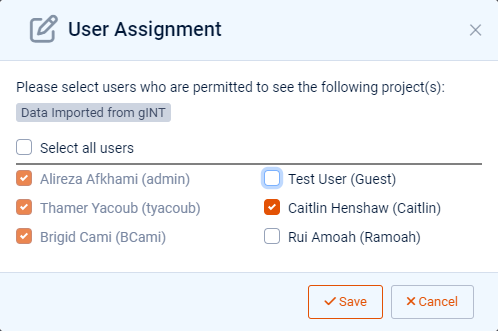
Assigning Users
In order to determine which users can access a given project:
- Hover the subject project on the list,
- Click the button and select Assign Users menu,
- A dialog appears with a list of all users in your RSLog account.
- Select which users should have access to this project,
- Click Save to close the dialog.
By assigning users to a project, the users who are excluded from the list will not be able to see or access this project.
Creating a Project
Before you can begin entering test hole data, you must first create a New Project.
- Select Projects List in the navigation panel to open the Projects page,
- Click + New button on the top toolbar. A dialog will appear.
- Enter project details (title, client name, site location, etc).
- Client name can be entered manually or selected from the drop-down list of your Contacts.
- Click Save to create the project.
After saving the project you will be taken to the list of test holes. See the Test Holes help page for more information.
Project Status
The purpose of Project Status is to update the progress of the project. During the course of a project its status may change from 'Site Investigation' to 'Log Review' to 'Design' to 'Final Review' to 'Completed' and 'Archived'. By archiving a project it is removed from the list of Current projects and added to the list in the Archived tab.
The list of project statuses can be customized on Settings page → Data Entry tab → Progress Status tab.
Site Location
When entering your project details, you will be asked to enter a Site Location. The Site Location can be a civic address or geographic coordinates. If an address is not available, you can click on the ‘map icon’ next to the Site Location textbox and set your project location on the map by following the below steps:
- Click the Map icon.
- Use your mouse to drag the pin to a new location on the map.
- Click the Polygon/Polyline tools to draw a polygon/polyline to represent the site layout or project alignment. This will be used later for preparation of site location figure, which is typically part of the engineering reports.
- Double click the last point on the map to complete the polygon/polyline.
- Click Save to close the dialog.
Once the site location is specified on the map, the project coordinates will be automatically added to the form.
Coordinates Reference System (CRS)
Please refer to this article for a detailed discussion of coordinates in RSLog. We recommend that you specify your project and boreholes locations either using Geographic, Projected, or UTM coordinates systems; This allows RSLog to place the test holes on the map (see GIS page).
If 'Local' coordinates system is selected, map features will be unavailable for the project.
Unit System
The Unit System determines the Unit System that will be used for all Test Holes and Lab Test data. Users can select:
- Imperial: depth unit is "ft"; unit weight is in "pcf"
- Metric (East Asia): depth unit is "m"; unit weight is in "gr/cm3"
- Metric (US): depth unit is "m"; unit weight is in "kN/m3"
The main implication of selecting a Unit System is the depth unit used in RSLog user interface and in the borehole log. For Imperial and Metric unit systems, "ft" and "m" will be used as the depth unit, respectively.
QR Web Link
A QR code is a two-dimensional barcode system that opens a web page when scanned by the camera of your cell phone or tablet. This could lead to your company website, a link to the geotechnical report, a link to a ftp website to download certain project files, etc.
In RSLog, you can insert a QR code on the header or footer of your report, via the Report Template Editor feature.
When entering the QR Web Link on the project dialog, please specify URL prefix from one of the following:
- http:// most of the web addresses start with this prefix (this is the default prefix).
- https:// for secure websites with SSL certificates.
- ftp:// when you would like to redirect user to a page to download files.
- mailto: links to an email address.
Quality Management tab
To utilize the quality management features for a project, the following assignments are required:
Assign Offices to a Project
In the upper portion of this tab select an office as the Prime Consultant assigned to this project. Other offices of your organization can play role in this project as well, but only one office can be assigned as Prime Consultant.
By clicking on an office from the list, the list in the lower portion of the page populates with the list of engineers (users) of that office.
Assign Engineers to a Project
From the list of users select the ones that are involved in this project and assign their roles. These are quality management roles that determine the role of the user in field data collection, review and approval of the borehole logs. To learn more about quality management roles please see this page.
Extra Tags tab
In this tab you can enter data for project Extra Tags.
Opening a Project
To access the test holes of a certain project, you need to 'open' the project; this will set that project as your Active Project. You can only open one project at a time. If you wish to switch to another project, you will need to go to the Projects page and open that project.
To open a Project for data entry, editing or generating reports:
- Select Projects List in the navigation panel to open the Projects page.
- Hover on your desired project from the list and click the
 button at the right end of that row.
 - This will select this project as your 'Active Project' and you will have access to its test holes data.
- A message will be shown asking if you would like to open the list of test holes for this project. Click Yes to be redirected to the Test Holes page.
Editing a Project
To edit the details of a project:
- Select Projects List in the navigation panel to open the Projects page.
- Hover on your desired project from the list and click the Edit button at the right end of that row.
- A dialog will appear. Edit the necessary fields.
- Click Save.
Copying a Project
In order to duplicate a project (including all of its boreholes) hover on the project on the Projects List page and click the then select Duplicate from the menu.
The copied project will have the same title of the original project with a "- copy" appended to the end.
Merging Projects
In order to merge two projects, move all boreholes of Project A to Project B (see how to move a test hole). Once this process is over check Project B to make sure all test holes are properly transferred. Next, you can proceed with deleting the empty Project A.
Transferring a Project
This feature is used for transferring the complete data of a project to another RSLog accounts. An example could be when you are retained by a Department of Transportation to carry out geotechnical investigation and design for a project. Once the project is completed, use the Transfer feature to send a copy of the project to your client. The recipient must have an active RSLog account.
For detailed instructions on transferring a project please see this article.
Archiving a Project
You can archive the projects that are no longer active; This allows you to focus on ongoing current projects that you are actively working on their data entry and reports. There are different ways for archiving a project:
- Option 1) hover on the project from the list and click on the
 button, then select Archive from the menu.
 - Option 2) select the checkbox beside the project from the list and click on the Archive button from the top toolbar.
- Option 3) hover on the project from the list and change the Status to 'Archived'.
To un-archive a project:
- On Projects page click the Archived tab to view the list of all archived projects.
- Hover on the row for the desired project and click the button at the right end of that row, and select Un-archive from the menu.
- Alternatively, you can change the status of the project to anything other than Archived.