Data Entry
The Settings page → Data Entry tab offers customization of the extra tags, quality management, list of formations and user-defined lab tests.
To access the Data Entry tab on Settings page:
- Go to the left-hand navigation menu and select Settings,
- Click Data Entry tab,
- Make desired changes as necessary,
- Click Save (some tabs don't have a Save button as everything will be saved automatically).
These customizations include the following sub-tabs:
General tab
This tab provides the following customizations:
Date Display
Determines how dates are shown on screen and in the reports.
Stratigraphy Customizations
In this section you can set the default line style used for new stratigraphy records.
- Enforce detailed stratigraphy data entry: if selected, on the stratigraphy edit dialog data entry is enforced in Detailed mode. This options guarantees consistency -no typo, same order of elements in the lithology- generated by all RSLog users in your company.
- Show AS1726 (2017) soil types: if selected, on the stratigraphy edit dialog in Group Name dropdown, additional items will be shown from the Australian Geotechnical Site Investigations manual (AS1726: 2017).
For New Test Holes
- Sample Type: Select the default Sample Type assigned to a new sample. List of Sample Types may be edited on Settings page → Field Investigation tab.
- Field Test Type: Select the default Field Test Type when adding field test data. List of Field Tests may be edited on Settings page → Field Investigation tab.
- Drill Method: Select the default Drill Method when a test hole is created. List of Boring Methods may be edited on Settings page → Field Investigation tab.
Test Hole Completion Notes
Completion Notes are displayed at the top and at the bottom of the Lithologic Description column in the borehole log. In this section of the Settings page you can set default texts for Completion Notes when creating a new test hole. User can utilize RSLog built-in keywords in these notes (see below).
- Start Notes: This is a note that will be presented at the top of the first layer in the Lithologic Description column of the borehole log (i.e. at depth = zero).
- Termination Notes: This is a note that will be presented at the bottom of the last layer in the Lithologic Description column of the borehole log.
Both Start Notes and Termination Notes can be overridden during borehole data entry from the General tab → Completion Notes section (on the right side of the page).
- {name} will be replaced by test hole name (e.g. "BH-01")
- {depth} will be replaced by borehole depth, including the depth unit (e.g. "34.5 ft")
- {elevation} will be replaced by borehole collar elevation, including the unit (e.g. "652.8 ft")
- {water_depth} will be replaced by groundwater depth (during drilling), including the depth unit (e.g. "7.8 m")
- {water_depth_short_after} will be replaced by groundwater depth (short-term), including the depth unit (e.g. "10.2 m")
- {water_depth_long_after} will be replaced by groundwater depth (long-term), including the depth unit (e.g. "11.9 m")
- {spt_energy} will be replaced by SPT hammer energy (e.g. "60 %")
Extra Tags tab
You can expand the list of data entry for projects or test holes by using Extra Tags. An example of Extra Tag is the Contract Number for a project; since Contract Number is not a default data entry item in RSLog, you can add it to project data entry page as an Extra Tag from the Settings page → Data Entry tab → Extra Tags tab:
- Tag: this is the label of the Extra Tag shown on RSLog user interface (e.g. during data entry on project page).
- Data Type: determines the type of data expected for this Extra Tag:
- Number (e.g. 125.6)
- String (e.g. "B50 Rig")
- Boolean (displayed as a checkbox), and
- Dropdown (list of selectable items).
- Options: only applies to a 'dropdown' extra tag. Enter the options value in comma separated format. For example if you add an Extra Tag for Department and would like the user to choose from Civil, Geotechnical and Environmental, in Options field write "Civil, Geotechnical, Environmental".
- Description: will be shown as the tooltip for that Extra Tag on the data entry pages.
Data Entry for Project Extra Tags
- On project data entry page, click Extra Tags tab to see the list of Extra Tags (more details),
- Click the cell next to the desired item and enter data.
Data Entry for Borehole Extra Tags
- On borehole data entry page → General tab, open the Extra Tags section (on the right side of the page) to see the list of Extra Tags (more details),
- Click the cell next to the desired item and enter data.
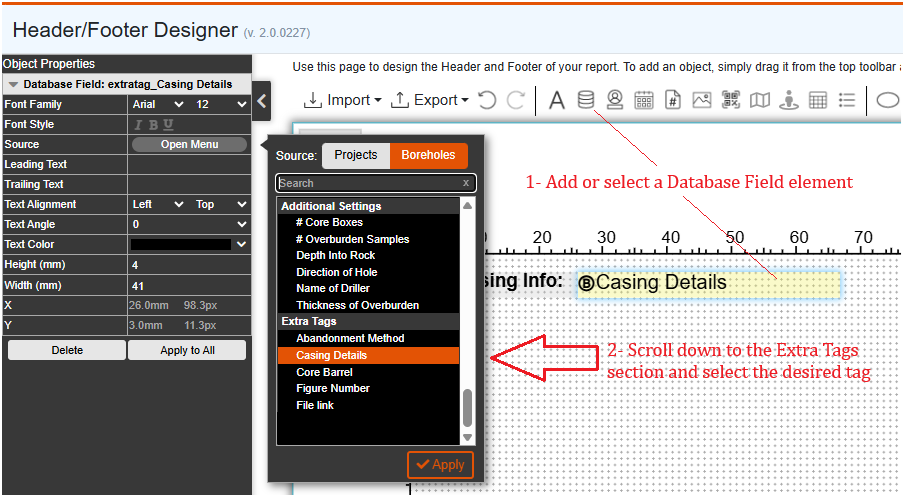
Presenting Extra Tags on the Borehole Logs
- Find and edit the desired log template from the Report Templates page,
- Click Customize Layout button to open the header/footer designer,
- Select a Database Field element from the header/footer or add one from the top toolbar. From its property grid (on the left side of screen) find the Source property and click Open Menu button,
- Choose whether you would like to link this Database Field element to a Project or a Borehole,
- In the list of source items, scroll down to the bottom of the list to see the Extra Tags section,
- Select the desired Extra Tag and click Apply button,
- Save the header/footer designer.
Quality Management tab
This tab allows for customization of the quality management roles (defined at the project level and assigned to each test hole) and quality management status (associated to test holes). For further information please see Quality Management documentation.
Test Hole Investigation Status
Use the table to edit the list of test hole statuses. The default options in this list are meant to represent the natural flow of drilling a borehole/excavating a test pit. The status of test holes is used to show the investigation progress visually at the top of the Test Holes page:

The following statuses are pre-built and cannot be deleted, however user can change the color and indicator (%) associated with any status:
- Planned: refers to a test hole that is created by RSLog Pre-Investigation Planner feature. A Planned test hole is 'planned' to be drilled/excavated but its investigation has not started yet.
- Utility Locating: indicates that utility locating is in progress for this test hole,
- Drilling / Excavating: means the test hole is in drilling or excavating state,
- Backfilling: indicates that the drilling of excavating phase is over and the test hole is being decommissioned,
- Completed: indicates that the field investigation for this test hole is completed. The default color of this test hole status may be changed by editing this record,
- Abandoned: test hole had to be abandoned (typically due to access issues, utility conflicts or subsurface challenges),
- Canceled: The field investigation for this test hole has been canceled.
Formations tab
Formations are defined globally for all projects that use a specific 'data template'. These can be used to reflect the local geology or hydrogeology in your subsurface stratigraphic data. You can group the geologic 'Units' under a 'Category'. A color can be assigned to each 'category' or geologic 'unit' for presentation on borehole logs or cross-sections.
During borehole data entry on Stratigraphy tab, you can assign a geologic unit to a stratum. Formation data can be imported from CSV files:
Importing List of Categories from CSV
Create a CSV file with 3 columns:
- Category*: this is the name of the category (required),
- Description: optional description of the category,
- Color*: this is the color associated with this category (required). Color must be in hex format including the # character (e.g. #FF0000 for red).
Importing List of Units from CSV
Create a CSV file with 4 columns:
- Category*: this is the name of the category that this unit belongs to (required),
- Unit*: this is the name of this unit (required),
- Description: optional description of the unit,
- Color*: this is the color associated with this unit (required). Color must be in hex format including the # character (e.g. #FF0000 for red).
Lab. Tests tab
This tab allows customization of user-defined lab tests. These tests are displayed on the Lab Tests page → User-Defined tab.