General Settings
Creating a Figure Template or a Log Template begins with general settings. The following describes various settings available for a template (items marked by * are only applicable to a log template):
Basic Settings
Include the following:
- Template Name: enter a name or title for your template. This helps finding this template in the list, during generating the reports.
- Measurement Units: determines whether millimeter (mm) or inch (in) is used for size of the log columns and other elements on the header and footer of the report.
- Log Page Depth*: determines the depth range shown on each page of the test hole log (e.g. 20 ft/m of depth on each page). The unit of the page depth depends on the unit system of the project for which the borehole log is being generated.
- Line Thickness: determines the line thickness used in the entire report.
- Advanced Settings: see this section for how these settings are used.
Font Styles*
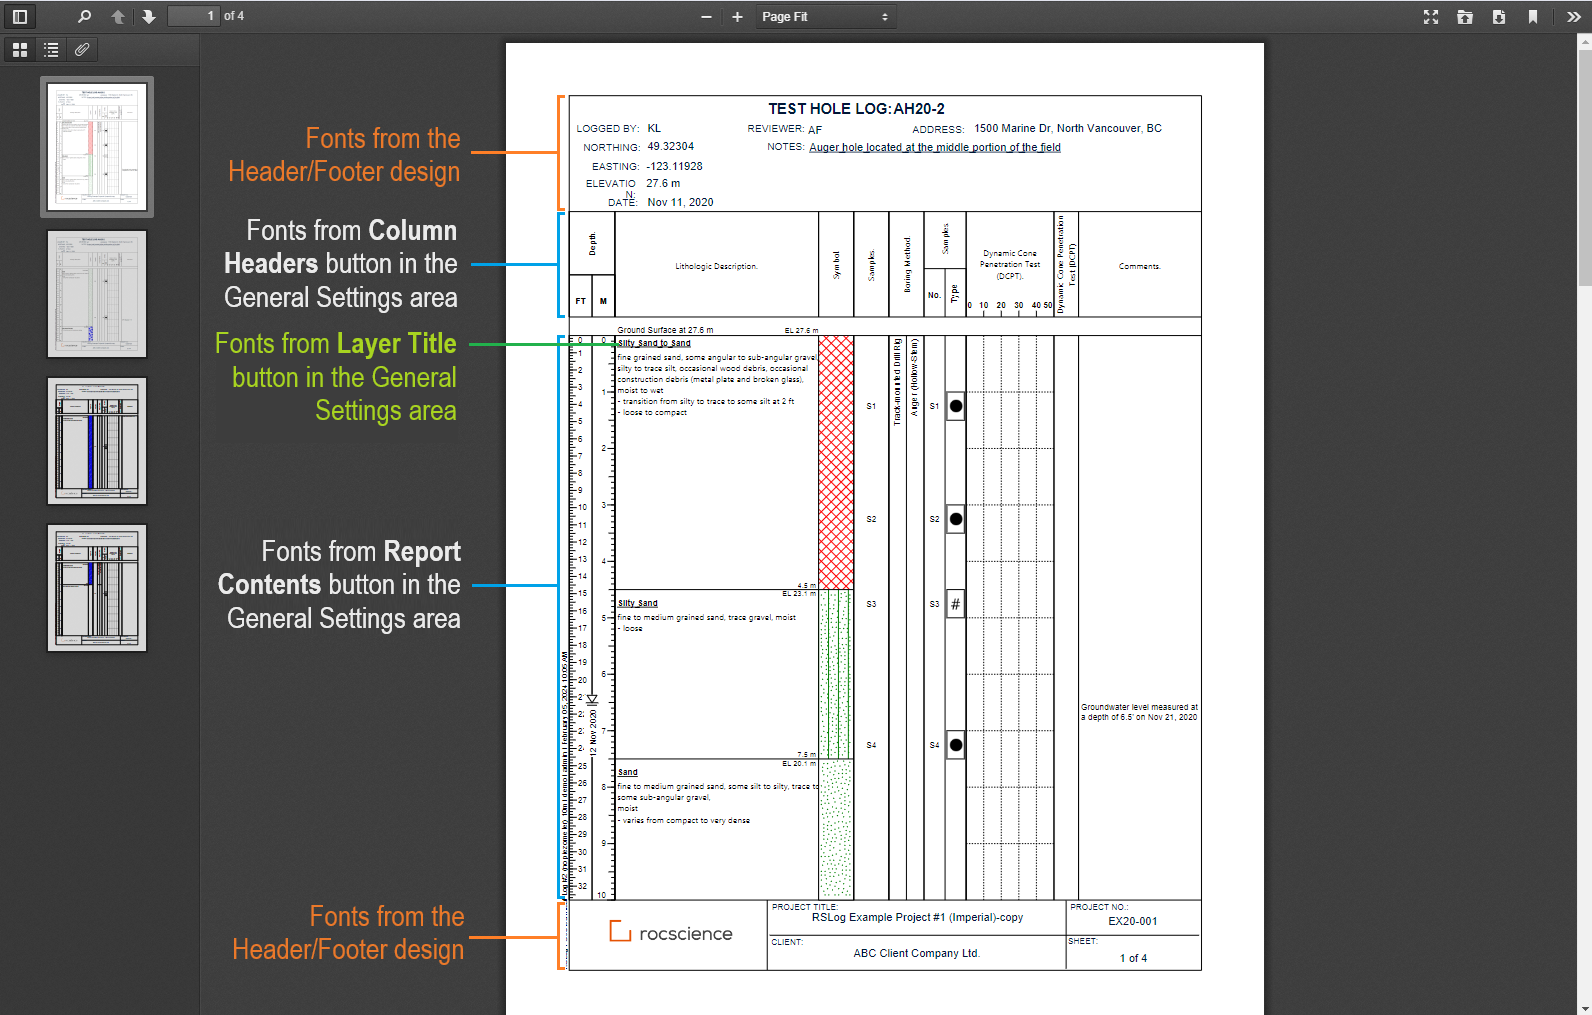
Click Assign Font Styles to select different font styles for the following sections of a borehole log report:
- Column Headers: click on this button to change the font size of the log column headers.
- Report Contents: click on this button to change the font size of the report contents (anything depth-related in the borehole log).
- Layer Title: click on this button to change the font size used for soil/rock layer titles.
The screenshot below explains the source of the fonts used in various sections of a report:
Printing Scale*
This section shows the actual printing scale of the borehole log calculated based on: paper height, top and bottom margins, heights of the header and footer, height of the column-headers, and the page depth. If you are trying to achieve a certain printing scale (e.g. 1 cm on paper = 10 m of borehole depth) please try editing the above-noted parameters.

Page Layout & Header/Footer Design
To select paper size, orientation, and margins click Customize Layout button. This opens the Header/Footer Designer on a new page.
Advanced Settings*
The checkboxes below the Font Styles section provide the following options:
- Use a separate template for subsequent pages: if selected, pages after the first page will use the log template selected from this dropdown,
- Indicate the bottom of borehole in all log columns: this option draws a horizontal line at the borehole depth,
- Include the depth and elevation log columns: if this option is selected, the horizontal line at the borehole depth will extend to the depth and elevation scale columns,
- Show the gap between the column headers and column body: if selected, a 10 mm gap will be added between the column-headers and the top of columns. This gap is where the Start Notes and elevation of the first layer will be shown. In addition, piezometer/well ID and stickup will be printed in this area,
- Show the start notes: if selected, the Start Notes will be shown at the top of the first layer in the log,
- Cut off the log columns below the bottom of borehole: if this option is selected, all log columns will be cut off below the borehole depth, (see screenshot below):
- Show 'featured' photos on the last page: if selected, test hole featured photos will be displayed within the blank area at the bottom of the last page. If the white space available on the last page is less than 20% of the page height, a new page will be created,
- Show the termination notes: if selected, the Termination Notes will be shown below the bottom of the last layer in the log:
- Place the Termination Notes below the borehole: The Termination Notes will be centered in the available area below the borehole, otherwise it will be aligned with the lithologic description column.

Log Columns
The list of log columns in a template is shown in a table at the lower portion of the page. Please see more on this page.