gINT Import
The gINT Import feature is accessed from the left menu panel under the Import page and allows the user to import their data from a gINT file to their RSLog account. This feature is specifically useful when a user does not have access to gINT Software anymore, or if they would like to switch to RSLog and want to import their previous projects into their RSLog database.
To best utilize this feature, it is recommended that the user has a good understanding of database design as well as the structure of their gINT file.
What is a Database?
A Database refers to a set of related data and the way it is organized. Access to this data is usually provided by a Database Management System (DBMS) consisting of an integrated set of computer software that allows users to interact with one or more databases and provides access to all of the data contained in the database.
Each database comprises a number of Tables. A table is a collection of related data held in a table format within a database. It consists of columns (or 'fields') and rows (or 'records').
Requirements for gINT Import
This feature requires one gINT database file (*.gpj or *.mdb) and an optional gINT library file (*.glb).
Limitations
This import tool assumes that the gINT data for each entity (e.g. projects, boreholes, stratigraphy, etc.) is stored in one table. For example, if the data for soil and rock strata are stored in different gINT tables, only one of these tables could be selected as the source of data.
Overview of gINT Import Process
This feature reads project data from the gINT file and writes data in your RSLog account. Due to the flexibility of gINT database files, the import tool needs to know where in the gINT file specific data is stored. For example, most gINT files store Project Title in PROJECT table and Name or Title field. Using the gINT Import tool, there are two types of 'data mapping' that needs to be done:
- Simple Data Mapping: Simple data such as project name, borehole depth, etc. only require determining the 'table' and 'field' in the gINT file where the data is stored.
- List Data Mapping: For more complex data types such as Sample Types, Soil Classification, Drilling Methods, etc. each item in the gINT list should be mapped to its corresponding 'type' in RSLog list. For example, in your gINT file you may have a sample type saved as "AUG", representing a soil sample taken from an auger flight during drilling. In your RSLog account you want to link this type of sample to RSLog Auger Sample.
When you open the gINT Import tool for the first time, the program automatically selects the default table and field names for part of the gINT data structure (depending on the structure of the gINT file loaded), however you will be able to review and edit this setting using the aforementioned two types of data mapping.
Selecting the gINT File
- Click on the Browse button next to Choose gINT File to select your gINT project file. This will initiate data processing. Once completed, you will see several tabs on the gINT Import dialog.
- If you have your lookup lists stored in your gINT library file, click on the Browse button next to Choose Library File to select this file.
Please note this is optional and if you don't have a library file, you can still setup your List Data Mapping manually.
List of Data Entities
Once your gINT file is processed, the dialog will show the list of Data Entities such as Projects, Boreholes, Samples, etc. in various tabs. Each tab shows the list of items, properties, available for each Data Entity (see screenshot below). Each table is structured as follows:
- Property (RSLog): shows the name of the property for a specific RSLog data entity. For example, each project (as Data Entity) has a Title (as property).
- Type: the data type for each property is shown in this column.
- gINT Table: indicates the table in the gINT file where the data for this property is stored.
- gINT Field: indicates the column (field) in the select gINT Table where the data for this property is stored.
- gINT Example Value (1st Record): shows the actual value of the property for the first record in selected gINT Table.

Simple Data Mapping
The first time you use the gINT Import tool, the program automatically selects the default table and field names for the most common data entities.
- Review /select the table and field selected for each item in the tables. You can use the example value shown in the last column to verify if the right combination of table and field is selected.
- Go through all the tabs and make sure that data mapping is completed for all data entities. Depending on the structure of your gINT files, some tabs may not be relevant. For example if piezometer data is not stored in your gINT file, you can skip settings for Piezometer/Well tab.
List Data Mapping
Where the value of a property in RSLog (e.g. project 'unit system') should be selected from a list of options, an ![]() icon will be displayed next to the gINT Field dropdown. Clicking on this icon will open the Data Mapping page, allowing a user to link the gINT lookup lists to the RSLog lists.
icon will be displayed next to the gINT Field dropdown. Clicking on this icon will open the Data Mapping page, allowing a user to link the gINT lookup lists to the RSLog lists.
There are two options for list data mapping:
- Manual Mapping: If you know the exact phrases used in your gINT data structure, enter it in the first column for each RSLog sample type. Please note by pressing Enter, the item is added to the list and you can start entering new item for the same RSLog value, if it is necessary.
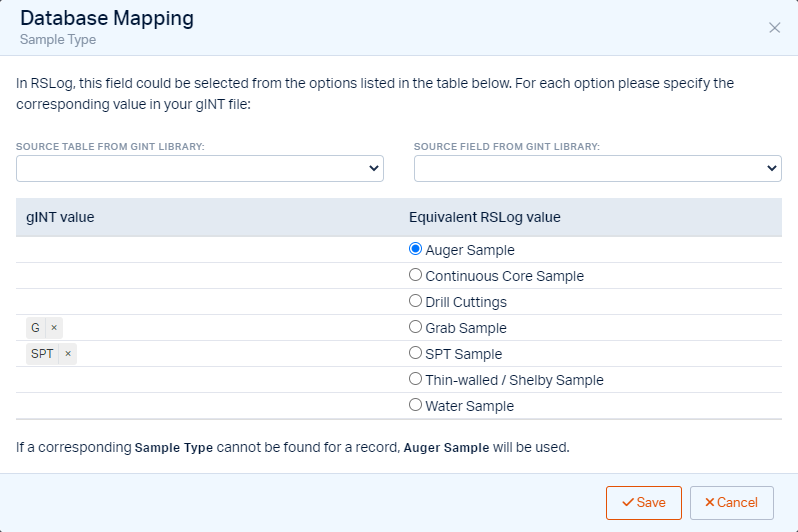
- Library Mapping: If you have loaded a gINT library file, use the dropdowns at the top of the page to select the library table and field containing the list. In this example, the SAMPLER TYPE table and Name field are selected (see screenshot below). By clicking in each cell in the first column, the list of all sample types from the library file will be shown. Select the desired item(s) from the list.

Once your data mapping is completed, click the Save button. Your settings will be saved under your account and next time you use the gINT Import tool, your settings will be loaded automatically.
Importing Data
Once all settings are completed, click on the Import Data button. This will create a new project in your RSLog account and all the 'mapped' data will be imported.
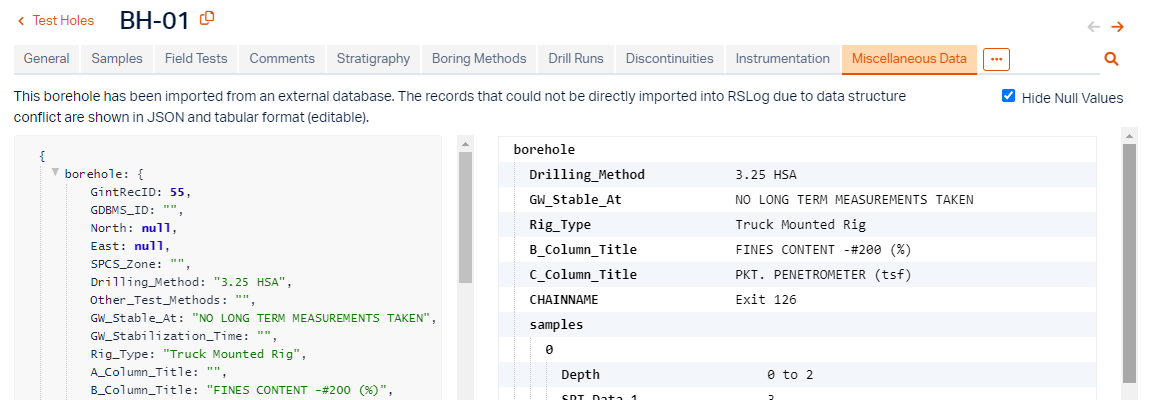
What Happens to the Unmapped Data?
The data that is not directly 'mapped' between your gINT and RSLog account will be imported to your new RSLog project. This data is typically shown in Miscellaneous Data tab of each borehole (see below).
Batch Import
This feature is under development and will be available soon.