Add Bolt Pattern
A regular pattern of bolts can be applied to the perimeter of the excavation, with the Add Bolt Pattern (End Support) option. The pattern location and spacing, bolt length and orientation can all be defined by the user.
To apply a pattern of bolts to the excavation ends:
- First, make sure you are viewing the End Support Designer view. Select the End Support Designer
 button from the toolbar.
If this button is disabled, make sure that the Compute End Wedges option is turned on in Project Settings. - Select the Add Bolt Pattern
 option from the Sidebar or the Support menu.
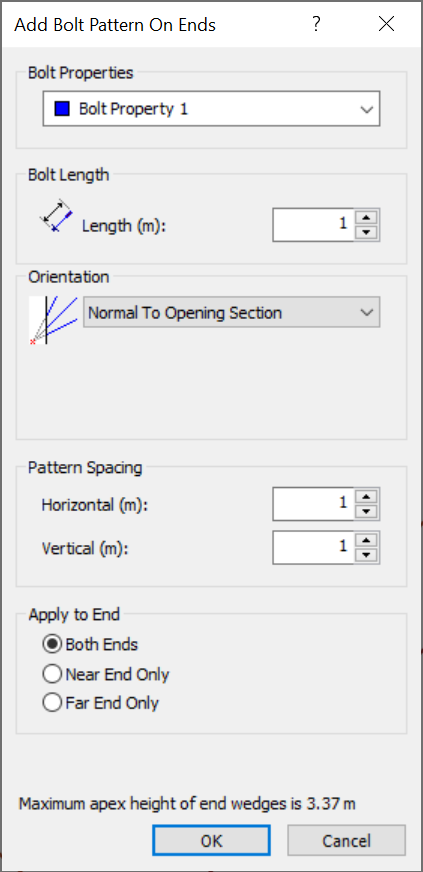
 - You will see the Add Bolt Pattern On Ends dialog.

Add Bolt Pattern On Ends dialog - In the Add Bolt Pattern On Ends dialog, enter the following information and select OK.
- Bolt Properties
- Bolt Length
- Orientation
- Pattern Spacing
- Apply to End
- You will then be prompted to enter a point which defines the location of the pattern. The point can be anywhere inside the Opening Section boundary. You can enter this either:
- Graphically with the mouse (you will see a grid of dots representing the pattern, which follows the mouse movement), OR
- Type the coordinates in the prompt line.
As soon as the point is entered, the Bolt Pattern will be added to the ends of the excavation. All bolts are installed normal to the plane of the Opening Section.
Bolt Properties
Assign the desired bolt property to the pattern. This will apply to all bolts in the pattern. Bolt properties are created and defined with the Bolt Properties option.
Bolt Geometry and Pattern Placement
Bolt Length
The length of all bolts in the pattern. Note that the Maximum Apex Height of the End Wedges is listed in the dialog. You can use this as a guide for setting the bolt length.
Orientation
The orientation of the Bolt Pattern which can be defined as one of the following:
- Normal to Opening Section - all bolts will be normal (perpendicular) to the Opening Section end.
- Local Trend and Plunge - this allows you to define the trend and plunge of the bolts in the pattern relative to the tunnel axis direction (i.e., the tunnel axis acts as the local azimuth).
Pattern Spacing
You can define the spacing of bolts independently in the Horizontal and Vertical directions.
Apply to End
By default, the Bolt Pattern is applied to Both Ends (i.e., Near End and Far End). You also have the option to apply it to Near End Only or Far End Only.
Display of Bolt Pattern on Ends
When a Bolt Pattern has been added to the ends of the excavation, the pattern will be displayed on the End Support Design View as a grid of points. To view the bolt length and pattern in 3-dimensions, use the 3D Wedge View or the End Wedges View.