Add Pressure
The Pressure option in UnWedge can be used to model the equivalent support pressure of any type of support system. It could also be used to model any type of general loading, which could be represented as pressure on the excavation boundary.
Notes:
- The pressure is always applied normal to the excavation boundary.
- The magnitude of the pressure is uniform.
- You can apply more than one Pressure to the perimeter boundary. For example, you can use multiple pressures to model support/loading which is not uniform, by entering a different magnitude for each Pressure. However, the extents of multiple Pressures are not allowed to overlap each other on the perimeter.
To add pressure to the perimeter:
- First, make sure you are viewing the Perimeter Support Designer view (select the Perimeter Support Designer
 button from the toolbar).
 - Select the Add Pressure
 option from the Support menu.
 - You will see the Add Pressure on Perimeter dialog.
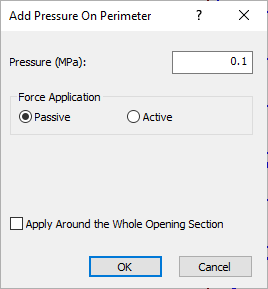
- In the Add Pressure on Perimeter dialog:
- Enter the magnitude of the support Pressure.
- You can select whether the pressure will be applied as an Active or Passive force in the analysis (i.e., Force Application). Default Force Application = Passive. For details, see the Active / Passive Force Application topic in the Theory section.
- If you want to apply the Pressure around the entire perimeter, select the checkbox Apply Around the Whole Perimeter.
- Select OK. The Pressure will be applied around the entire perimeter of the model (in this case you will exit the option, and step 5 does not apply).
- If you are applying Pressure on part of the perimeter, you will then be prompted to enter the starting and ending points for the Pressure on the perimeter. This can be done graphically with the mouse, or by entering coordinates in the prompt line.
- Start Point: You will notice a cross-hair icon which appears on the Opening Section boundary, and follows the mouse movement. You can use this cross-hair to graphically locate the starting point of the Pressure on the perimeter. If the Snap option is toggled, the cross-hair will snap exactly to vertices. Snap can be toggled in the right-click. Click the left mouse button when the cross-hair is at the desired location. Alternatively, you can type in the coordinates of the start point in the prompt line.
- End Point: As you move the mouse, the Pressure will be drawn on the model, in a counter-clockwise direction from the Start point. The Pressure will appear as a series of arrows oriented normal to the perimeter, pointing outward. Use the cross-hair cursor to graphically locate the endpoint, or type the coordinates in the prompt line.
- When the End Point has been entered, the Pressure will be added to the model
The Pressure is always created in a counter-clockwise direction around the perimeter, from the Start point to the End point. Therefore you must define the start and end points accordingly. If you enter the points in the wrong order, you will have to start over. If this occurs, press ESCAPE to exit the option, or if you have already added an incorrect Pressure, select Undo.
Multiple Pressures
On the perimeter, you may define more than one Pressure if necessary, by repeating the above steps. The pressures can be located anywhere on the perimeter, however, they cannot overlap (the program automatically checks for this, and does not allow you to add overlapping pressures).