Add / Edit Shotcrete Layer
Shotcrete can be added to the ends of the excavation with the Add/Edit Shotcrete Layer option (End Support Designer view).
Because the shotcrete location does not have to be defined, the application of shotcrete to the ends is simplified - adding or removal of layers is all accomplished with one dialog, as described below.
To add/remove shotcrete on the excavation ends:
- First, make sure you are viewing the End Support Designer view. Select the End Support Designer
 button from the toolbar.
 - Select the Add / Edit Shotcrete Layer
 option from the Sidebar or the Support menu.
 - You will see the Add / Edit Shotcrete Layers On Ends dialog.
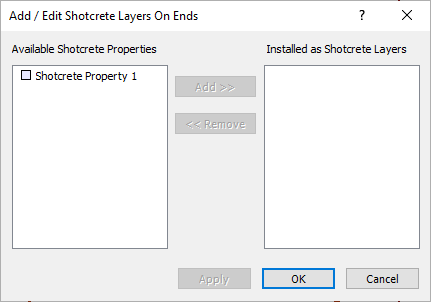
Add / Edit Shotcrete Layers on Ends Dialog
A list of all currently defined Available Shotcrete Properties types will appear at the left of the dialog.Shotcrete properties are created and defined with the Shotcrete Properties option. If Shotcrete layers have been applied, the applied layers are listed at the right of the dialog under Installed as Shotcrete Layers. - To add shotcrete layers:
- Click on the name of a shotcrete property type under the Installed as Shotcrete Layers list at the left of the dialog, and select the Add button. This will define an installed layer of Shotcrete with the selected property type. The Installed as Shotcrete Layers list at the right of the dialog keeps track of all installed Shotcrete layers.
- You can also just double-click on a Shotcrete property type from the Installed as Shotcrete Layers list (at the left of the dialog) to add a layer to the Installed as Shotcrete Layers list (at the right of the dialog).
- If you have multiple property types and layers, multiple layers can be simultaneously added by holding down the SHIFT and/or CTRL keys, while selecting from the property list in the dialog, and selecting the Add button.
- To remove existing shotcrete layers:
- Click on the name of a Shotcrete layer from the Installed as Shotcrete Layers list (at the right of the dialog), and select the Remove button. This will remove an installed layer of Shotcrete.
- You can also just double-click on a Shotcrete layer from the Installed as Shotcrete Layers list (at the right of the dialog) to remove the layer.
- Multiple layers can be simultaneously removed by holding down the SHIFT and/or CTRL keys while selecting from the layer list in the dialog, and selecting the Remove button.
- Select OK when you have finished adding/removing layers, and the layers will be applied to the ends of the excavation.
Ordering of Layers
If you have multiple shotcrete layers, the ordering of the layers in the Add / Edit Shotcrete Layers dialog, does not matter. The layers can be applied in any order, and this will not affect the results of the UnWedge analysis in any way.
Display of Shotcrete on Ends
On the End Support Designer View, applied Shotcrete layers are not displayed directly on the Opening Section (because it would be impossible to represent the display of multiple layers). Instead, applied Shotcrete on the excavation ends, is represented by a Legend, which indicates the applied shotcrete layers (name and colour). The Legend appears in the lower right corner of the End Support Designer view.