Add Zone
A pile capacity Zone containing a number of different pile types can be added to the model with the Add Zone option. Within a Zone, you can add some or all pile types defined in the Pile Types dialog.
To add a Zone:
- Select Rectangle
 or Polygonal
  from the Zones tab.
 - In the Add Zone dialog:
- Set a unique Name for the Zone. By default, the name will be "Zone" followed by the Zone's ID.
- To add a Base Pile Type either select the Add
 button until all Pile Types are exhausted, or the Add Multiple button which brings you to the Add Multiple Pile Types dialog for quick selection.
 - To delete a Base Pile Type, highlight one or more rows and select the Delete
 button.
 - For each Base Pile Type, set a unique Pile Type Designation which will be used to identify the pile in the Zone.
- For each Base Pile Type, the Pile Length can either be the Default length of the Base Pile Type or a Custom length. Toggle the Pile Length dropdown to Custom to enable the Pile Length column.
- Set the Cut-off Elevation. This value will override the Pile Head Elevation for all piles in the Zone.
- Set the Pile Depth Increment. This value will override the Depth Increment used for all piles in the Zone.
- Select OK to exit the dialog and begin drawing the Zone in the Plan View.
If you initially selected Add Rectangular Zone: - Pick the first corner of the Zone (or enter as X,Y coordinates in the command prompt and hit ENTER).
- Pick the second corner of the Zone (or enter as X,Y coordinates in the command prompt and hit ENTER).
If you initially selected Add Polygonal Zone: - Pick all the vertices to define a polygon for the Zone (or enter as X,Y coordinates in the command prompt and hit ENTER). Please note that it must be a convex polygon to ensure a representative average soil column at the centroid of the Zone.
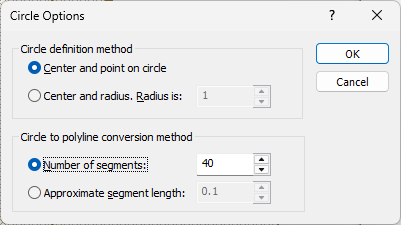
Circle Options
When adding a zone as a polygon, there are additional options available for assisting in the creation circular shaped zones. To access the Circle Options dialog:
- Select Zones > Add Zones > Polygon
- Define the Zone in the Add Zone dialog (explained above) and click OK.
- Enter i into the Command Prompt and press Enter. The Circle Options dialog will appear.
View Zone Coordinates
After creating a Rectangular zone, the user can review the zone coordinates by right clicking on a zone and selecting View Zone Coordinates.
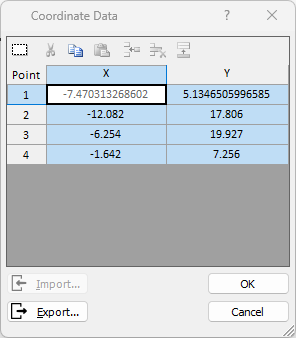
From this dialog the coordinates can be reviewed, copied to the clipboard, or Exported to a csv.
Add Multiple Pile Types
The Add Multiple Pile Types dialog allows users to quickly select/deselect Base Pile Types in the Zone. Select All and Deselect All options are also available. The Pile Type Summary shows the Cross-Section Type, Pile Length, Top Elevation, and Bottom Elevation of the Base Pile Type selected.