Rock Shapes
If you are using the Rigid Body method for your RocFall analysis, you can define rock Shapes when defining Rock Types in the Rock Type Library. You can choose from a wide variety of pre-defined smooth or polygonal shapes, or define custom polygonal shapes.
Defining Rock Shapes
To define rock Shapes:
- Select Rock Type Library
 from the toolbar or the Seeder menu.
In the dialog, you'll see two buttons for defining shapes - Smooth Shapes and Polygons.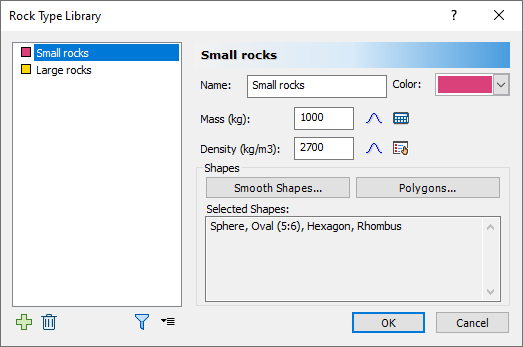
- Select the Rock Type in the list and click the button for the type of rock shape you want to assign.
For each rock type, you can assign any combination of smooth and/or polygonal rock shapes. For example, a rock type may be assigned:- a single rock shape
- a few selected rock shapes
- smooth shapes only
- polygonal shapes only
- any combination or number of smooth and/or polygonal rock shapes
- custom polygonal shapes
- Once you have selected the desired shape(s) as described below, click OK in the Shapes dialog to save the selections.
All currently selected shapes for each rock type appear in the Selected Shapes area, including both smooth and polygonal shapes. - Repeat the steps above as necessary for each rock type.
- Click OK in the Rock Type Library dialog to save all input.
Defining Smooth Rock Shapes
To define smooth rock shapes:
- In the Rock Type Library, click the Smooth Shapes
 button.
The Smooth Shapes dialog appears, listing the available smooth shapes.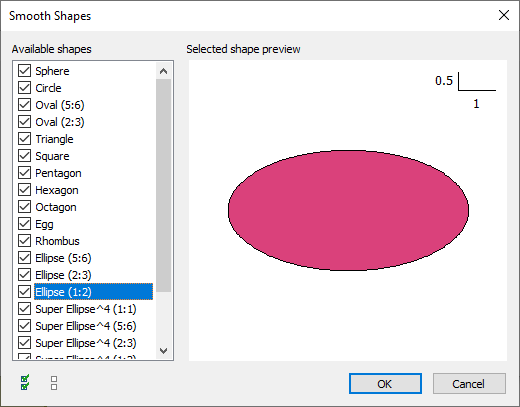
- Select the checkboxes in the list for the shapes you want to assign to the selected Rock Type. Sphere is selected by default.
TIP: You can use the icons in the bottom-left corner to select/deselect all shapes in the list.
- Click OK to save the selection and return to the Rock Type Library.
Defining Polygonal Rock Shapes
To define polygonal rock shapes:
button.
The Polygons dialog appears, listing the available polygon shapes.
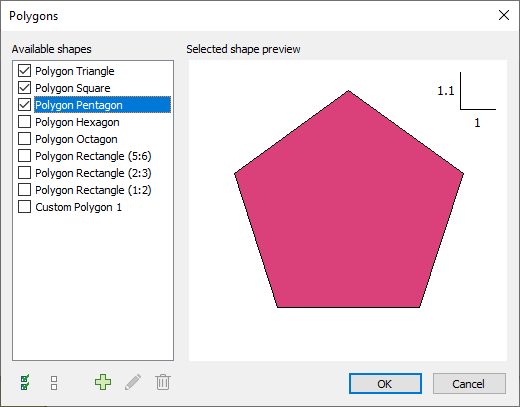
- Select the checkboxes in the list for the shapes you want to assign to the selected Rock Type. Sphere is selected by default.
- To define custom polygonal shapes, select the Custom Polygons
 button. See below for details.
 - Click OK to save the selection and return to the Rock Type Library.
TIP: You can use the icons in the bottom-left corner to select/deselect all shapes in the list.
Defining Custom Polygonal Rock Shapes
To define custom polygonal rock shapes:
- Select the Custom Polygons button in the Polygons dialog.
The Custom Polygons dialog appears.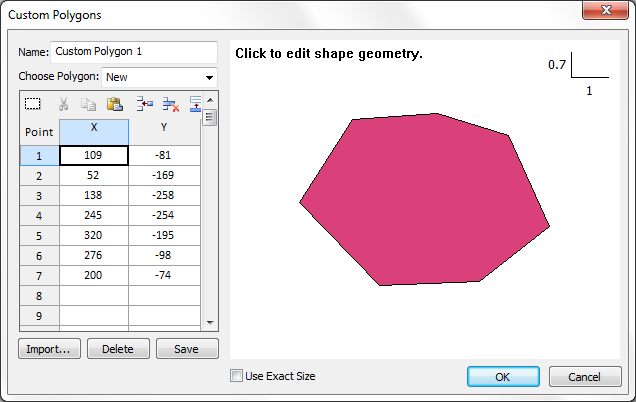
- To define a custom rock shape:
- Graphically click the mouse in the drawing area, OR
- Enter XY coordinates into the spreadsheet, OR
- Select the Import button to import coordinates from a text file or a DXF file
- Enter a Name for the custom polygon shape.
- If you want the size of the rock to be exactly defined by the coordinates you have entered, select the Use Exact Size check box. See below for details.
- Click OK to return to the Polygons dialog.
Notice that the Name of the custom shape you have just defined now appears in the list of Available Shapes and can be selected in the same manner as any of the pre-defined polygon shapes.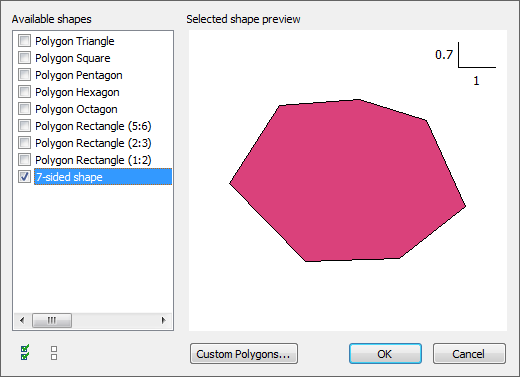
TIP: To edit a custom polygon, select it in the Polygons dialog list, click Custom Polygons, and edit the shape the same way you created. You can also delete a custom polygon shape by clicking the Delete button.
- Click OK to close the Polygons dialog.
- Click OK to close the Rock Type Library.
CUSTOM POLYGONAL SHAPES (USE EXACT SIZE)
In the Custom Polygons dialog there is a Use Exact Size check box. The purpose of this option is as follows:
- If the Use Exact Size check box is turned ON, then the two-dimensional size of the rock generated by the analysis will be exactly determined by the XY coordinates you have entered for the custom rock shape. This allows you to define a custom polygonal rock with an exact two-dimensional size and shape. In this case, the mass of the rock determines the out-of-plane dimension of the rock shape, so you must take care to enter the correct rock mass for the desired size.
- By default, this check box is OFF. In this case, the final size of the actual rock generated by the analysis is determined by the mass and density of the rock, as described in the Rock Shape and Size verification document. The size of the rock is automatically generated such that the two-dimensional (in-plane) and third (out-of-plane) dimensions of the rock are approximately equal, in order to achieve the specified mass. This is the same algorithm used to determine the dimensions of all other rock shapes (smooth, polygon, or custom polygon).
Effect of Rock Shape on the Analysis
It is difficult to generalize the effect of rock shape in a rockfall analysis, and results will be dependent on slope geometry and material properties. You should choose shapes that most closely resemble the type of rocks you expect to encounter on your slope. Note the following:
- Smooth shapes may tend to roll for longer distances than polygonal shapes
- Polygonal shapes may tend to stop earlier than smooth shapes due to sliding on a flat surface, or they may travel further due to geometric impact considerations.
- Rounder shapes (e.g. circle, octagon) tend to travel further by rolling than oblong shapes (e.g. super-ellipse, rectangle)
See Tutorial 02 - Rock Shapes in RocFall and Tutorial 09 - Polygonal Rock Shapes in RocFall for some examples of the effect of rock shape on the analysis.