This tutorial demonstrates RocFall2's ability to define polygonal rock shapes with corners.
Topics Covered in this Tutorial:
Polygonal rock shapes
Smooth vs. Polygon comparison
Endpoint graphs
Finished Product
The finished product of this tutorial can be found in the Tutorial 09 Polygonal Shapes data file. All tutorial files installed with RocFall2 can be accessed by selecting File > Recent Folders > Tutorials Folder from the RocFall2 main menu.
2.0 Model
Let's start by opening the file for the tutorial:
Select: File > Recent Folders > Tutorials Folder and open the Tutorial 09 initial file.
You should see the following model.
This model already has all slope properties defined except for Crest Loss.
3.0 Rock Shapes
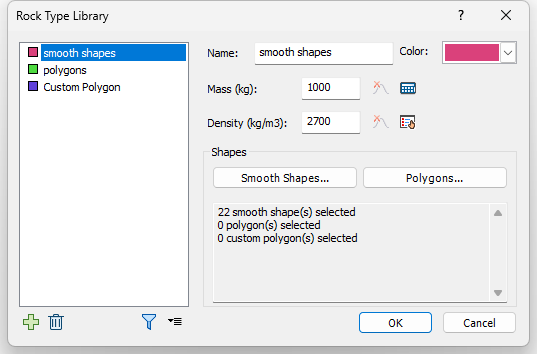
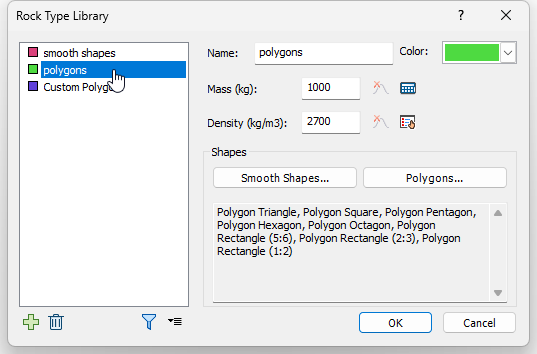
3.1 ROCK TYPE LIBRARY
Next we'll look at the options for creating rock shapes in the Rock Type Library.
Select Rock Type Libraryon the toolbar or the Seeder menu.
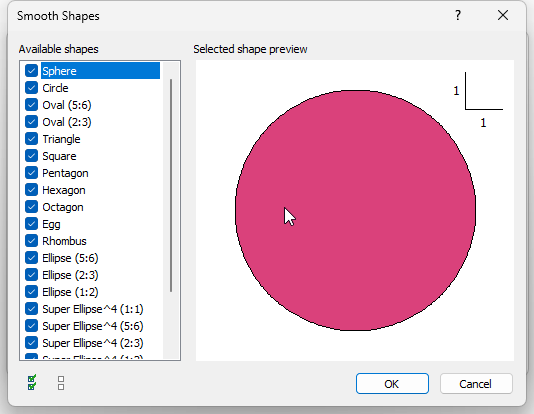
Notice that there are separate options for selecting Smooth Shapes or Polygons:
The Smooth Shapes option is exactly equivalent to the rigid body shapes available in earlier versions of RocFall2. These are also referred to as Fourier Shapes due to their mathematical formulation.
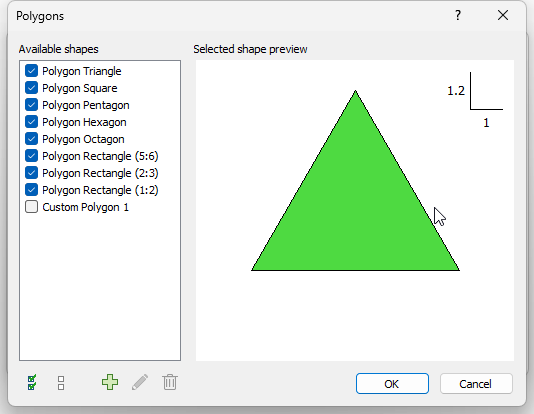
The Polygons option allows you to choose from pre-defined regular polygons (triangle to octagon) or to define custom shapes.
NOTE: In this example file, we have created two groups, one for smooth shapes and one for polygons. This was done for the purpose of comparing results with the filter options. However in general, you may combine smooth shapes and polygons in the same “group”, you do not have to assign them to separate groups.
Make sure smooth shapes is selected in the Rock Type list.
Click the Smooth Shapes button and note that we've selected all the available smooth shapes.
Click Cancel to close the dialog.
Select polygons in the Rock Type list.
Click the Polygons button and note that we've selected all available pre-defined polygons.
Click Cancel to close the dialog.
Click Cancel again to close the Rock Type Library.
3.2 PATH RESULTS
Now we compute to view the resulting rock paths. Since the seeder is set to throw 100 rocks, this should generate about 50 smooth shapes and 50 polygons.
Select Compute from the toolbar or the Analysis menu.
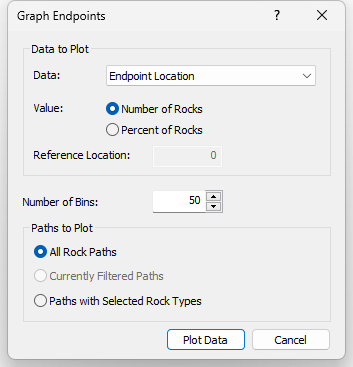
3.3 GRAPH ENDPOINTS
Next we'll generate an Endpoints graph to view the distribution of rock path end locations.
Select Graph Endpointson the toolbar or the Graphs menu. The Graph Endpoints dialog should appear.
Set Data = Endpoint Location.
Set Value = Number of Rocks.
Set Number of Bins = 50.
Set Paths to Plot = All Rock Paths.
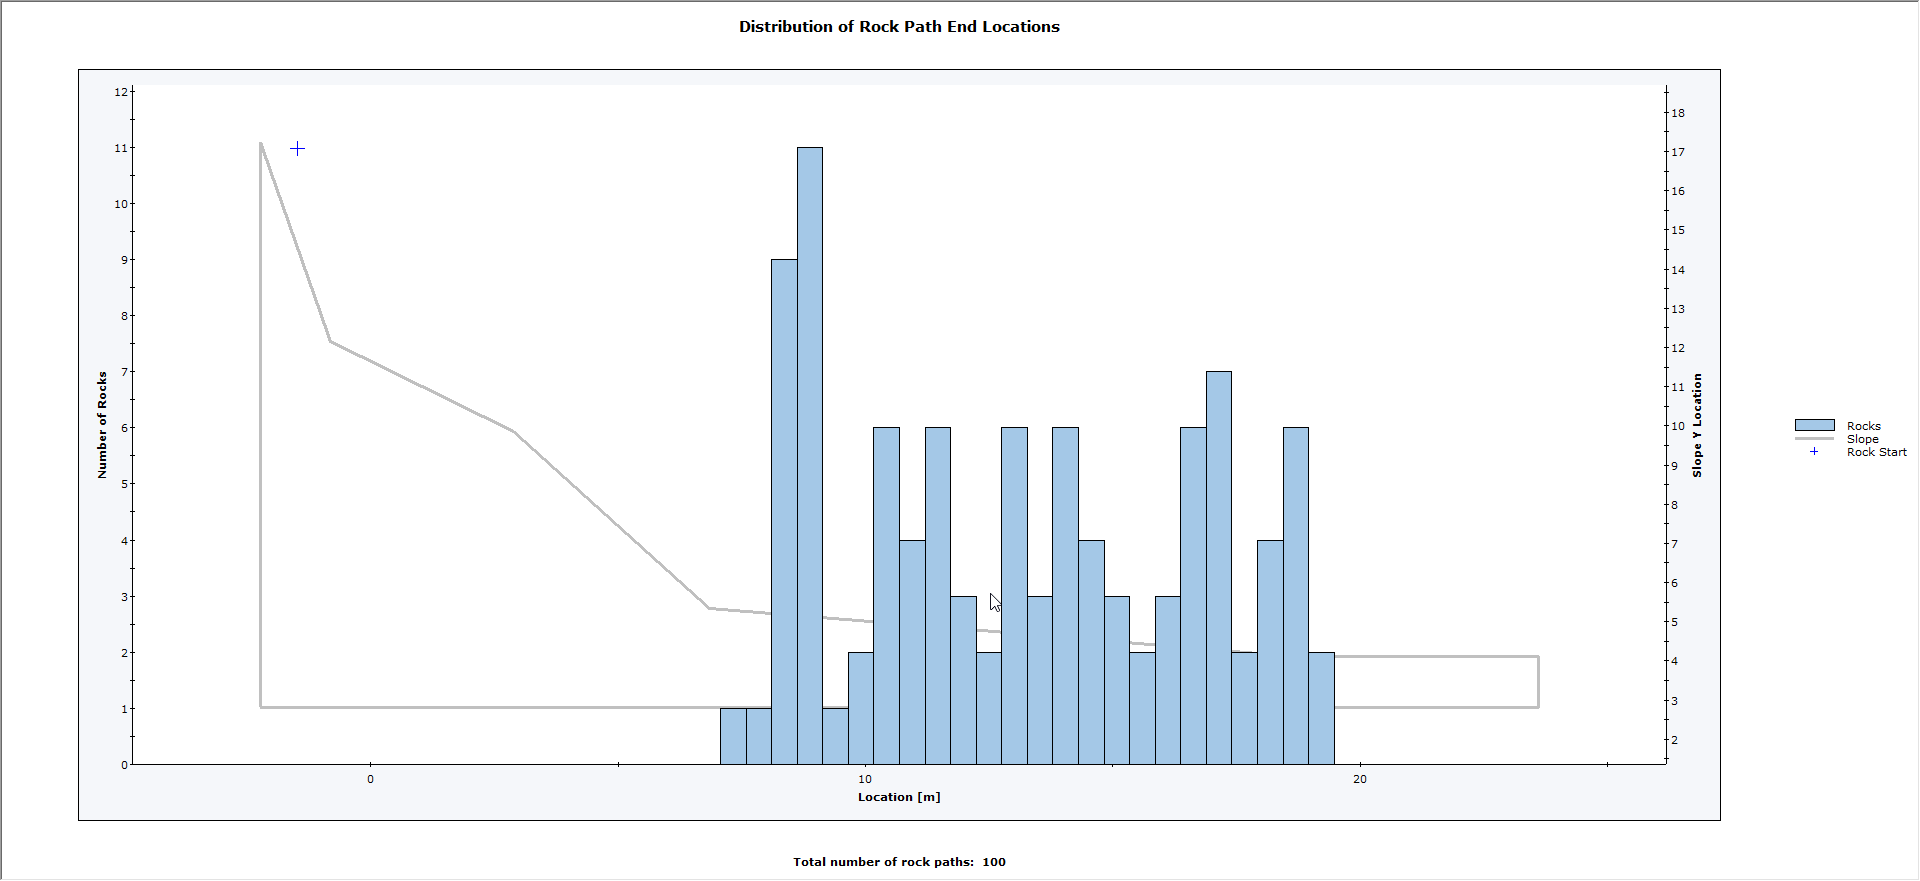
Select Plot Data to generate the Distribution of Rock Path End Locations graph.
3.4 FILTER ROCK TYPES
Now let’s use the filter options to see the effect of rock shape. We'll start by filtering on smooth rocks.
With the Endpoints graph in view, select Filter Results/Options on the toolbar or Results menu. You should see the Filter Results dialog.
Click Rock Type.
In the Filter Options popup, select Smooth Shapes as the Rock Type and click OK.
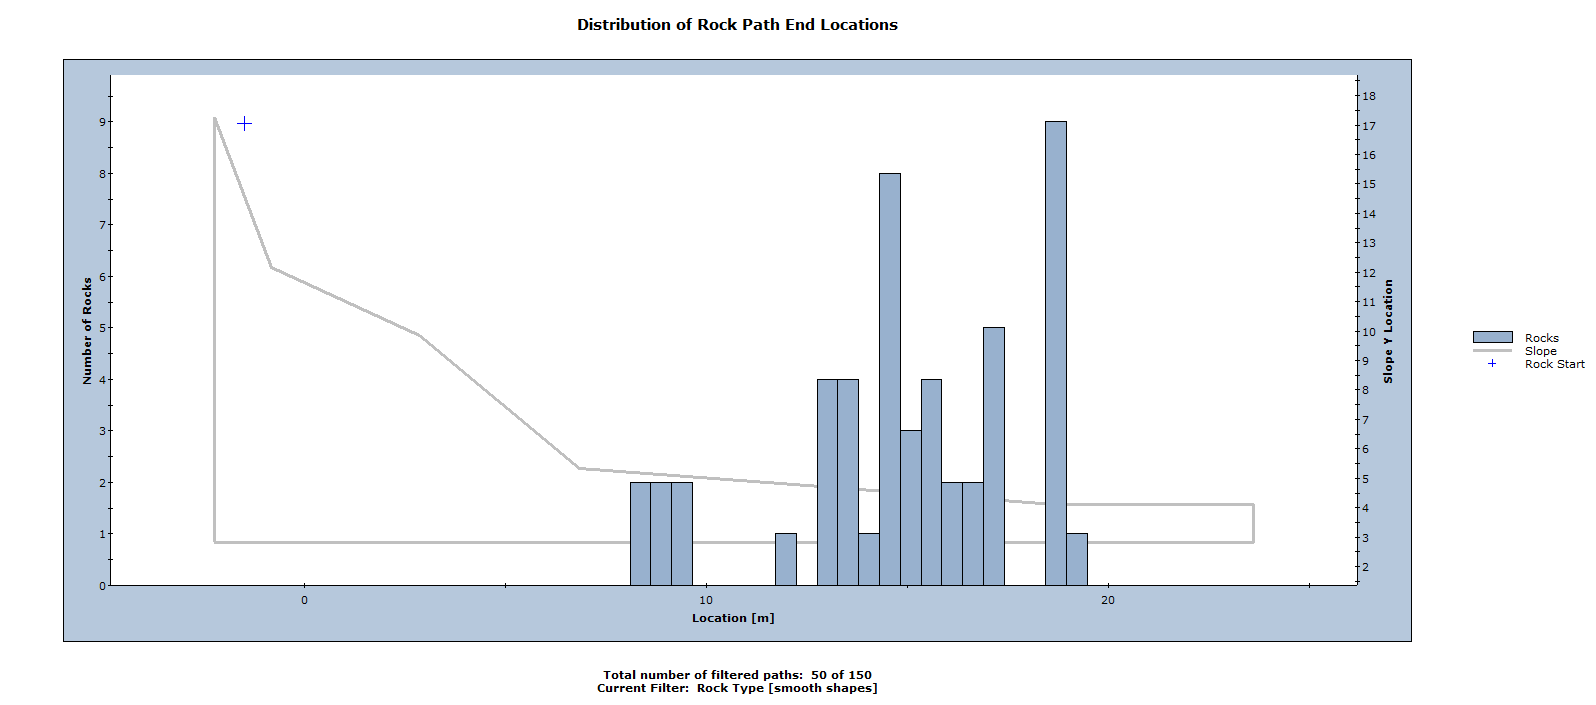
The endpoint graph should now look as follows:
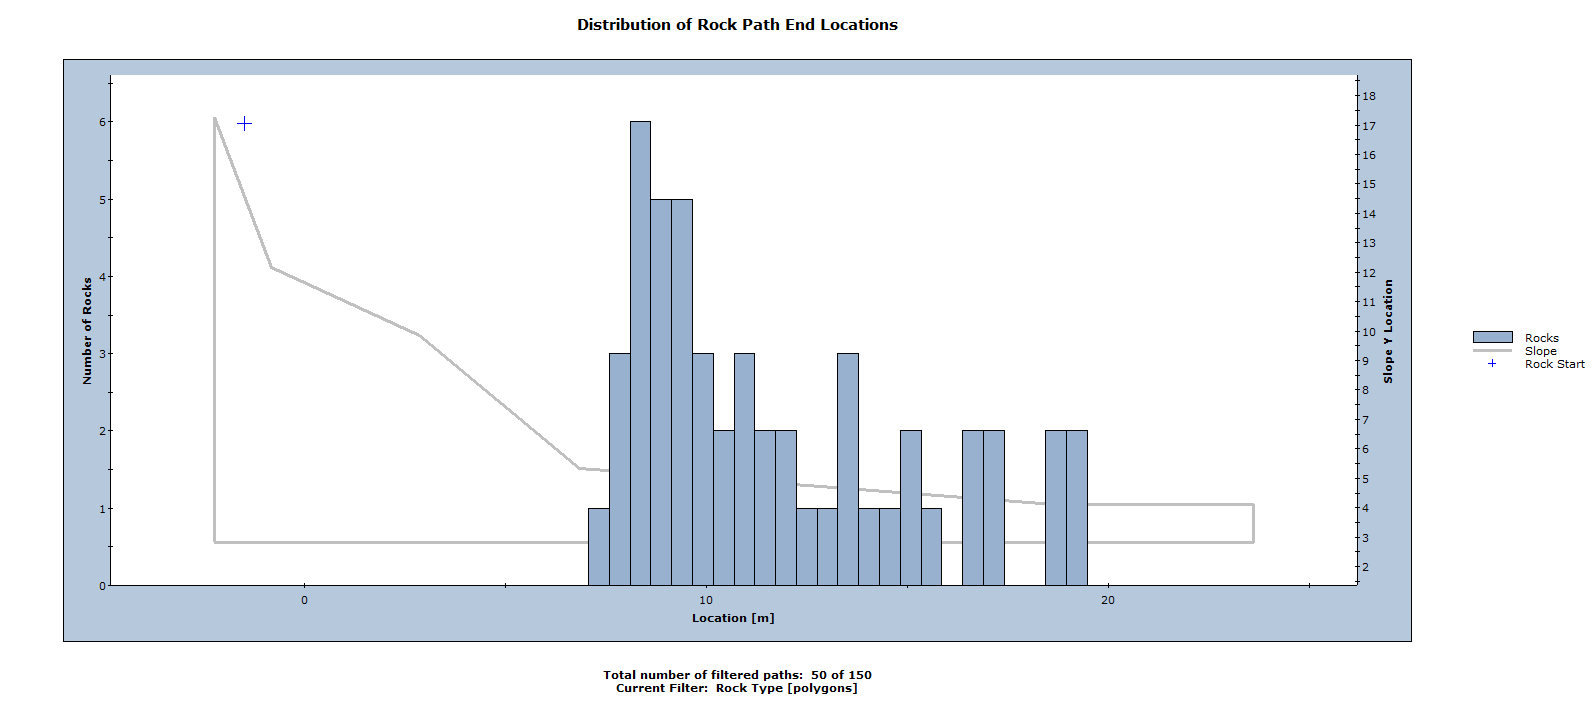
Now we'll filter on Polygons.
With the Endpoints graph in view, select Filter Results/Options on the toolbar or Results menu.
In the Filter Results dialog, click the Clear Filter button.
Click Rock Type.
In the Filter Options popup, select Polygons as the Rock Type and click OK.
Click OK.
The endpoint graph should now look as follows:
If you compare the endpoint graphs for smooth shapes and polygons, you can see that the distributions are different. The polygons have a more dispersed distribution, and some of them come to rest on the upper slope. In comparison, all of the smooth shapes have come to rest on the bottom sections of the slope model.
This is just a simple quick demonstration of how to assign rock shapes and compare results. You are encouraged to experiment further with different types of shapes (smooth and polygon) to see the effect on results for various types of slope models and input parameters.
4.0 Custom Polygons
In addition to the pre-defined polygons, you can also define custom polygonal rock shapes.
4.1 DEFINE CUSTOM POLYGON
Close the graph view.
Select Designon the toolbar to switch to Design Mode.
Select Rock Type Libraryon the toolbar or the Seeder menu.
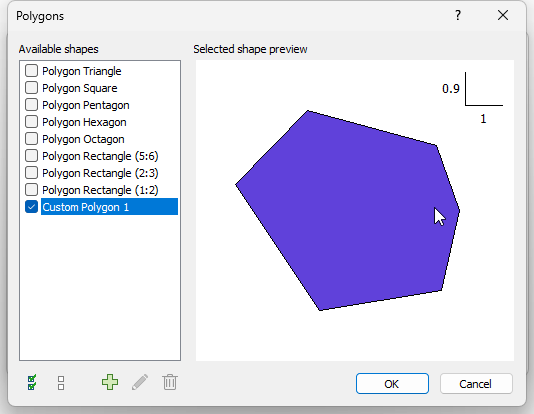
Select Polygons in the Rock Type list.
Click the Polygons button.
Select the Custom Polygon 1 check box at the bottom of the Available Shapes list.
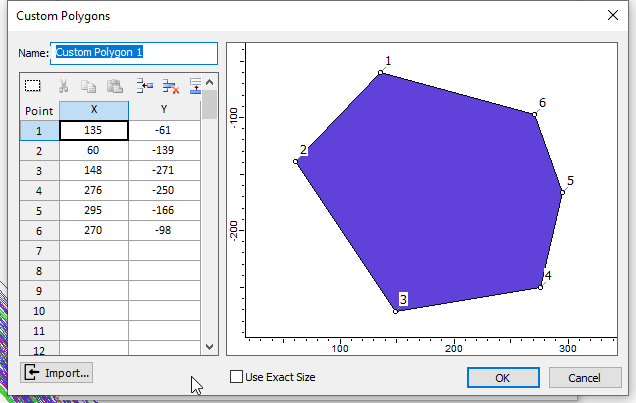
Select Custom Polygon 1 on the list and click the Pencil icon below the list.
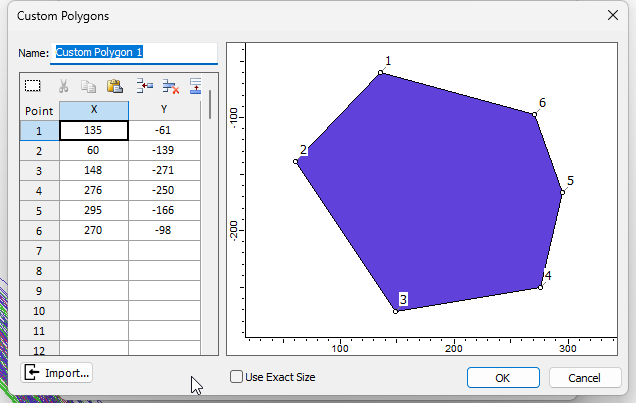
In the Custom Polygons dialog, define a rock shape by entering the coordinates shown below.
Click OK twice.
Back in the Rock Type Library, select Custom Polygon on the list.
Click the Smooth Shapes button, clear all the check boxes in the Smooth Shapes dialog and click OK.
Click the Polygons button, clear all the check boxes in the Polygons dialog except for Custom Polygon 1.
Click OK in both dialogs.
4.2 VIEW PATH RESULTS
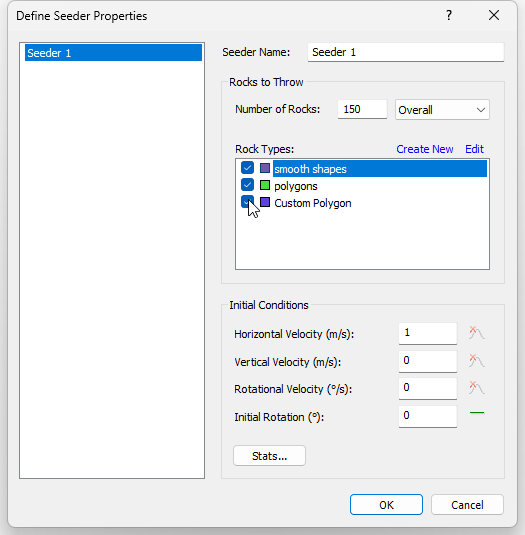
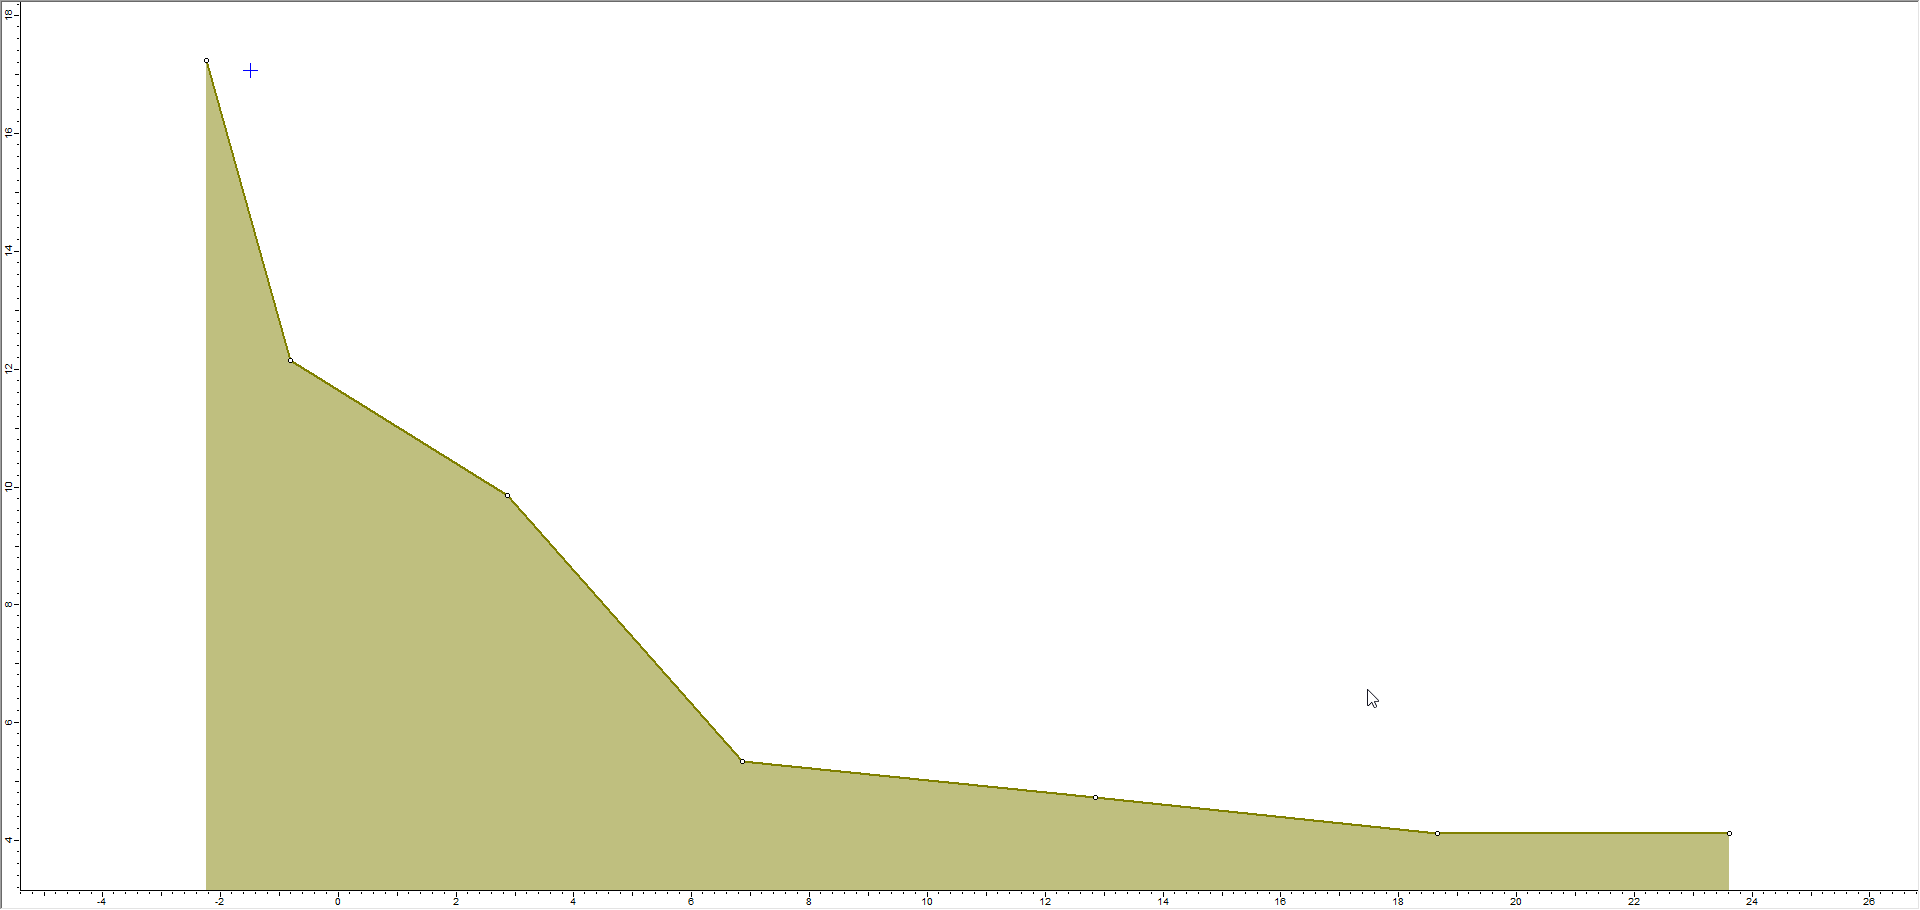
Now we'll view results, first changing the Number of Rocks to 150 and selecting the custom polygon we just created.
In the slope model, right-click the seeder (the blue cross at the top of the model).
In the popup menu, select Seeder Properties.
Set Number of Rocks = 150.
Select Custom Polygon in the Rock Types list.
Click OK.
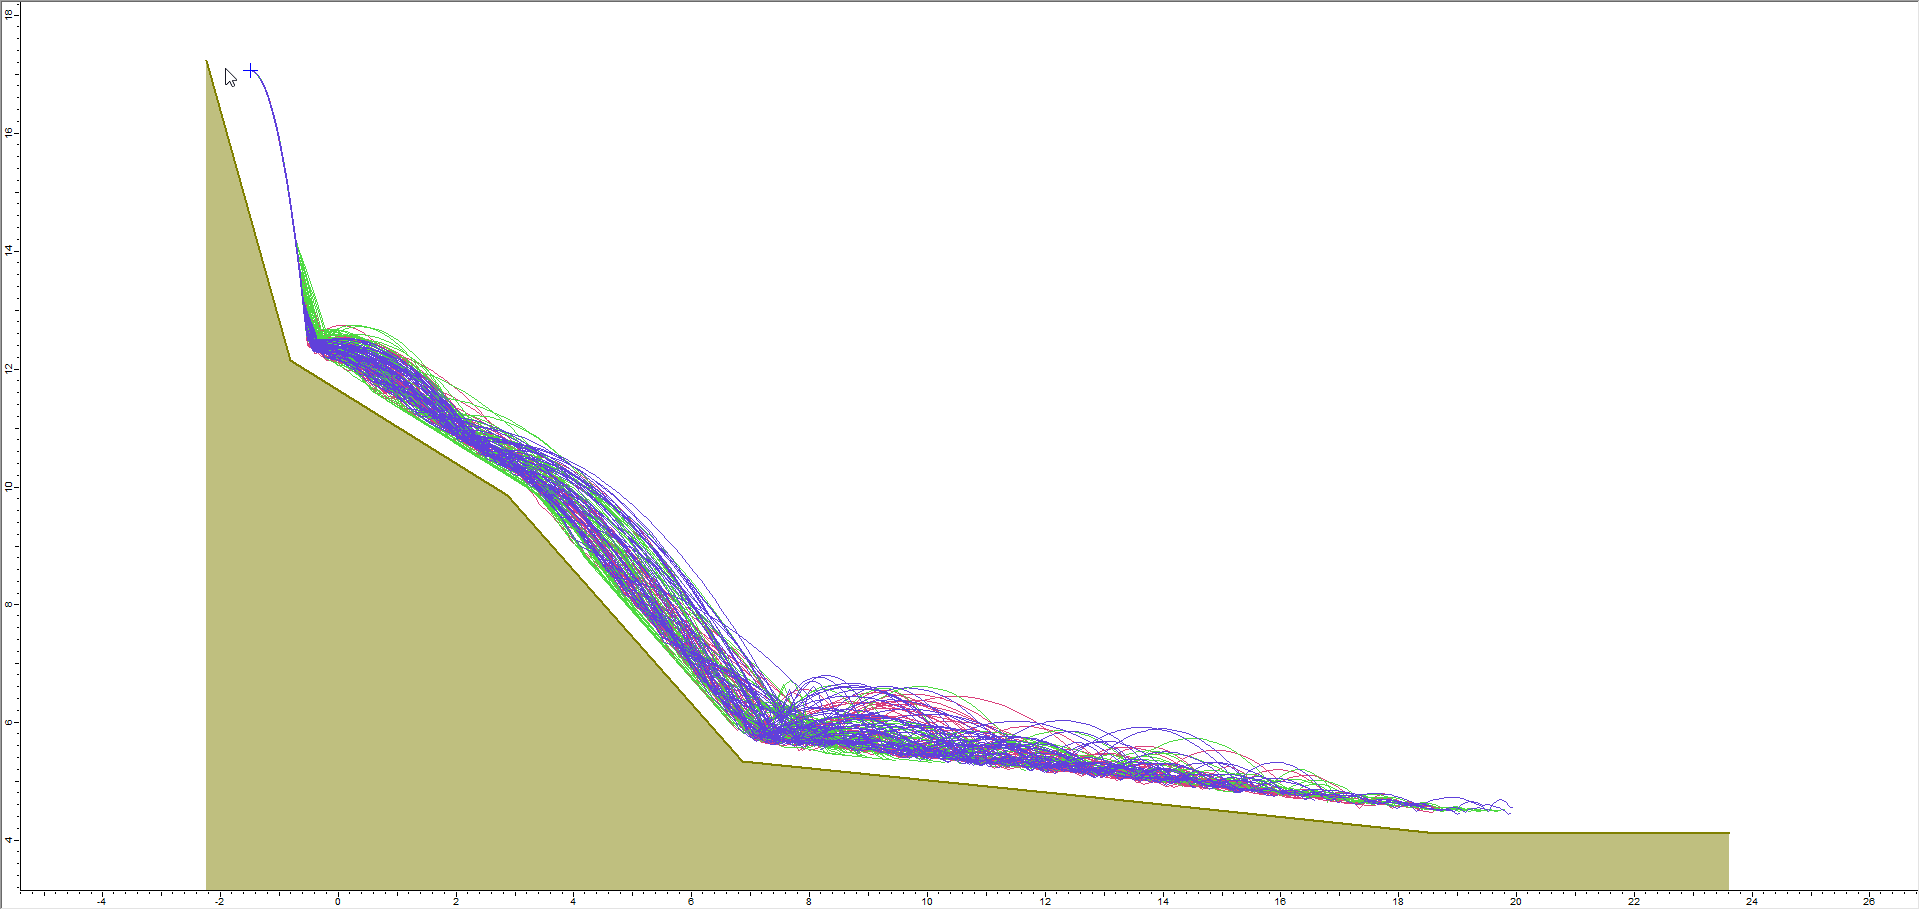
Select Compute from the toolbar or the Analysis menu.
You should see the following rock paths.
4.3 FILTER RESULTS
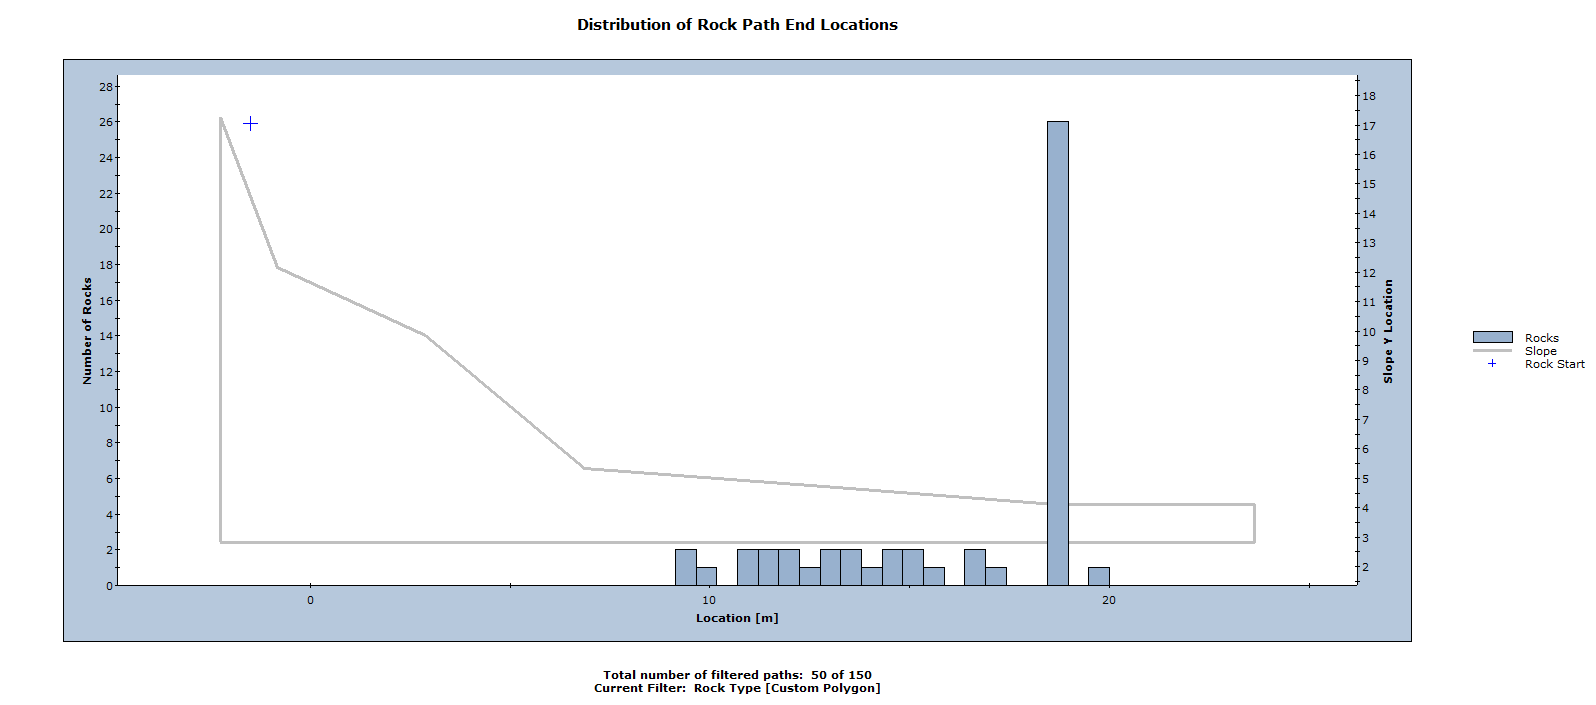
Next, filter results so you see only the custom polygon paths and endpoints.
Select Results > Filter Options.
In the Filter Results dialog, click Shape under the Available Filters.
In the Filter Options popup, select Custom Polygon as the Shape and click OK twice.
You should see the following filtered paths and endpoints.
Compare the endpoint distributions for the custom polygon versus the smooth shapes and regular polygons.
4.4 USE EXACT SIZE
In the Custom Polygons dialog, you will notice a check box for Use Exact Size.
This option allows you to define the actual size and shape of a rock using real coordinates (e.g., obtained from laser scanning). In conjunction with the rock weight, this allows you to define rocks of a specific shape and weight corresponding to actual rocks observed on a slope.
NOTE: If you do NOT use the Use Exact Size option, the rock size is automatically scaled according to the rock weight so the shape is preserved but the actual size is determined by the program. The scaling is done in such a way as to obtain a rock with approximately the same in-plane and out-of-plane dimensions.
This is left as an optional exercise to experiment with.

 from the toolbar or the Analysis menu.
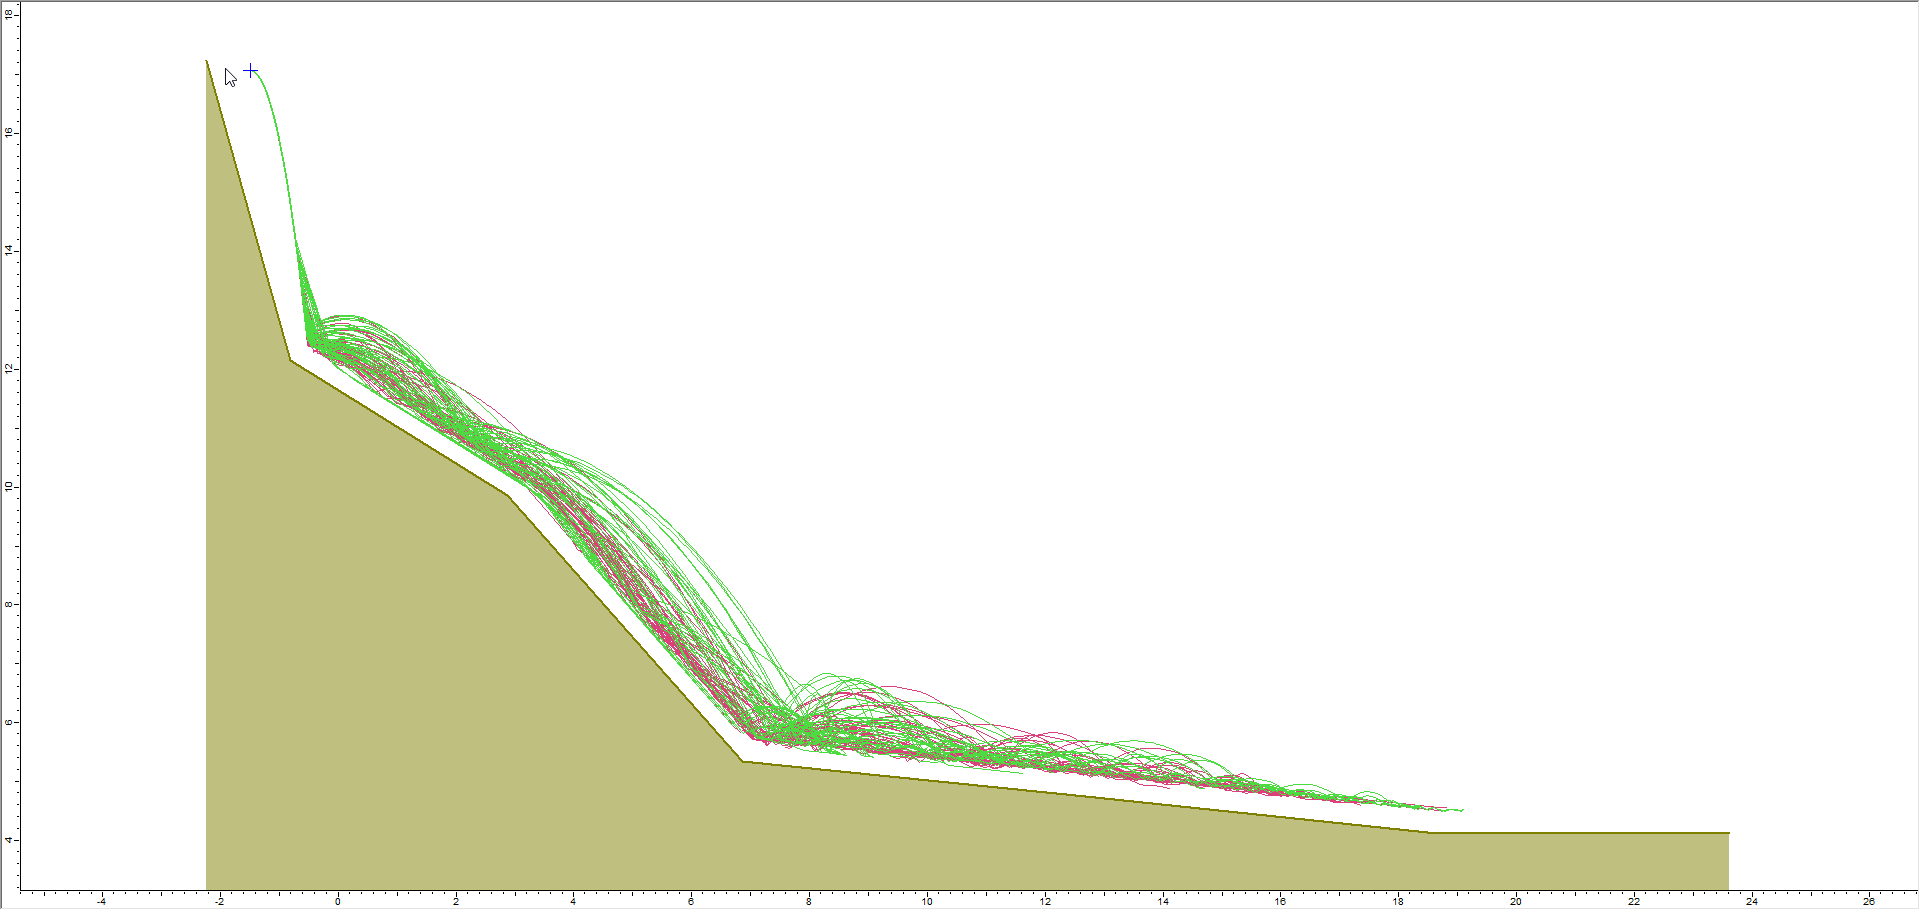

 on the toolbar or Results menu.
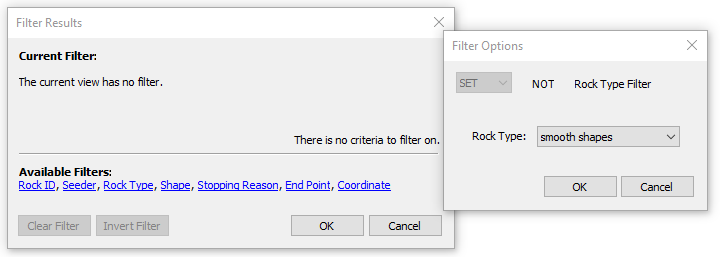


 below the list.