Features
This section describes the available functions of the ModelEditor.
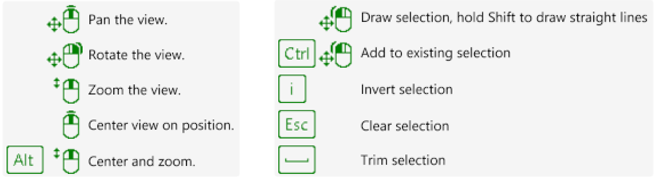
By pressing F1 on the keyboard tooltips for navigation as well as for editing are available in the 3D viewer. Examples:
Toolbar of the 3D Viewer
3D View Options 
- Move to Home Position
 - Sets the viewer to its initial position
 - View All

 - Zooms out from the current view. Zooms to the previous view again
 - Top Down View
 - Orientates the 3D model from the camera view (top down)
 - Auto Rotate (fixed or view)
 - Rotates the 3D model from a fixed point (top down) or from the current point of view
 - Projection type

 - Toggles between perspective and orthographic projection
 - Fullscreen
 - Switches between the fullscreen display and the windowed display
Mesh Draw Mode 
- Draw as is - The 3D topography is completely overlaid by the digital photograph
- Wireframe
 - A triangulated red coloured point cloud is forming the topography
 - Wireframe Overlay
 - The 3D model and a red coloured overlay of the wireframe is forming the topography
 - Points
 - The point cloud of the scene shown
 - Show Texture - Displays the 3D model with texture in the viewer (shortcut key “Ctrl” T)
3D View Visibility 
- Show Axes - Turns the co-ordinate axes on and off
- Show Bounding Box - Turns the bounding box surrounding of the 3D model on and off
Navigation
Mouse navigation
- Pan View
 - The middle mouse button is used to pan the 3D model
 - Rotate View
 - The right mouse button rotates the 3D model. Just keep the right button pressed and move the mouse around to see the 3D model rotating.
 - Zoom View
 - When turning the wheel of a mouse the 3D model is zoomed
 - Center View on Position
 - Centers to the current position
 - Center and Zoom
 - Pressing “Alt” and turn the mouse wheel centers the and zoom to the current position
Keyboard navigation
- Rotation of the 3D model in a desired direction is performed with the corresponding arrow key “Left”, “Right”, “Up” or “Down”
- Straight motion is performed by pressing “Shift” simultaneously with the corresponding arrow key “Left”, “Right”, “Up” or “Down”
- Zooming is performed by pressing “Ctrl” simultaneously with the arrow key “Up” for zooming in and the arrow key “Down” for zooming out
Menu bar
The menu bar comprises three menus. The menu commands are accessible using the mouse.
Menu File
- Open 3D Model - Opens a 3D model (“.jm3x” file)
- Import 3D model
- Import from JM3 Imports “.jm3” files from former versions and generates a “.jm3x” file
- Import from OBJ Enables the import of “.obj” files
- Import from E57 Enables the import of “.e57” files
- Import from LAS Enables the import of “.las(z)” files
- Convert multiple JM3 to JM3x - Converting multiple “.jm3” files into “.jm3x” files
- Save 3D Model - Saves the 3D model to the current “.jm3x” file
- Save 3D Model as - Saves the 3D model to a new “.jm3x” file
- Export 3D Model
- Export for RocTunnel3 -Exports the 3D model to the RocTunnel3 “.obj” format
- Export for RocFall3 - Exports the 3D model to the RocFall3 “.3grs” format
- Export for RocSlope3 - Exports the 3D model to the RocSlope3 “.3grs” format
- Export as OBJ - Exports the 3D model as an “.obj” file
- Export as DXF - Exports the 3D model as an “.dxf” file
- Export as VRML - Exports the 3D model as an “.vrml” file
- Export as CSV - Exports the 3D model as an “.csv” file
- Show Reconstruction Report - Opens the report generated by MultiPhoto
- Exit - Closes the ModelEditor
Menu Edit
- Undo - Revokes the previously executed commands step by step
- Redo - Redoes the commands revoked by the “Undo” function step by step
Menu Help
- User Manual - Opens the manual of the software component
- Units - Displays the units used by the software
- About - Displays versions and release information of the software component
- RSInsight - Direct link to RSInsight, the AI‑powered support platform
Toolbar

- Open 3D Model
 - Opens a 3D model (“.jm3x” file)
 - Save 3D Model
 - Saves the 3D model (“.jm3x” file)
 - Save 3D model as
 - Renames and saves the 3D model (“.jm3x” file)
 - Undo
 - Revokes the previously executed commands step by step
 - Redo
 - Redoes the commands revoked by the “Undo” function step by step
 - Trim Model with Polygon
 - Selects a point cloud by using a polygon
 - Trim Model with Sphere
 - Selects a group of points enclosed by a sphere
 - Invert Selection
 - Inverts the selection to delete
 - Import Trim History
 - Imports a trim process (“.trim”)
 - Export Trim History
 - Exports a trim process (“.trim”)
 - Flip Mesh Orientation
 - Flips the upward normal vector of the 3D model
 - Show Reference Plane
 - Shows/hides the Reference Plane as a semi-transparent green plane
 - Set Reference Plane
 - Opens the Plane dialog for adjusting the Reference Plane
 - Set Reference Plane from Selection
 - Set the position of the Reference Plane from a selected region
 - Flip Reference Plane Orientation
 - Flips the upward normal vector of the 3D model
 - Move Reference Plane
 - Defines/moves the Reference Plane by a mouse click on the 3D model