Scripting Tunnel Tutorial (Part 1)
1.0 Introduction
The RS3 Scripting feature is an API tool based on the Python programming language, designed to model and interpret results with the interface. This tutorial walks you through how to automate the modeling process for a practical application using RS3 Scripting. You will also learn the basic steps required to run your first RS3 Python Script.
Topics covered in this tutorial include scripting exercise to conduct following operations:
- Opening, closing and saving a model;
- Defining Project Settings;
- Defining properties of Materials and Liners;
- Assigning material properties after Selecting external volume entities using different query methods;
- Setting field stress; and
- Meshing and computing the model
Prerequisites
Before you begin, ensure you have the RS3 program installed at minimum Version 4.042 and have gone through Getting Started with RS3 Python Scripting tutorial so you have initial setup with RS3 Scripting completed.
1.1 Tutorial Files
All tutorial files installed with RS3 can be accessed by selecting File > Recent > Tutorial Folder from the RS3 main menu. The starting files can be found in the Scripting > Scripting Tunnel Tutorial (Part 1) subfolder, including an initial model file, a python file (.py) and the python Jupyter notebook file (.ipynb) with the description markdowns, and a csv file of input data for material. The next part of this tutorial Scripting Tunnel Tutorial (Part 2) continues the result interpretation with the final product of this tutorial. The RS3 project file can be found in the Scripting >Scripting Tunnel Tutorial (Part 2).
2.0 Set Up RS3 and RocScript Editor
- Open RS3 Modeler
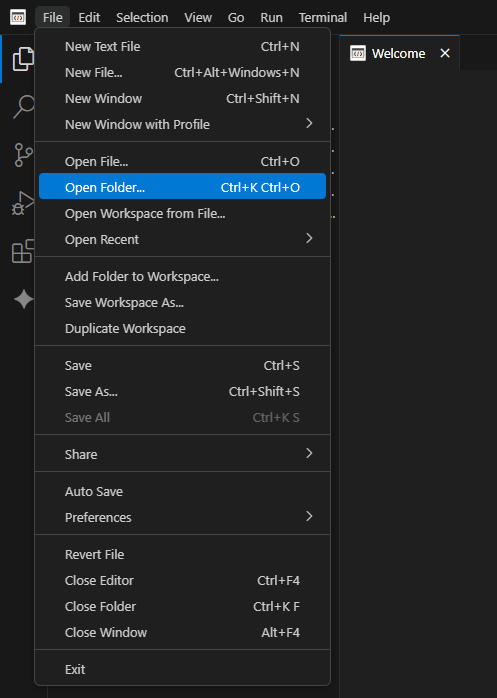
- Select Scripting from the top menu > Select RocScript Editor
 . The RocScript Editor will be launched.
 - In the RocScript Editor, select File > Open Folder, and select folder C:\Users\Public\Documents\Rocscience\RS3 Examples\Tutorials\Scripting Tunnel Tutorial (Part 1).
If you provided a custom location for example files when installing RS3, search the provided location instead.
- Navigate to Explorer tab and select New File
- Name the new file "Scripting_tutorial_modeler.py"
3.0 Set Up the Script and Open the Model
3.1 Import the Required Modules from RS3 Scripting
The RS3Modeler module is the primary module that contains scripting functions used to manipulate the models through scripts. Each submodule in RS3 scripting has a corresponding enum module. These enum modules provide predefined options for functions, similar to the dropdown selections available in the RS3 program. For example, enums related to material and support (e.g. bolt, beam, pile, etc) are located in the PropertyEnums module, while enums for project settings are stored in the ProjectSettingEnums module.
- Import the required modules from RS3 Python API library and os library.
from rs3.RS3Modeler import RS3Modeler
from rs3.projectSettings.ProjectSettingEnums import *
from rs3.properties.PropertyEnums import *
from rs3.mesh.MeshEnums import *
from rs3.CommonEnums import *
from rs3.ModelEnums import *
from rs3.loadings.LoadingEnums import *
from rs3.Geometry import Point, Polyline, Cube
import os
3.2 Open Starting Model File
- Start the RS3 program (server) with the port number 60064
- The script (client ) connects with RS3 Modeler through the same port number 60064
- Open the starting file from the directory where the tutorial files are installed.
port=60064
RS3Modeler.startApplication(port)modeler = RS3Modeler(port)# Find the current file folder path
currentFileFolderPath = os.path.abspath("")
# Open the model
modelPath = rf"{currentFileFolderPath}\Scripting Tunnel Tutorial (Part 1) - Initial.rs3v3"
model = modeler.openFile(modelPath)
4.0 Project Settings
In this section, the system of units, stages, and groundwater conditions is defined from project settings module
4.1 Define Units
The unit system is one of the most fundamental settings in a project. Changing the unit system at a later stage may reset all unit-dependent properties. Therefore, it is good to set the unit system at the beginning of the project.
RS3 supports a variety of metric and imperial units. The unit system used in a model is determined by the selected stress unit. In this tutorial, the metric unit system with kPa as the stress unit is used.
model.ProjectSettings.Units.setUnitSystem(UnitSystemType.METRIC_KPA)4.2 Define Stages
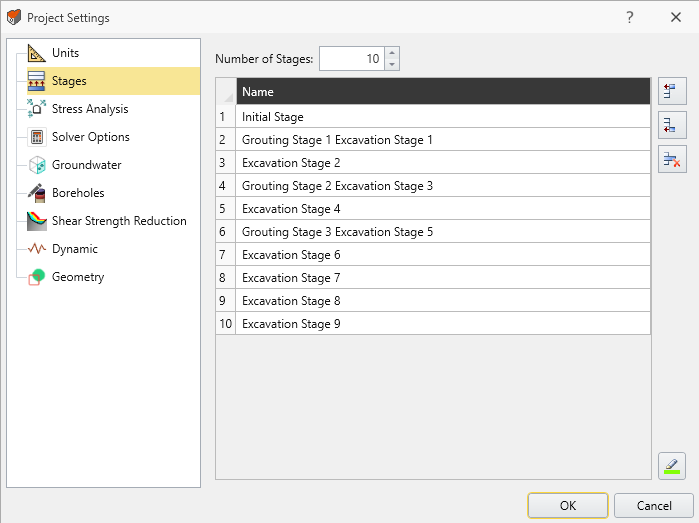
The model requires 10 stages, organized as follows:
- Initial Stage
- Grouting Stages, before excavation for every two tunnel slices
- Excavate Stages, where every tunnel slice is excavated in three steps
- Support Installation, where liners are installed at the same stage as the excavation
Since liners are installed sequentially in the initial model, a grouting stage is inserted before the liner installation for every two tunnel slices.
- To simplify the syntax, a variable is defined to reference the stages object:
- Stage names can be updated individually if needed.
- A grouting stage is added before any excavation using reference stages. When a reference stage is specified, the new stage is inserted after the reference stage.
- If the stages follow a consistent naming pattern, for loops can be used to simplify the process. Each slice of tunnel is excavated in three steps. In total, there are three grouting stages and nine excavation stages. The name reflects both
stages = model.ProjectSettings.Stagesstages.setName(1, "Initial Stage")# Add a stage after stage 1
stages.addStages(1, 1)
groutingStageCount = 1
excavationStages = 9

for excavationStageIndex in range(excavationStages):
 stageNumber = 2 + excavationStageIndex

 if groutingStageCount <= 3 and excavationStageIndex % 2 == 0:
 stages.setName(stageNumber, f"Grouting Stage {groutingStageCount} Excavation Stage {excavationStageIndex+1}")
 groutingStageCount += 1
 else:
 stages.setName(stageNumber, f"Excavation Stage {excavationStageIndex+1}")
4.3 Set Groundwater Method
Groundwater analysis is not included in this model. Therefore, the groundwater method type can be safely set to None.
model.ProjectSettings.Groundwater.setGroundwaterMethod(GroundwaterMethodType.GW_NONE)5.0 Set Material Properties
In this section, material properties and support properties are defined through scripting
5.1 Set Material Properties in Scripting
-
Create a new material for grouting.
groutingName = "grouting" model.createNewMaterialProperty(groutingName) grouting = model.getMaterialPropertyByName(groutingName) -
Assign a color associated with the material. After entering a hex color code, you may optionally use the color picker to select the desired color.
grouting.setMaterialColor("#727272") -
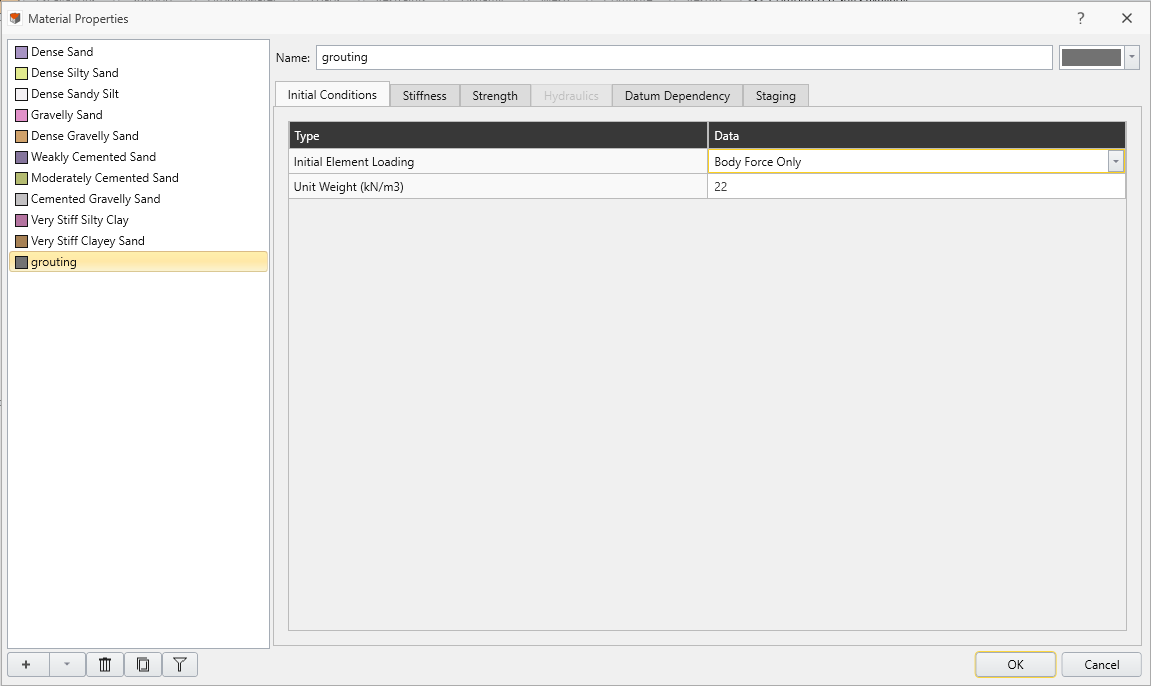
Assign the material properties of the grouting as summarized in the following table.
Property Value Initial Element Loading Body Force Only Unit Weight (kN/m3) 22 Elastic Type Linear Isotropic Poisson's Ratio 0.25 Young's Modulus 150e3 Constitutive Model Elastic Peak Cohesion (kPa) 50 Peak Friction Angle (o) 35 Tensile Strength (kPa) 30
Properties can be assigned through individual function calls or collectively using thesetProperties()function.grouting.InitialConditions.setInitialElementLoading(InitialElementLoadingType.BODY_FORCE_ONLY) grouting.InitialConditions.setUnitWeight(22) grouting.ConstitutiveModel.MohrCoulomb.setElasticType(MaterialElasticityTypes.LINEAR_ISOTROPIC) grouting.ConstitutiveModel.MohrCoulomb.LinearIsotropicStiffness.setPoissonsRatio(0.25) grouting.ConstitutiveModel.MohrCoulomb.LinearIsotropicStiffness.setYoungsModulus(150e3) grouting.ConstitutiveModel.setConstitutiveModel(constitutiveModelTypes=ConstitutiveModelTypes.MOHR_COULOMB) grouting.ConstitutiveModel.MohrCoulomb.setMaterialType(MaterialType.ELASTIC) grouting.ConstitutiveModel.MohrCoulomb.setProperties(Cohesion=50, FrictionAngle=35, TensileStrength=30)
Have completed this step, check the material dialog from RS3 (Materials > Define Materials), you shall find the the material property named Grouting created
- Not all properties are available through the `setProperties()` function, so some properties may still need to be set individually
- All materials are set to behave perfectly elastic. Strength parameters are used only for the strength factor calculations and non-linear analysis shall not be computed to take into account the material yielding
5.2 Import Material Properties through a CSV File
-
Soil properties can also be imported from a CSV file. In this tutorial, the third-party library
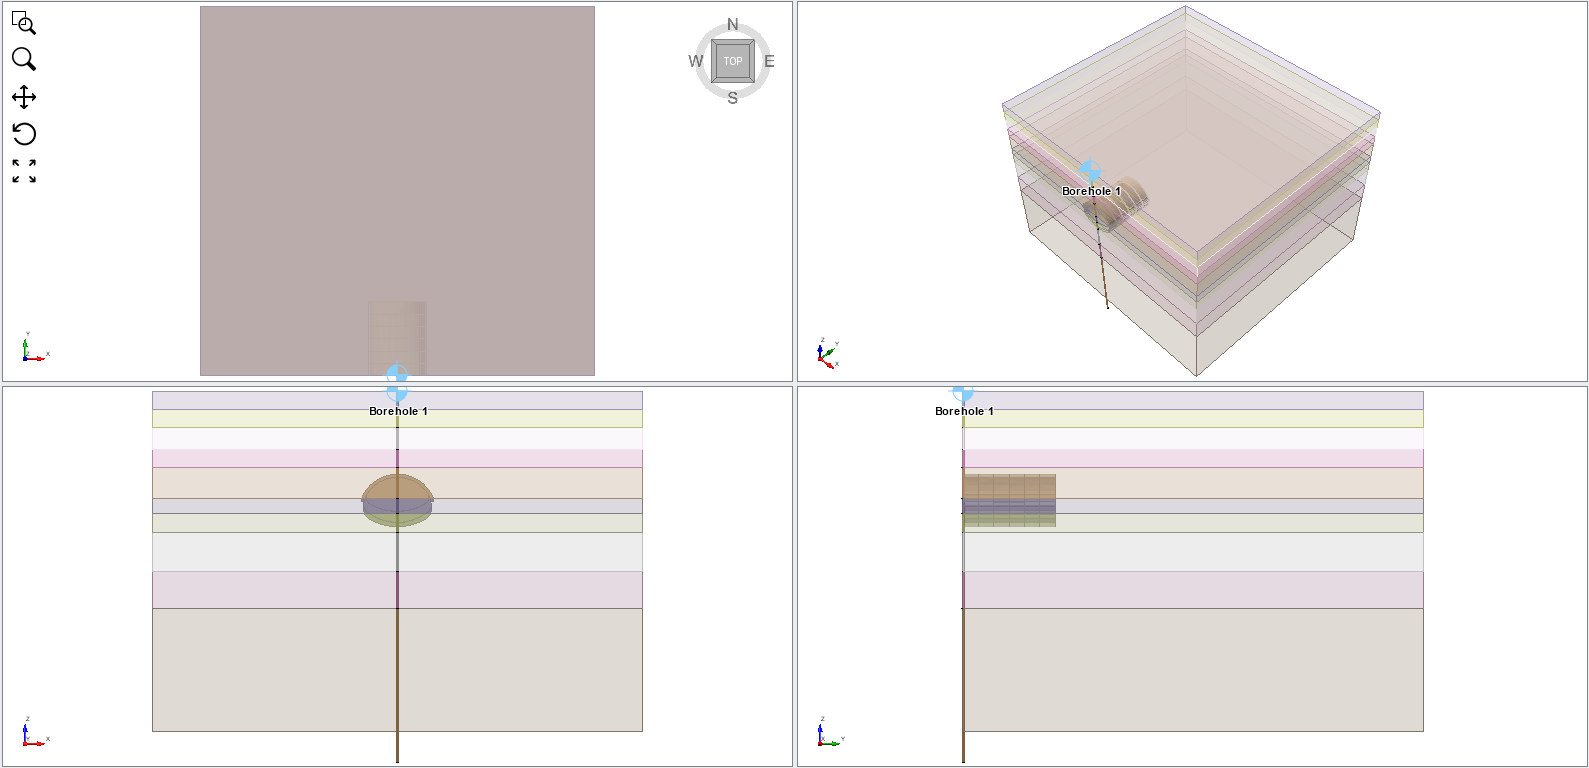
pandasis used to read the CSV file and create a DataFrame, which simplifies data manipulation.import pandas as pd soilPropertiesPath = rf"{currentFileFolderPath}\Soil Properties.csv" # Read the csv file soilPropertiesDf = pd.read_csv(soilPropertiesPath) # Set the soil layer as the index of the DataFrame soilPropertiesDf = soilPropertiesDf.set_index("Soil Layer") soilPropertiesDf -
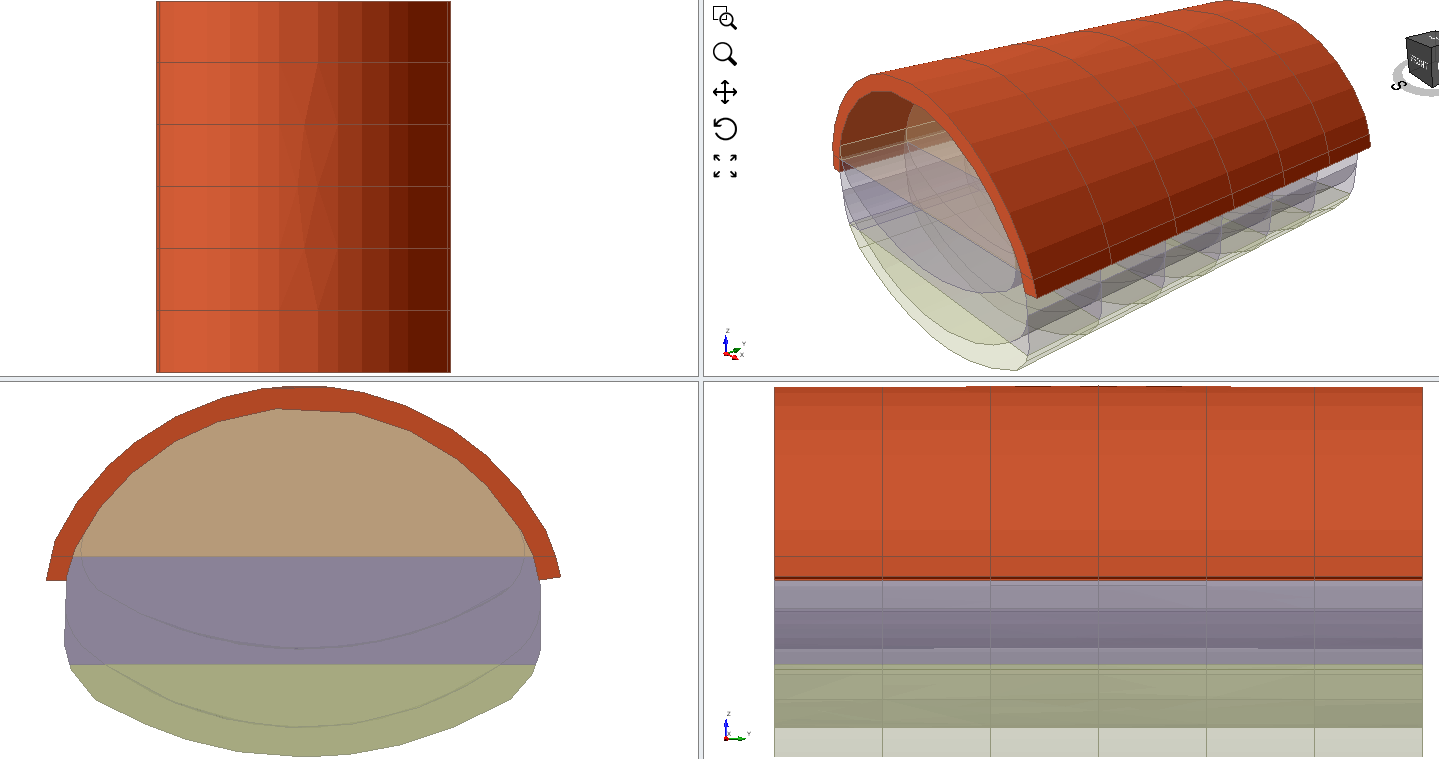
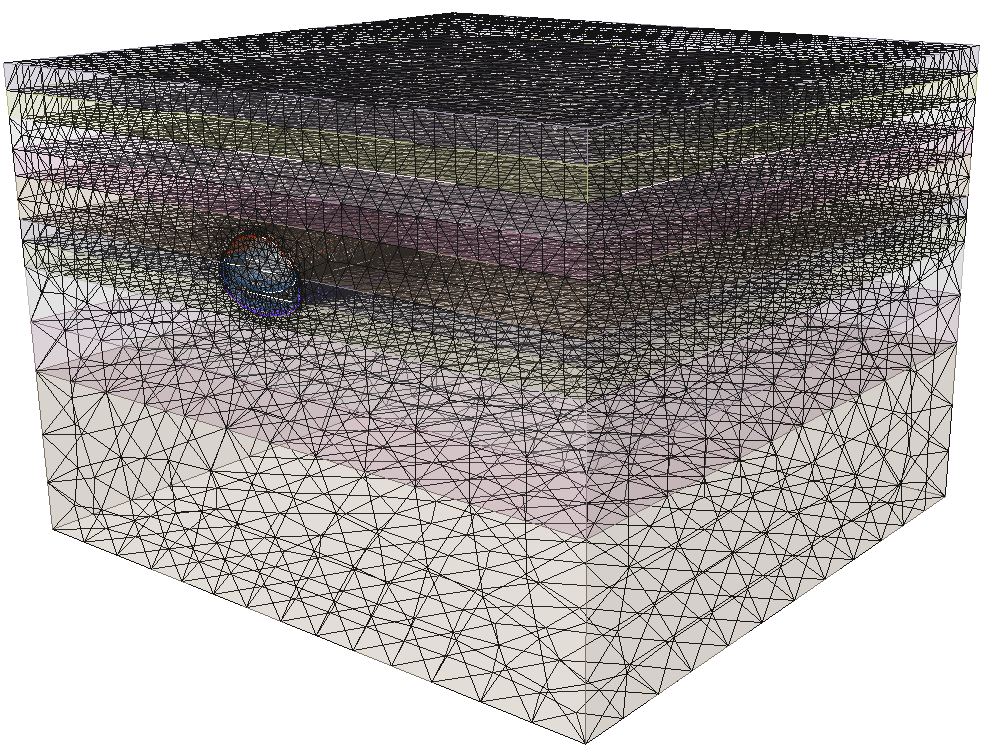
As shown in the model, there are 10 soil layers, each with its own set of material properties. These properties can be assigned using various RS3 scripting functions. Using a pandas DataFrame provides a convenient way to organize and access the soil property data before assigning them to the model.
numOfSoilLayers = 10

for soilLayerIndex in range(numOfSoilLayers):

 # Get the material property by name
 material = model.getMaterialPropertyByName(f"Material {soilLayerIndex+1}")

 # Get each row of data from the DataFrame
 row = soilPropertiesDf.iloc[soilLayerIndex]

 # Set the material name based on the table
 material.setMaterialName(row["Material Name"])

 # Set the initial condition of the model
 material.InitialConditions.setUnitWeight(row["Unit Weight (kN/m^3)"])

 # Set constitutive model properties
 material.ConstitutiveModel.setConstitutiveModel(ConstitutiveModelTypes.MOHR_COULOMB)

 material.ConstitutiveModel.MohrCoulomb.setProperties(
 TensileStrength=row["Tensile Strength (kPa)"],
 FrictionAngle=row["Friction Angle (°)"],
 Cohesion=row["Cohesion (kPa)"],
 DilationAngle=row["Dilation Angle (°)"]
 )

 material.ConstitutiveModel.MohrCoulomb.setMaterialType(MaterialType.ELASTIC)

 material.ConstitutiveModel.MohrCoulomb.LinearIsotropicStiffness.setProperties(
 PoissonsRatio=row["Poissons Ratio"],
 YoungsModulus=row["Young's Modulus (kPa)"]
 )
5.3 Set Liner Properties
There are four liners pre-defined in the model, each with a thickness of 0.1 m. However, in the tunnel section used in this tutorial, the liner thickness needs to be increased to 0.17 m. Young's modulus is set to 21 GPa (21e6 kPa) A for loop can be used to retrieve all liners currently defined in the model and update their properties simultaneously.
liners = model.getAllLinerPropertiesInUse()
for liner in liners:
 liner.Standard.setThickness(0.17)
 liner.Standard.setYoungsModulus(21e6)
6.0 Automate Sequential Excavation
This section demonstrates methods to assign material properties to external volumes
6.1 Introduction to Selection Module
The function model.Selection.getExternalVolumes() provides a powerful way to select external volumes directly through scripting. It returns a set of references to volumetric entities in the same manner as selecting those volumes from the graphical user interface. The references are obtained based on volume entities intersecting with a specified coordinate point, a polyline, or a bounding region such as a cube, cylinder, or sphere. Once the external volume entities are selected, their names, assigned material properties, and roles can be modified programmatically.
This approach offers several advantages over the traditional workflow. Normally, volumetric entities must be selected manually in the view port or accessed through their predefined names in visibility panes. In complex models with a large list of geometric entities, locating and selecting the correct geometry can be time-consuming and error-prone. By selecting geometry based on spatial queries, scripts can automatically identify the relevant volumes without requiring prior knowledge of their names or manual interaction with the UI. This makes the process particularly useful for large or complex geometries, where manual selection would be difficult. As a result, scripting-based selection significantly improves modeling efficiency, reproducibility, and automation during model creation.
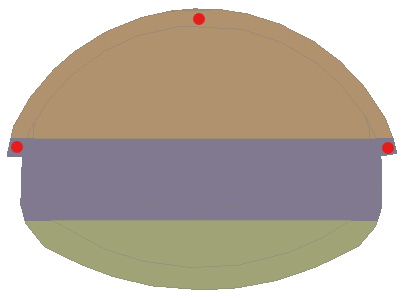
6.2 Select by Point - Grouting
In this section, grouting material is applied to the volumes selected as shown using scripting
-
In this model, there are six slices of tunnel sections. A variable is created to store this number so that it can be reused later in the script.
numOfSlices = 6 -
To apply grouting for every two slices of tunnel before three-stage excavation, a for loop is used.
Each slice is selected using a point located inside the slice. Three points are selected per slice to apply loop along the tunnel length
- After the external volumes are selected, the entities are renamed, and the grouting material defined in Section 5.2.1 is assigned to them.
currentStage = 2 for sliceIndex in range(numOfSlices): # (Optional) To view the changes while modeling model.setActiveStage(currentStage) # each selection should get only one slice of external volume. y = 2.5 + sliceIndex * 5 centralPoint = Point(0, y, 771.4) centralExternalVolume = model.Selection.getExternalVolumes(centralPoint)[0] # rename the slice centralExternalVolume.setName(f"Central Grouting {sliceIndex + 1}") # Change the current material to grouting centralExternalVolume.setAppliedMaterialProperty(currentStage, groutingName) leftPoint = Point(-11.25, y, 763.5) leftExternalVolume = model.Selection.getExternalVolumes(leftPoint)[0] leftExternalVolume.setName(f"Left Grouting {sliceIndex + 1}") leftExternalVolume.setAppliedMaterialProperty(currentStage, groutingName) rightPoint = Point(11.25, y, 763.5) rightExternalVolume = model.Selection.getExternalVolumes(rightPoint)[0] rightExternalVolume.setName(f"Right Grouting {sliceIndex + 1}") rightExternalVolume.setAppliedMaterialProperty(currentStage, groutingName) # After every two steps, set the currentStage to the next stage that sets grouting if sliceIndex % 2 == 1: currentStage += 2setAppliedMaterialProperty()requires both the stage number and the property name as inputs. CallingsetActiveStage()is optional if only assigning properties. It can be used to switch stages and visualize the modeling process, but skipping rendering can reduce modeling time during automation.
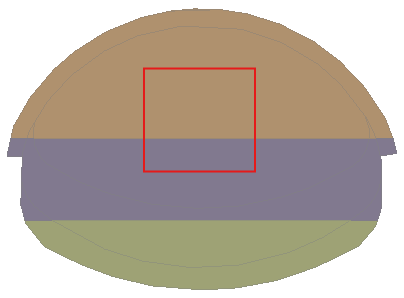
6.3 Select by Cube - Upper Zone Excavation Sequence
There are two external volumes involved in the first excavation step. Defining a bounding region for selection can be useful when the region contains multiple small pieces of geometry. By default, any volume that intersects with the bounding region is selected. If you only want to select volumes completely inside the bounding region, the parameter includeIntersecting can be set to False. In this example, the default setting (includeIntersecting = True) is used
noMaterial = "No Material"
currentStage = 3
for sliceIndex in range(numOfSlices):
# (Optional) To view the changes while modeling
model.setActiveStage(currentStage)
# each selection should get only one slice of external volume.
cube = Cube(Point(-4, 2 + sliceIndex * 5, 768), Point(4, 3 + sliceIndex * 5, 762))
externalVolumes = model.Selection.getExternalVolumes(cube)
for externalVolumeIndex in range(len(externalVolumes)):
# rename the slice
externalVolumes[externalVolumeIndex].setName(f"Tunnel {sliceIndex + 1}-1-{externalVolumeIndex + 1}")
# Change the current material to no material
externalVolumes[externalVolumeIndex].setAppliedMaterialProperty(currentStage, noMaterial)
# Moving one slice further
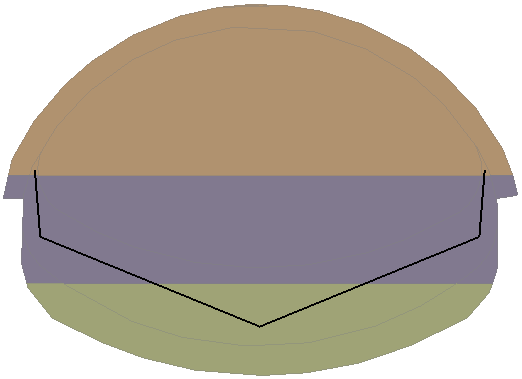
currentStage += 16.4 Select by Polyline - Lower Zone Excavation Sequence
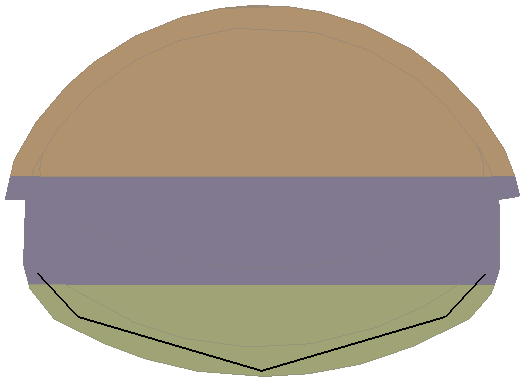
The second excavation step has an irregular tunnel shape, making it difficult to select all volumes using simple bounding regions such as cubes, cylinders, or spheres. In this case, selecting volumes by points or by polyline is more convenient. Here, a polyline selection method is used. This method is particularly useful when the region contains many small pieces, as any volume intersecting the polyline is selected.
currentStage = 4
for sliceIndex in range(numOfSlices):
 # (Optional) To view the changes while modeling
 model.setActiveStage(currentStage)

 # three slices will be selected by the polyline
 y = 2.5 + sliceIndex * 5
 polyline = Polyline([Point(-10.4, y, 764.25), Point(-10.15, y, 761.15), Point(0, y, 757), Point(10.15, y, 761.15), Point(10.4, y, 764.25)])
 externalVolumes = model.Selection.getExternalVolumes(polyline)

 for externalVolumeIndex in range(len(externalVolumes)):
 # rename the slice
 externalVolumes[externalVolumeIndex].setName(f"Tunnel {sliceIndex + 1}-2-{externalVolumeIndex + 1}")

 # Change the current material to no material
 externalVolumes[externalVolumeIndex].setAppliedMaterialProperty(currentStage, noMaterial)

 # Moving one slice further
 currentStage += 1
Similarly, the third excavation step can also be performed using the polyline selection method.
currentStage = 5
for sliceIndex in range(numOfSlices):
 # (Optional) To view the changes while modeling
 model.setActiveStage(currentStage)

 # three slices will be selected by the polyline
 y = 2.5 + sliceIndex * 5
 polyline = Polyline([Point(-10.35, y, 759.5), Point(-8.5, y, 757.5), Point(0, y, 755), Point(8.5, y, 757.5), Point(10.35, y, 759.5)])
 externalVolumes = model.Selection.getExternalVolumes(polyline)

 for externalVolumeIndex in range(len(externalVolumes)):
 # rename the slice
 externalVolumes[externalVolumeIndex].setName(f"Tunnel {sliceIndex + 1}-3-{externalVolumeIndex + 1}")

 # Change the current material to no material
 externalVolumes[externalVolumeIndex].setAppliedMaterialProperty(currentStage, noMaterial)

 # Moving one slice further
 currentStage += 1
7.0 Set Field Stress
This model uses the gravity field stress method with K0 condition.
fieldStress = model.Loadings.FieldStress
fieldStress.setType(FieldStressType.GRAVITY)
fieldStress.Gravity.setK0Condition(True)
8.0 Mesh the Model
-
Set the model with 4-Noded Tetrahedra Graded mesh.
mesh = model.Mesh mesh.setElementType(MeshElementType.MESH_4_NODED_TETRAHEDRA) mesh.setMeshGradation(MeshGradation.GRADED) -
Mesh the model.
mesh.mesh()
9.0 Compute the Model
Before compute, save the model as a new model.
saveAsPath = rf"{currentFileFolderPath}\Scripting Tunnel Tutorial (Part 1) - Final.rs3v3"
model.saveAs(saveAsPath)
# open the new model
saveAsModel = modeler.openFile(saveAsPath)
Compute the model. After computation is complete, the convergence status will be printed. This status indicates whether the model has converged at each stage. Based on the convergence status, you can determine whether it is appropriate to query the results for the corresponding stages.
computeResults = saveAsModel.Compute.compute()10.0 Save and Close the project
Once the modeling process is complete, the project can be closed. You must specify whether the changes should be saved before closing the project.
# Not saving changes to the initial model
model.close(False)
# Save changes to the current model
saveAsModel.close(True)
This concludes the Scripting Tunnel Tutorial (Part 1).