10 - Advanced Filtering
1.0 Introduction
This tutorial will demonstrate how to use results filters in RocSlope2 to restrict which blocks are shown in the model views, Results Grid, and charts, so you can focus on a specific subset of results.
In earlier tutorials we computed and reviewed full analysis results. In this tutorial, we will create a named results filter, apply it to the project, and review how filtered displays differ from unfiltered results — including the case where every block is filtered out.
Topics Covered in this Tutorial:
- Creating a results filter
- Applying and clearing a filter
- Building a compound filter with grouped conditions
- Interpreting All blocks filtered out vs unfiltered results
Finished Product:
The finished product of this tutorial can be found in the Tutorial 10 Advanced Filtering (Final).rocslope2 file, located in the Examples > Tutorials folder in your RocSlope2 installation folder.
2.0 Base File
- If you have not already done so, run the RocSlope2 program by double-clicking the RocSlope2 icon in your installation folder or by selecting Programs > Rocscience > RocSlope2 in the Windows Start menu.
This tutorial will use Tutorial 10 – Advanced Filtering (Initial).rocslope2 as a base model.
- Select File > Recent > Tutorials Folder

- Open the Tutorial 10 – Advanced Filtering (Initial).rocslope2 file.
Before applying a filter, note the unfiltered results for the active analysis. There are 311 Wedge Blocks, 6 Planar Blocks and 6 Toppling Blocks. You will compare these to the filtered views later.
3.0 Create a Results Filter
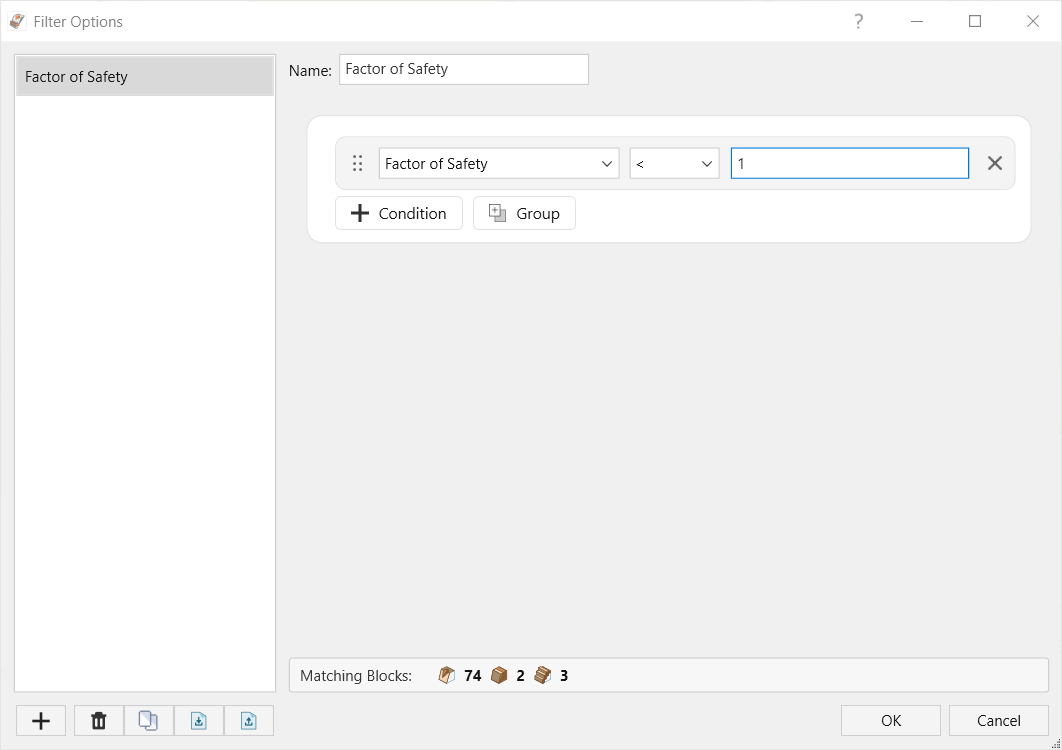
We will create a filter that keeps only blocks with a Factor of Safety less than 1 (failed blocks relative to a design Factor of Safety of 1).
- Select Results > Filter > Filter Options

- When no filters are defined, a default New Filter is populated. Change the default filter’s name to “Factor of Safety.”
- In the Advanced Filter pane, change the field from Analysis Mode to Factor of Safety.
- Change the comparator to “<”.
- Set the value as 1.
The dialog shows a match preview of how many blocks meet the criteria for each enabled analysis type (Wedge 74 blocks / Planar 2 blocks/ Toppling 3 blocks).
- Click OK to save the filter and close the dialog.
4.0 Review Filtered Results
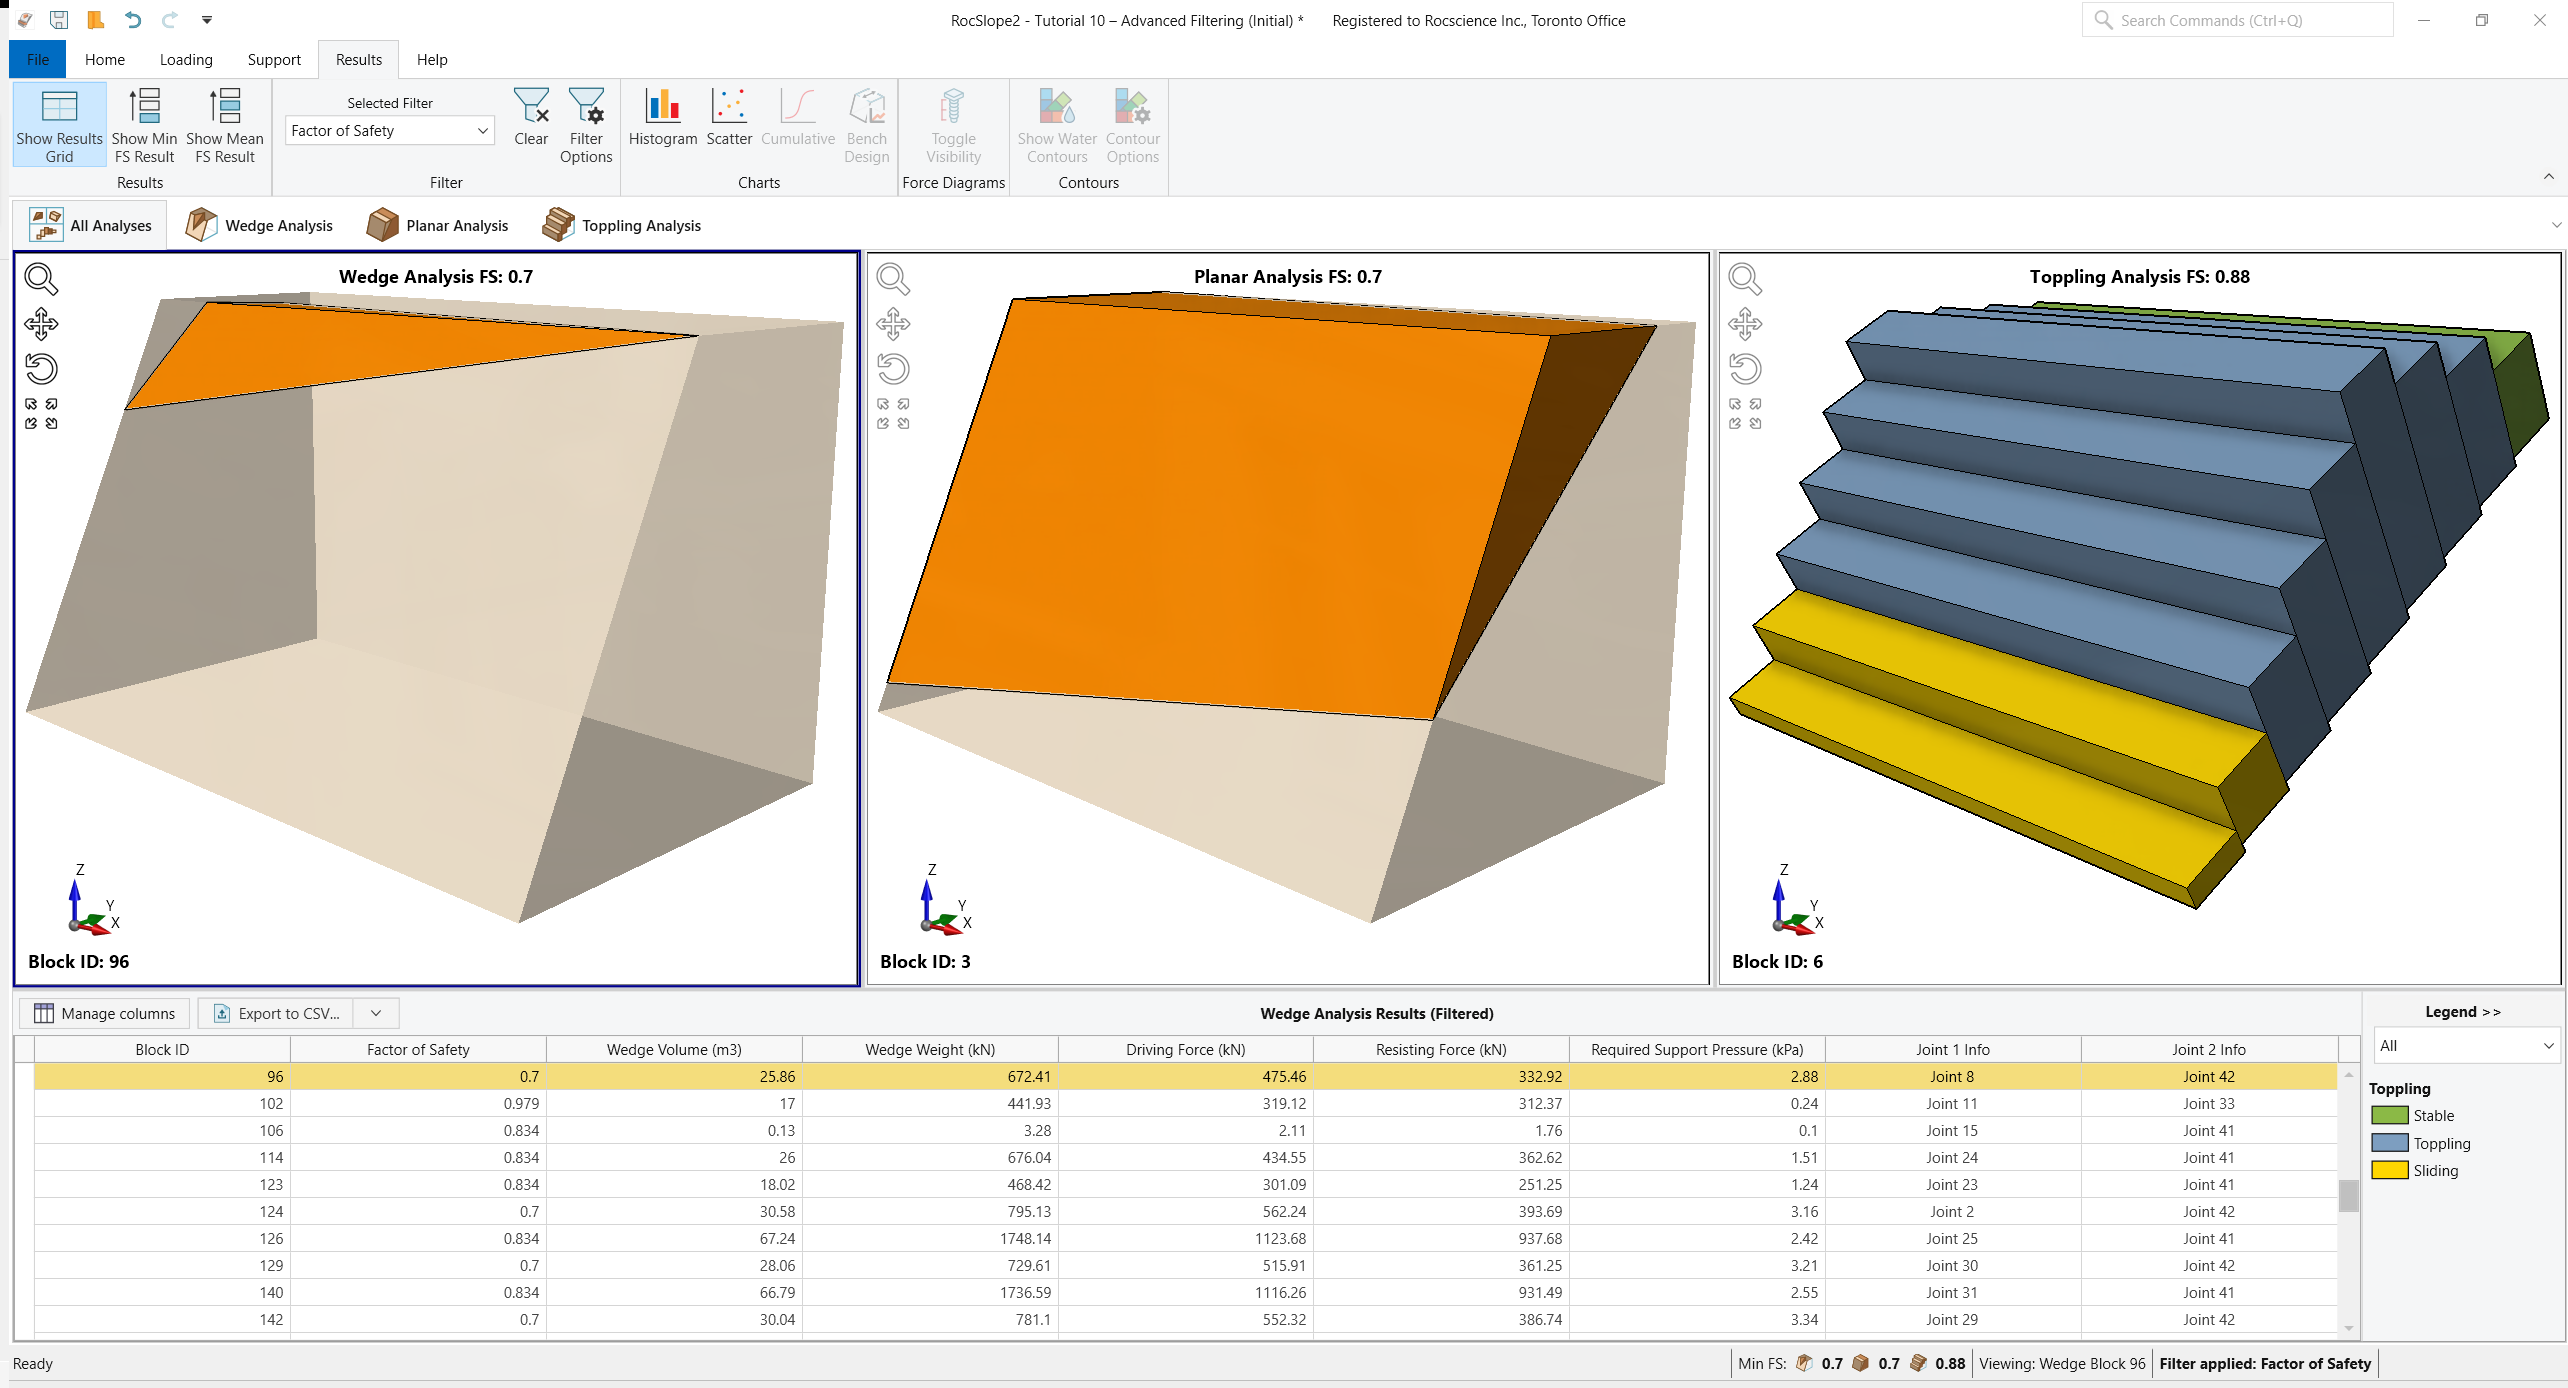
With the filter is applied, only blocks that satisfy the criteria remain visible and listed.
4.1 Results Grid
- Observe the Results Grid for the active Analysis Window.
Only blocks meeting the filter criteria remain listed. The grid title indicates filtered results (for example, Wedge Analysis Results (Filtered)).
4.2 Chart
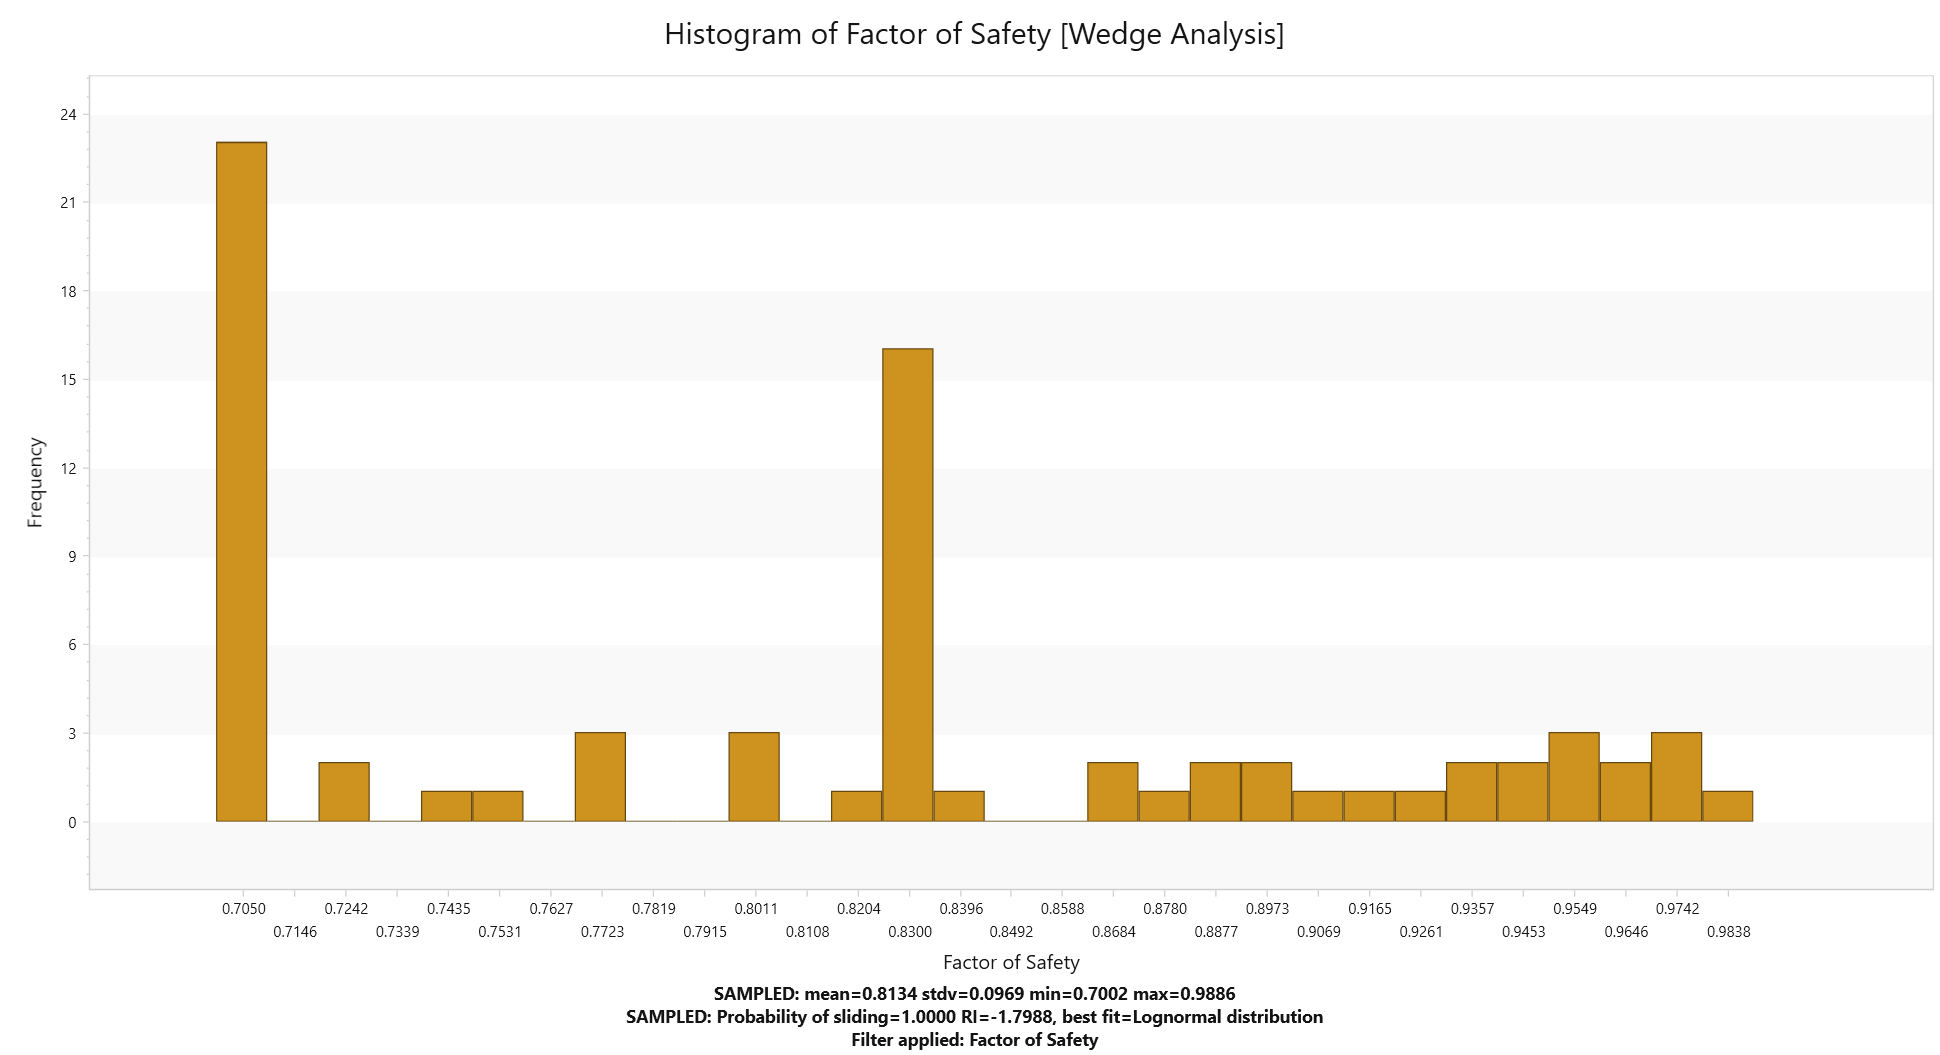
- Select Results > Charts > Histogram

- Ensure Analysis Type = Wedge Analysis
- Set Data to Plot = Factor of Safety and Number of Bins = 30.
- Click OK.
Observe that the histogram reflects the filtered sample set and a footnote indicating the filter applied appears on the chart.
5.0 Compound Filter with Groups
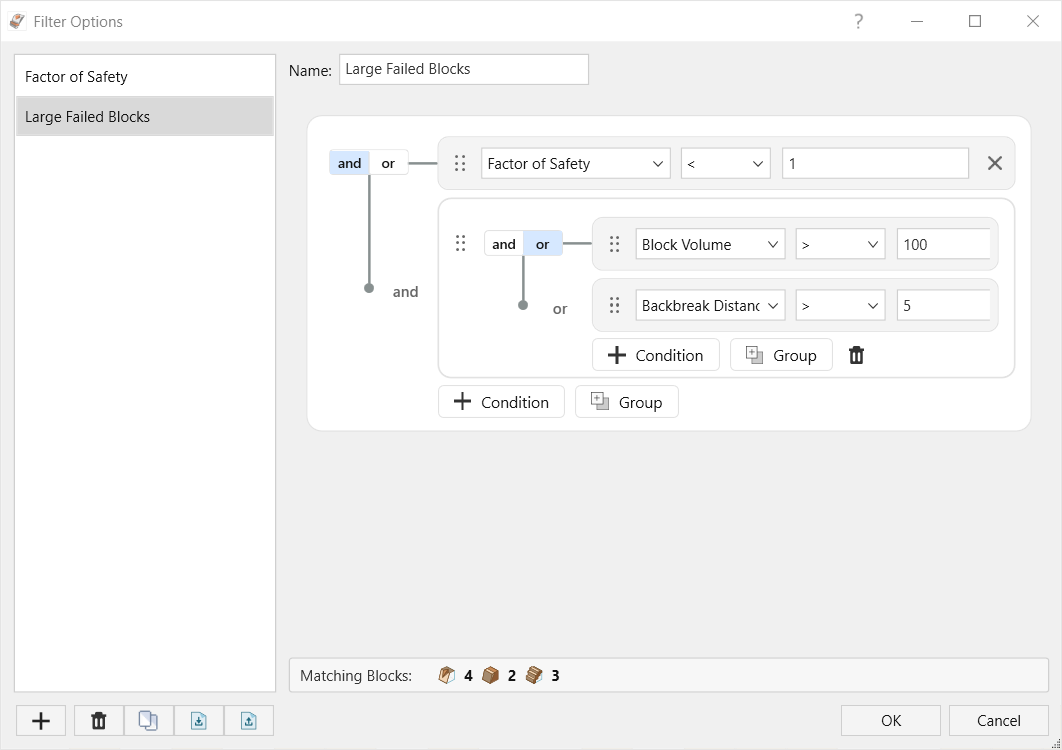
Results filters can combine multiple conditions using AND / OR logic. Groups let you control evaluation order — for example, require Factor of Safety < 1 and either of two size criteria.
- Select Results > Filter > Filter Options
- Click Add
 to add a new filter and name it “Large Failed Blocks.”
 - In the Advanced Filter pane, enter Factor of Safety < 1 as the first condition.
- Click + Group to add a group.
- In the group you just created, set the first condition as Block Volume > 100.
- Within the group, click + Condition to add another condition and define it as Backbreak Distance > 5.
- Within the group set the relationship between the two conditions to OR by clicking the OR side of the AND/OR switch.
The overall filter is therefore: Factor of Safety < 1 AND (Block Volume > 100 OR Backbreak Distance > 5).
- Click OK to save the filter and close the dialog.
- Select Results > Filter > Selected Filter and change the selected filter to Large Failed Blocks.
Only blocks that fail the Factor of Safety criterion and satisfy at least one condition in the group remain listed in the model views, Results Grid, and charts.
- Clear the filter by selecting Results > Filter > Selected Filter > <No Filter> or Results > Filter > Clear
 before continuing.
6.0 All Blocks Filtered Out
Next we will apply a condition that matches no blocks, to distinguish All blocks filtered out from a model that formed no blocks.
- Select Results > Filter > Filter Options
- Add a new filter called “Negative Block Volume.”
Create a filter that requires Block Volume to be < 0. Clearly, this will result in no valid blocks.
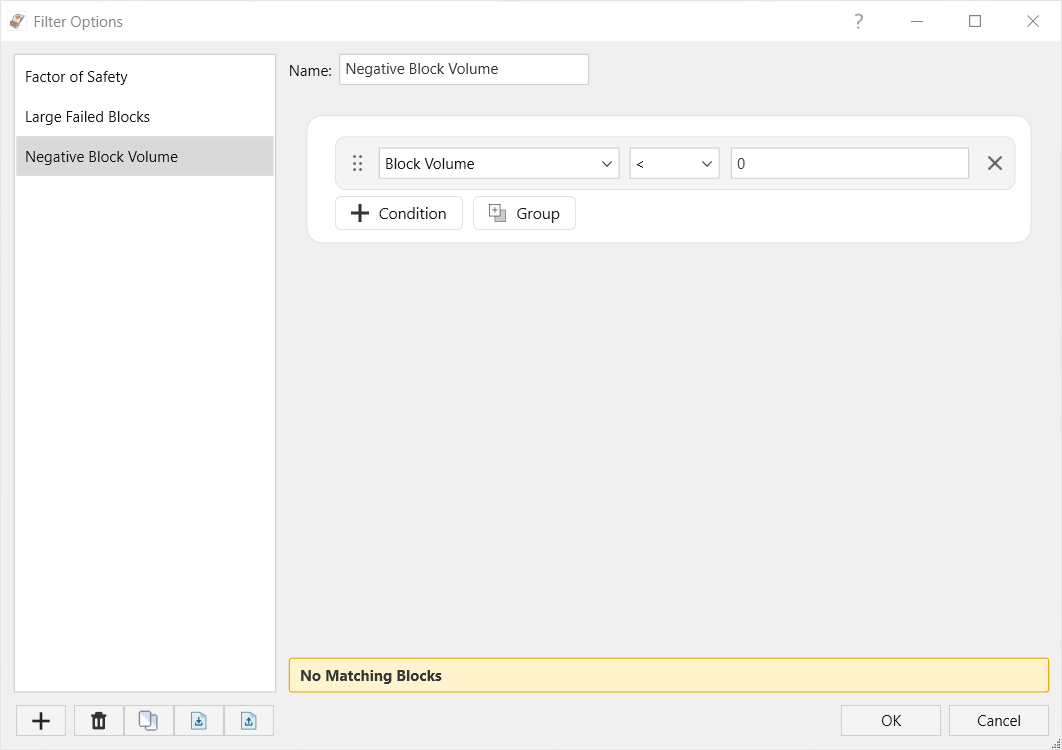
Filter Options dialog with Negative Block Volume - We can see in the match preview that there are no matching blocks.
- Click OK and ensure the filter is selected under Selected Filter.
When the unfiltered model contained blocks, the Factor of Safety display should show All blocks filtered out. This is distinct from No blocks formed, which is reported when no blocks existed prior to applying the filter.
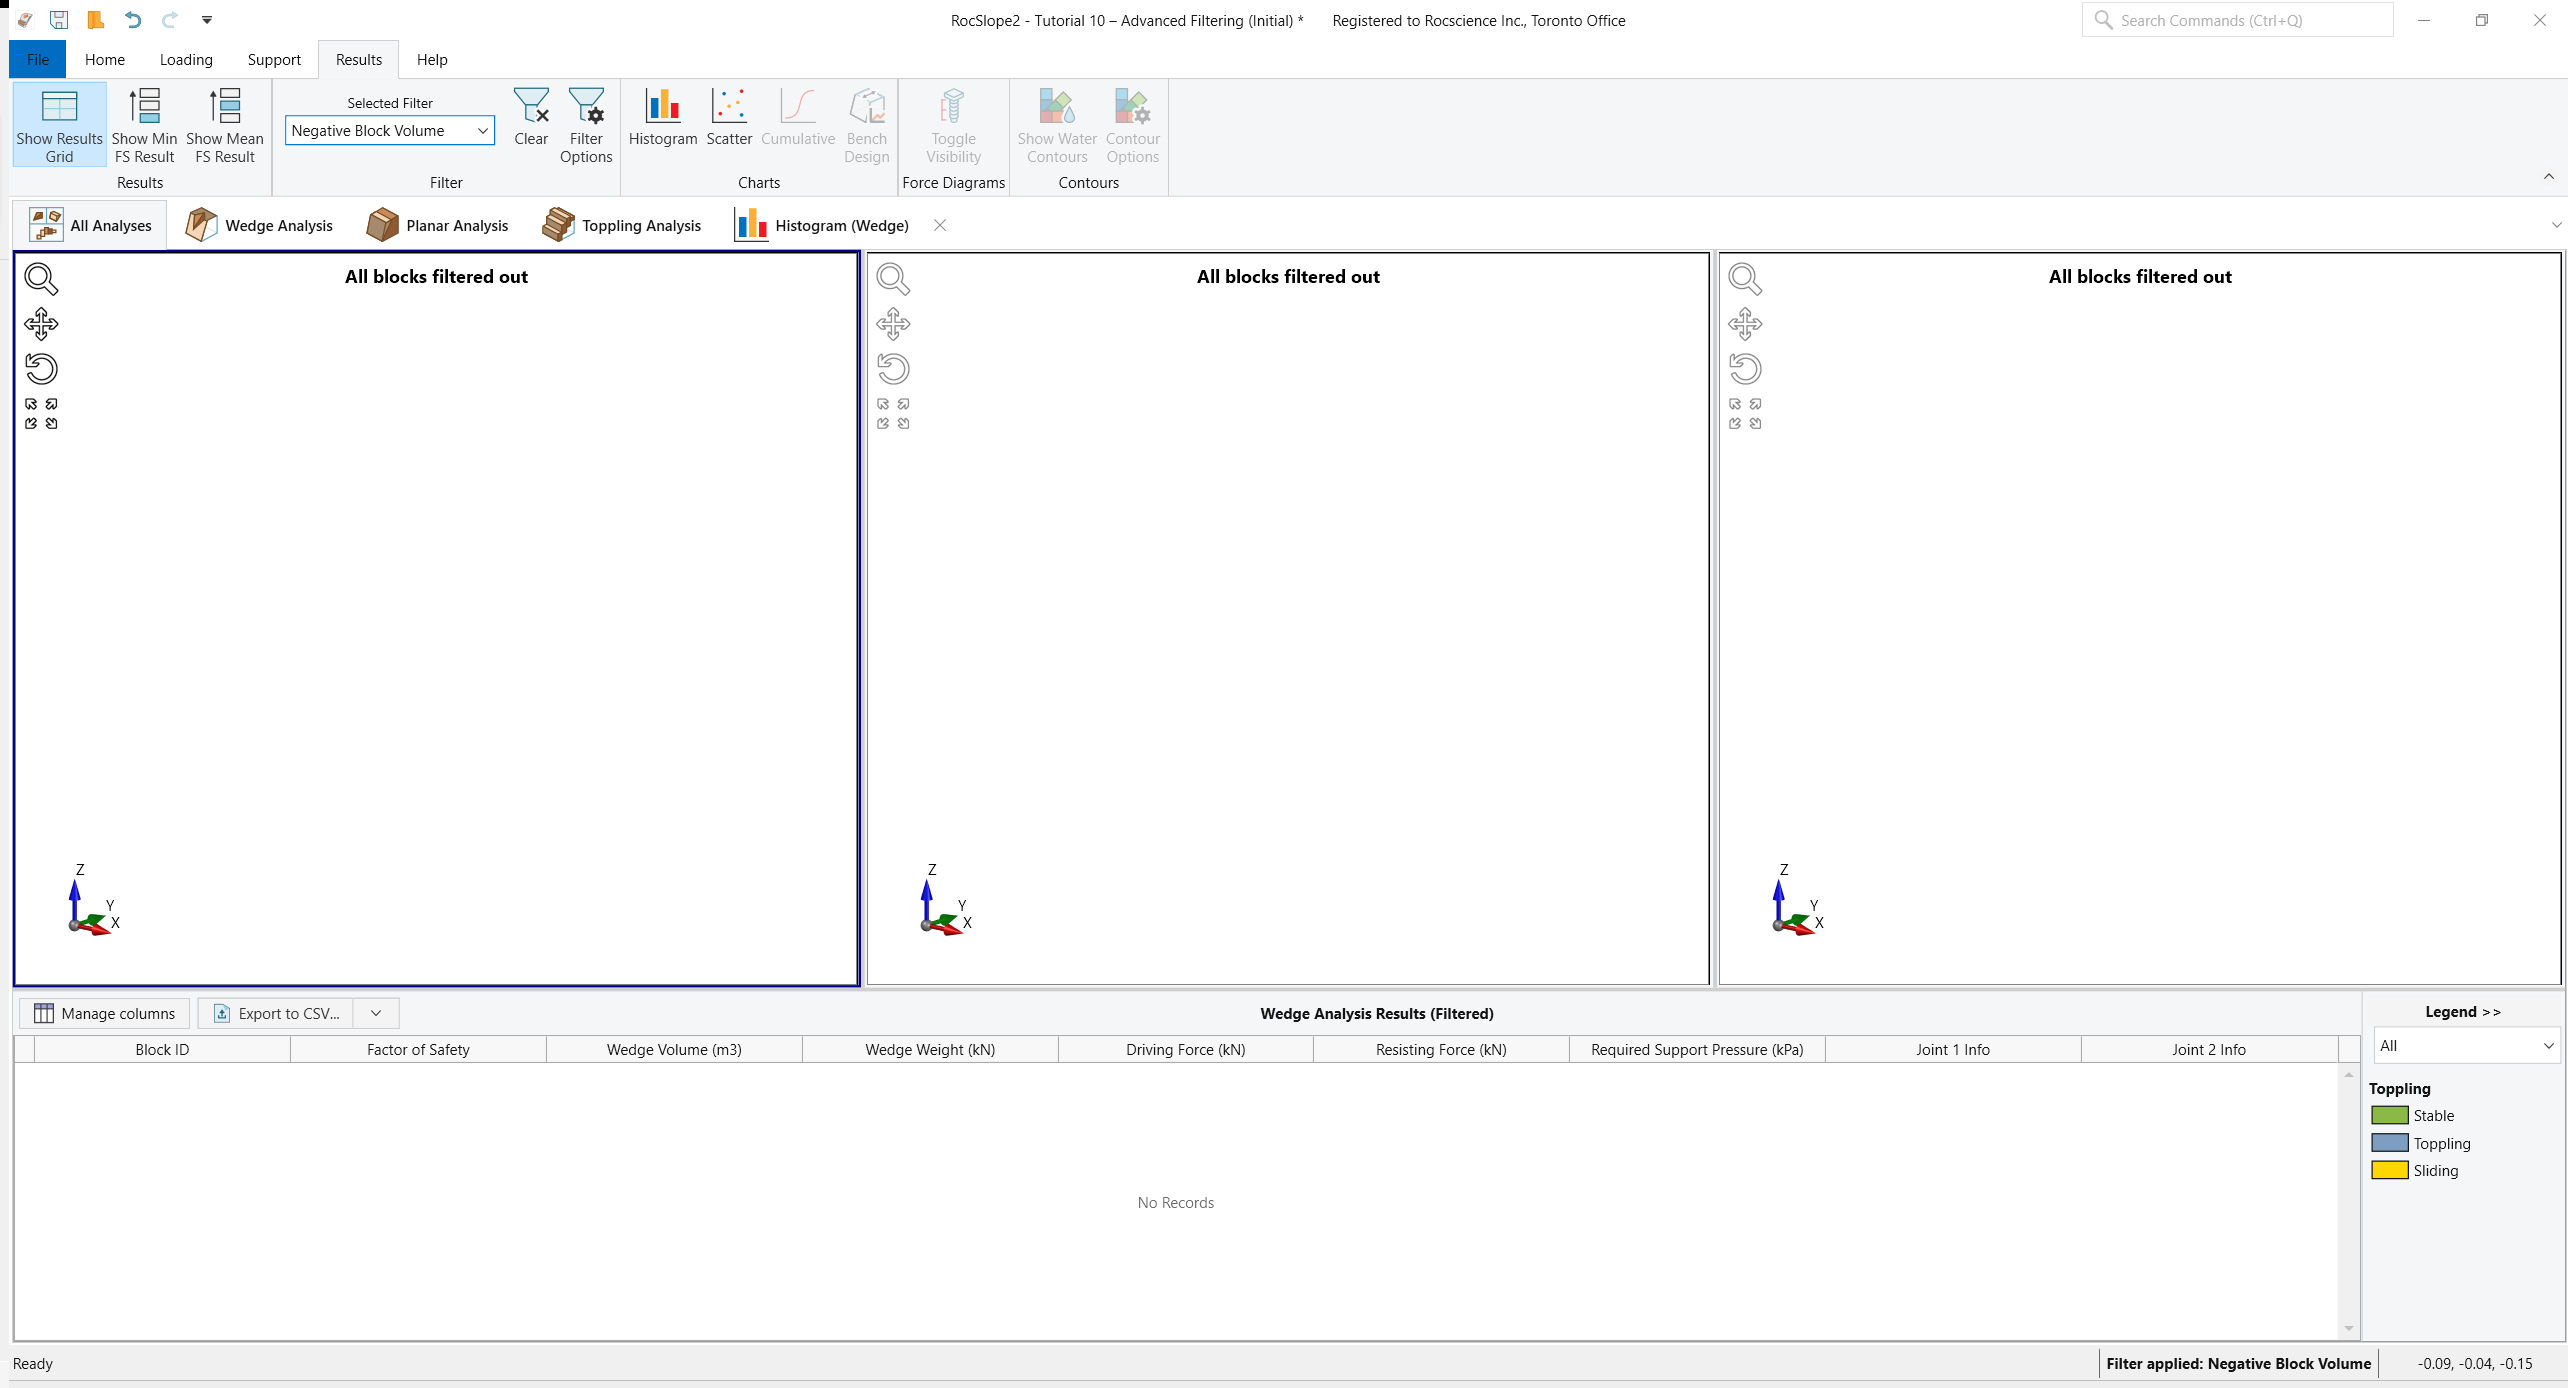
- Clear the filter by selecting Results > Filter > Selected Filter > <No Filter> or click Clear
This concludes the tutorial.