Integrated Rockfall Barrier & Berm Design using RocFall3 and RocFall2
Designing effective rockfall mitigation measures, such as barriers and berms, is essential to minimizing risks to infrastructure, transportation, and public safety. To address the complexities of rockfall mitigation, the latest developments in RocFall3 and RocFall2, offer a range of new features for the spatial analysis of rockfall energies, bounce heights, and frequencies, enabling you to make more informed decisions when implementing protective measures.
Spatial Analysis of Rockfall Energies and Bounce Heights
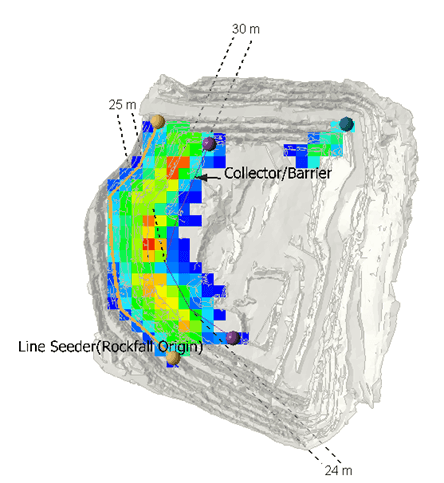
RocFall3 and RocFall2 bring together advanced spatial analysis capabilities to assist in the design of rockfall barriers and berms. Heatmaps in RocFall3 allow the spatial analysis of the distribution of rock end points, impact points, bounce heights, total kinetic energy, translational kinetic energy, and rotational kinetic energy, thus providing valuable identification of high-risk areas and of strategic locations for mitigation placement. After preliminary mitigation placement, 3D barrier plots allow the spatial analysis of impact intensity along a plane of data collection, further helping you identify critical areas for design and maintenance. Lastly, optimization of mitigation measures can be performed, via RocFall3’s critical slope section identification and export, followed by sensitivity analyses in RocFall2.
How to Optimize Using RocFall3 and RocFall2 Together
When designing mitigation measures like barriers and berms, it is essential to determine their optimal placement and characteristics. RocFall3 and RocFall2 offer a seamless integration that allows you to make informed decisions in the following ways:
Utilizing Heatmaps in RocFall3
For designing cost-effective mitigation, it is important to identify areas where mitigation measures of different types can be placed, and where rocks have the range of bounce heights and energies that can be practically contained by available protection systems. The heatmap feature in RocFall3 provides this capability through the analysis of maximum, mean, and user-defined percentiles of rock energies and bounce heights as distributed on the slope.
Defining and Exporting Critical 2D Sections to RocFall2
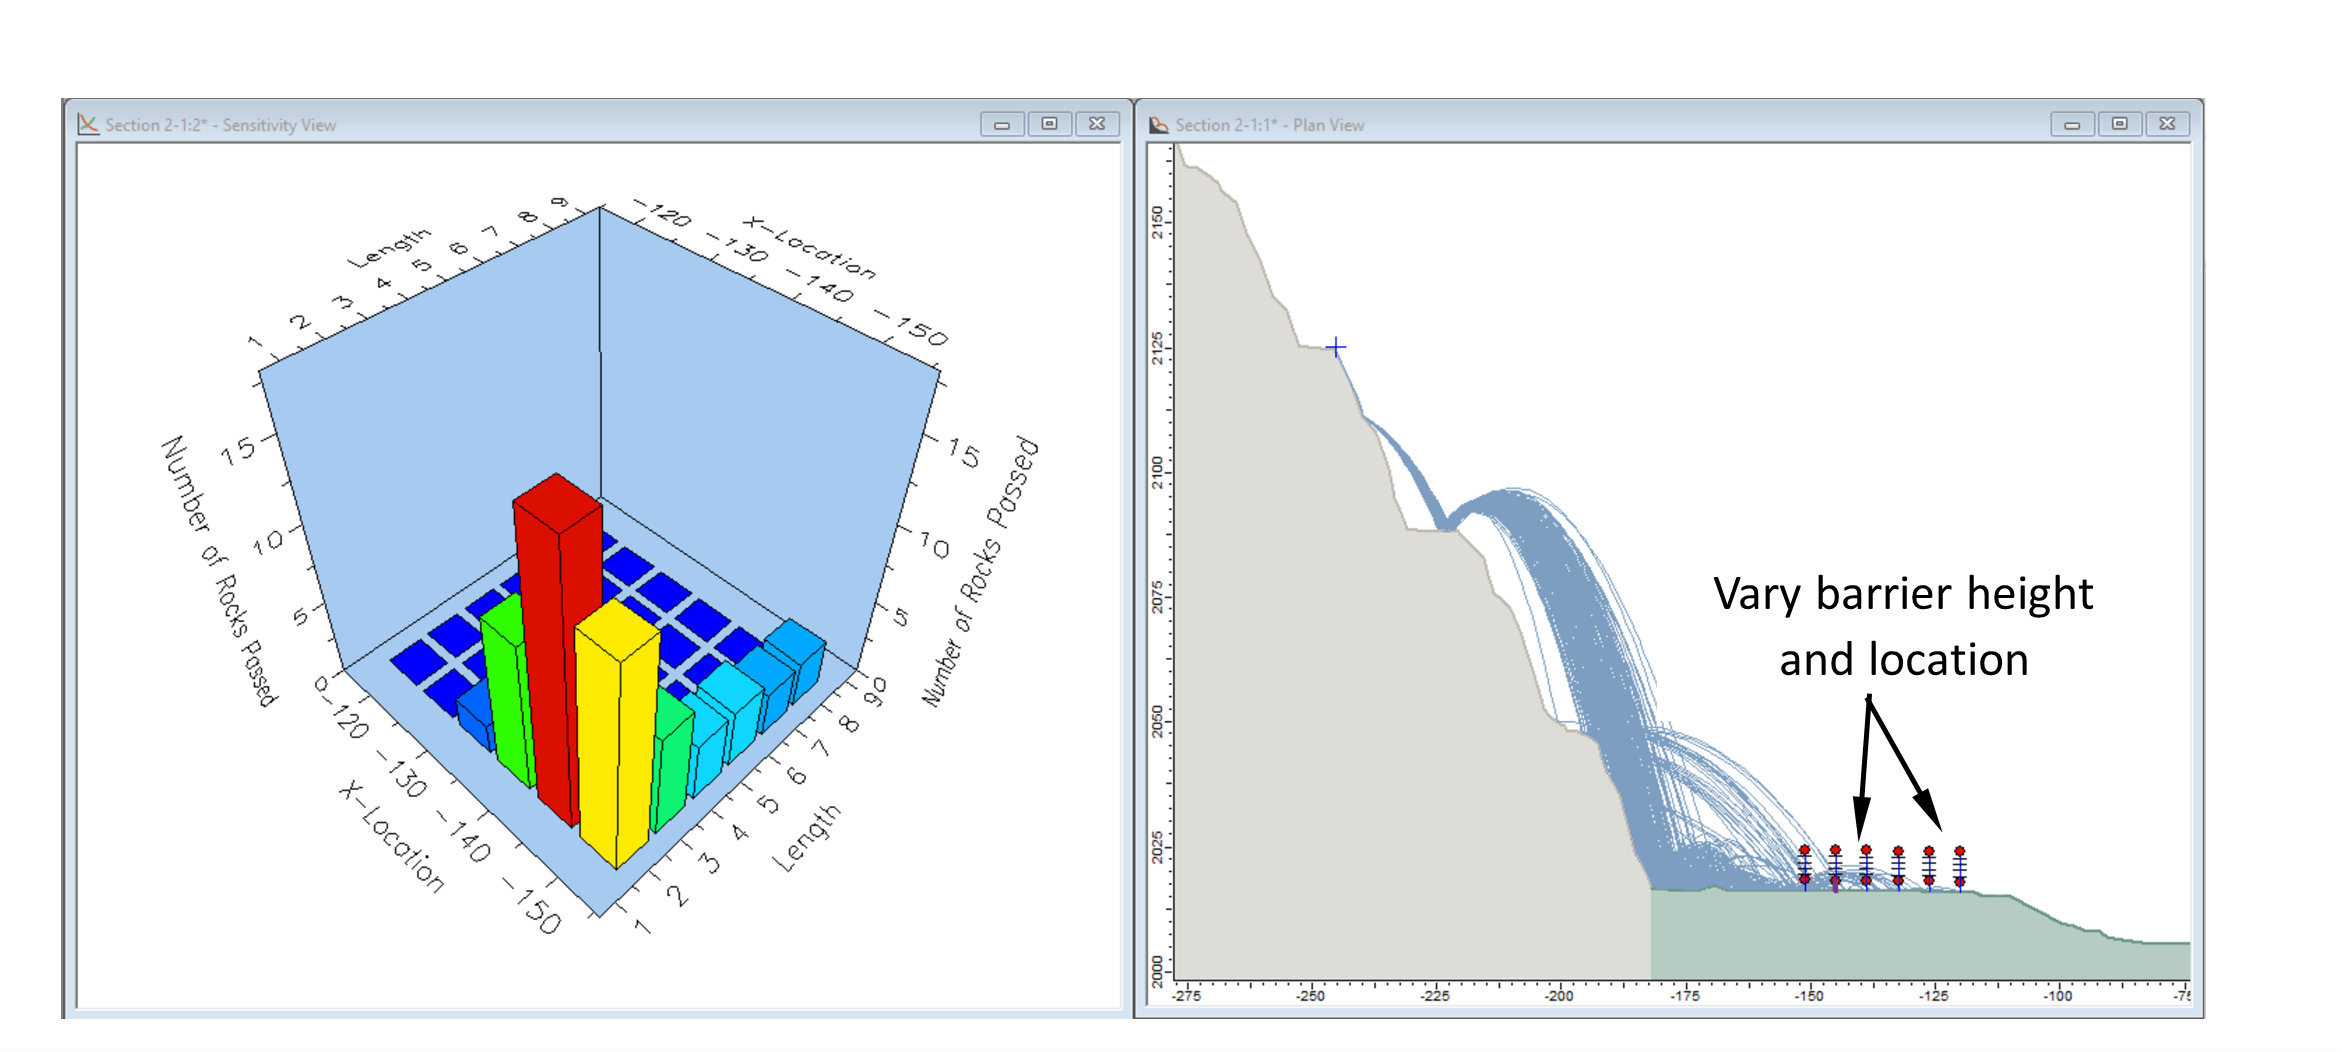
Following preliminary mitigation placement, optimization of the mitigation design is desirable in terms of the required capacity, geometry, and final placement location. While a sensitivity analysis is suited for this purpose, it is also best performed quickly in 2D, using one or more critical slope sections. Critical slope sections can be identified in RocFall3 via features such as the 3D barrier plot. The 3D barrier plot provides analysis of the impact intensity and frequency along the barrier or plane of information collection (e.g., energy, bounce height, number of hits and passes). Impact parameters for energy, velocity, bounce height, and impact angle can be analyzed at the maximum value or at a user-defined percentile. The distribution of these quantities may influence the selection of multiple critical sections, whether for the purpose of short-term retainment or long-term maintenance.
For ease-of-use, sections can be conveniently defined in RocFall3 by drawing polylines in the modeler view and then directly converted into 2D sections for export to RocFall2.

Barrier Sensitivity Analysis in RocFall2
The barrier sensitivity analysis in RocFall2 enables the optimization of barrier design. Effects on rock energy (and required capacity) and retention rates can be studied by varying essential barrier design parameters (i.e., height, capacity, inclination, and location). The sensitivity analysis can be for a single variable or for two variables for determining the most effective design. In a single-variable analysis, one essential parameter is varied while all other parameters remain constant. In a double-variable analysis, the combination of the two essential variables is varied while all other parameters remain constant.
The Power of Integration
The combined power of RocFall2 and RocFall3 offers a comprehensive solution for designing rockfall barriers and berms. With the ability to analyze rockfall hazards spatially and to optimize mitigation measures, you can make well-informed and cost-effect decisions to protect against rockfalls.
Start using an integrated approach for your barrier and berm design.
Try RocFall2 and RocFall3 for free today.
Free Trials