Working with Tables
Tables are used in various pages of RSLog for presenting and editing data. The following screenshot shows a table with the list of test holes of a project:
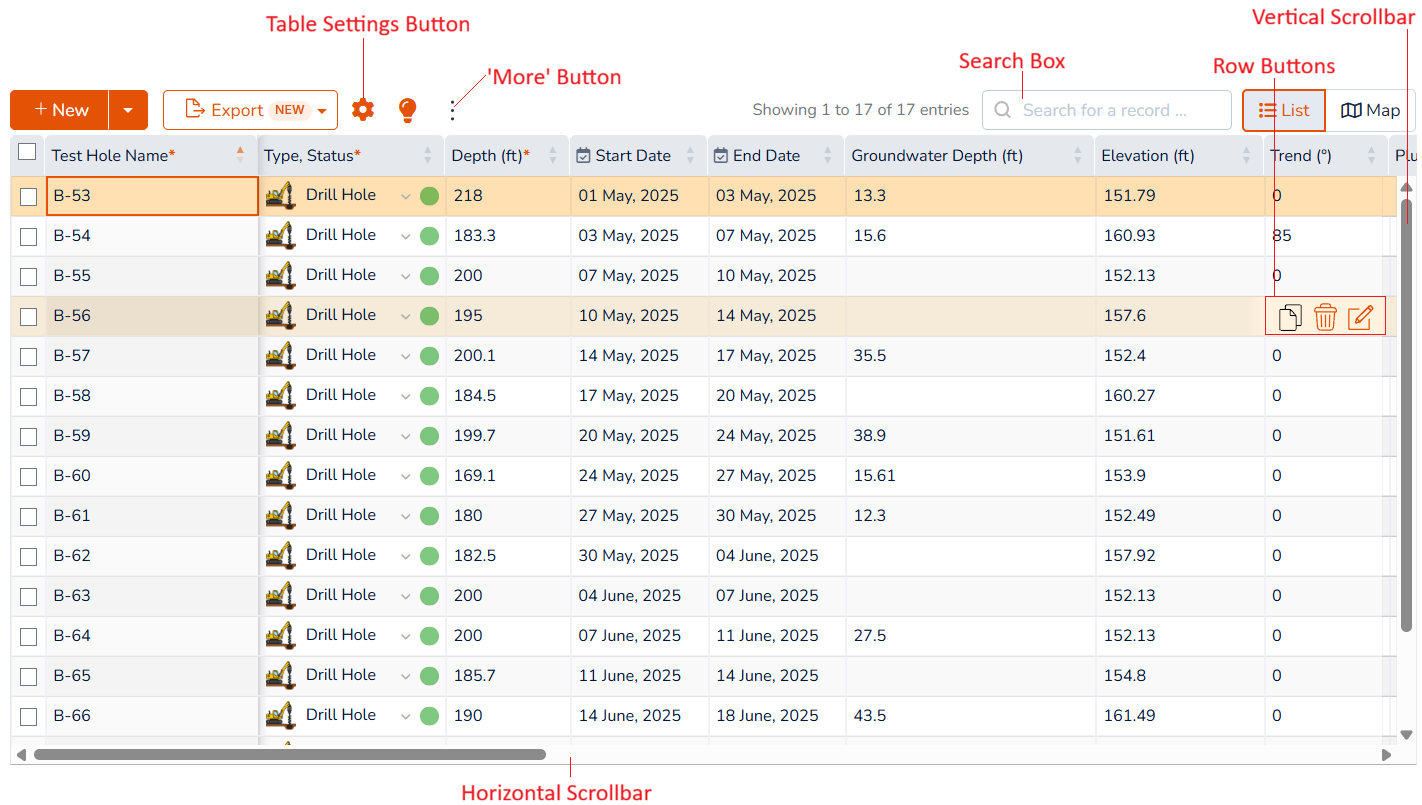
Each row stores the data for one 'record' (in this example, a test hole). By default, each tables shows the most common columns; In order to show all data entry columns for a record use one of the following options:
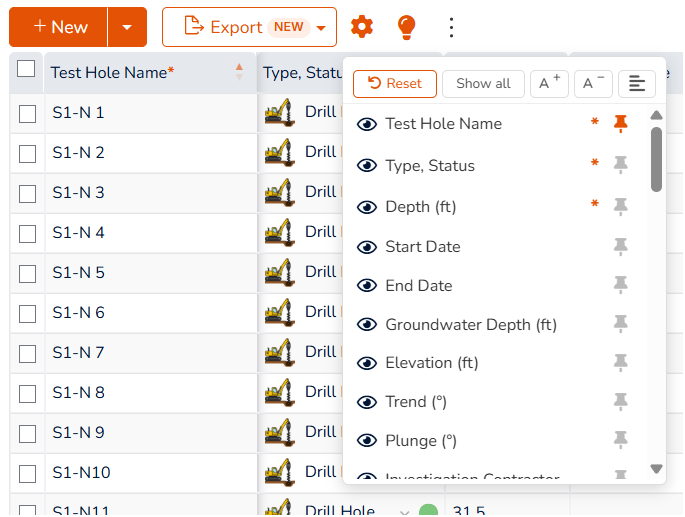
- Click the Settings button from the toolbar at the top-left of the table. Then turn on more columns as desired, or
- Hover over the record to see the 'row buttons' at the right end of the row, then click the Edit button.
Column Options
The Settings  button offers the following functions. These functions are saved in your RSLog account for each table:
- Column Visibility: turn columns on/off as needed,
- Pinning: use the pin button in the list to pin a column to left or right. When a column is pinned, its position is maintained while user uses the horizontal scrollbar,
- Font Size: use the font buttons to adjust the font size,
- Text Wrap: turn the text wrap effect for cells containing long text,
- Reset: use this button to reset the settings to default values,
Reordering Columns
To customize the order of columns use one of the following options:
- Click the Settings button from the top toolbar, then grab one of the items (mouse down) in the list and drag to adjust its order, or
- Grab the column-header of a column (mouse down) and drag the column to adjust its order.
Sorting Rows
To sort the table based on a column, click the column-header of the desired column. This will sort the rows in ascending order. Clicking the same column-header for the second time will sort the rows in descending order. The sort order is marked on the column-header with a small orange arrow:

Navigation
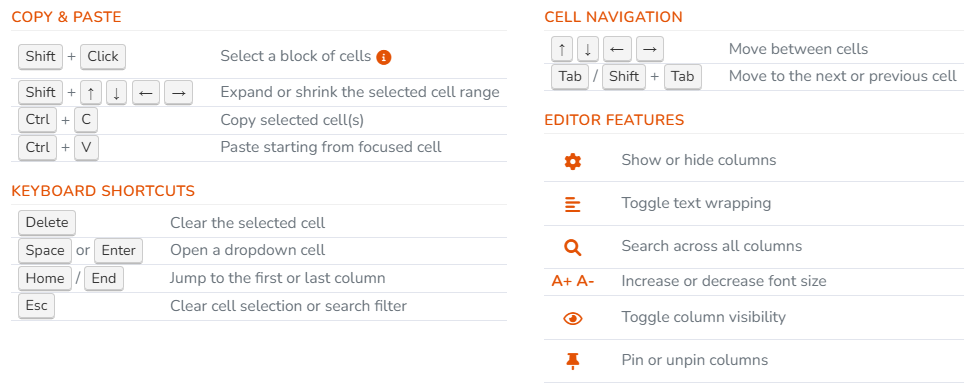
Use arrow keys or Tab key to navigate between cells. For other keyboard shortcuts please refer to the following legend:
Scrolling
To see more data, click and drag the scrollbar at the bottom of the table left or right to view other columns. Drag the scrollbar on the right side of the table up or down to view other rows. You can also use your mouse wheel or trackpad gestures to move through the table.
- Horizontal Scroll: Move side-to-side to see extra columns,
- Vertical Scroll: Move up and down to see extra rows,
- Mouse Wheel: Scroll down to move down, or hold Shift while scrolling to move sideways,
All tables load maximum 100 records at a time. To load more records, scroll to the bottom of table and the next 100 records will be loaded automatically:

Edit
The following edit functions are available for tables:
- Add a Record: click the + New button to add a new record. This will open a new dialog-box to allow data entry,
- Edit a Record: you can edit a record by:
- Clicking on a cell to edit it,
- Hovering over that record and clicking the Edit from the row buttons (at the right end of the row),
- Delete a Record: to delete a record:
- Select the checkbox on the left side of the desired rows, and click the Delete button from the top toolbar,
- Hover over the record and click the Delete button that appears at the right end of the row,
- Duplicate a Record: some tables offer copying a record (e.g. boreholes and projects tables). To do so, move the cursor to hover the record and click the Copy button from the row buttons,
Copy/Paste to Excel
Tables allow for copy and paste of a range of cells between RSLog and spreadsheet programs like Microsoft Excel:
- Copy to Clipboard: to select a range of cells and copy to clipboard:
- Select a cell,
- Hold Shift key and click another cell,
- The cells between these cells will be selected,
- Press Ctrl+C to copy,
- Paste to Table: to paste the data to a table:
- Go to your spreadsheet application and select a cell range,
- In RSLog, select the cell representing the top-left corner of the data you want to paste,
- Press Ctrl+V to paste,
Import (CSV)
To start importing records from a CSV file, click the dropdown next to the + New button to open the dropdown menu, then select Import CSV File menu. Please see more details.
Export
In order to export the table:
- Export to CSV: from the top toolbar click the Export button and select Export to CSV,
- Export to Excel: from the top toolbar click the Export button and select Export to Excel,
- Export to PDF: from the top toolbar click the Export button and select Export to PDF,
More Options
Use the 'more button' from the top toolbar to:
- Copy Table: this copies the visible records to the clipboard. To use this feature click the 'More' button
 from the top toolbar and select Copy Table from the menu,
 - Print the Table: this prints the entire table to your default printer. To use this feature click the 'More' button from the top toolbar and select Print Table from the menu,
- Clearing Table Data: this will delete all records of the table (this cannot be undone!). To use this feature click the 'More' button from the top toolbar and select Clear Table Data from the menu,
Search
In order to search for specific records, enter your search criteria (e.g., borehole name, project number etc.) in the search box located at the right end of the top toolbar. This will filter the table and shows the records that match the search criteria.