AGS Editor
The AGS Editor page offers all capabilities needed to handle AGS data: import, edit, filter, search and export. The current version of AGS Editor supports AGS 4.1.x.
To access the AGS Editor page:
- Create or open an AGS project,
- Go to the left-hand navigation menu and select Test Holes,
- Make desired changes as necessary,
- Save or export data.
Importing AGS File
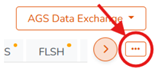
To import an AGS files use the AGS Data Exchange button (at the top-right of the page) and select the Import AGS File option. This will open the Import AGS dialog box to allow uploading the AGS file. Once the file is processed, the lower portion of the page shows the list of all standard groups:
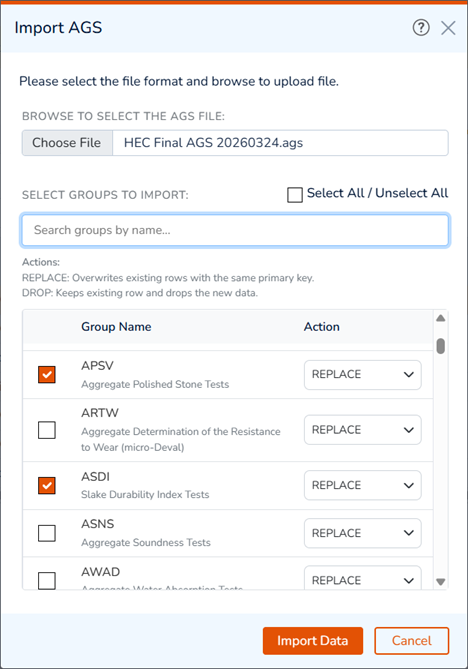
Since user can import multiple AGS files to the same project, the potential 'conflicts' between rows with the same KEY column values must be handled by the Action column. Options include:
- REPLACE: this will replace the original record with the incoming imported record.
- DROP: will ignore the incoming changes.
This can be done on a GROUP by GROUP basis.
AGS Groups
Use the tabs at the top of the page to select the desired AGS group, and start editing data in a spreadsheet format:

The … button opens the Manage Group Tabs modal, where you can add/remove AGS groups from the list of tabs.
Editing Data
To edit the data, simply select a cell and use the following options:
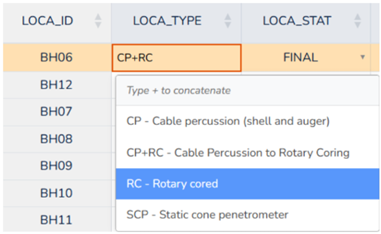
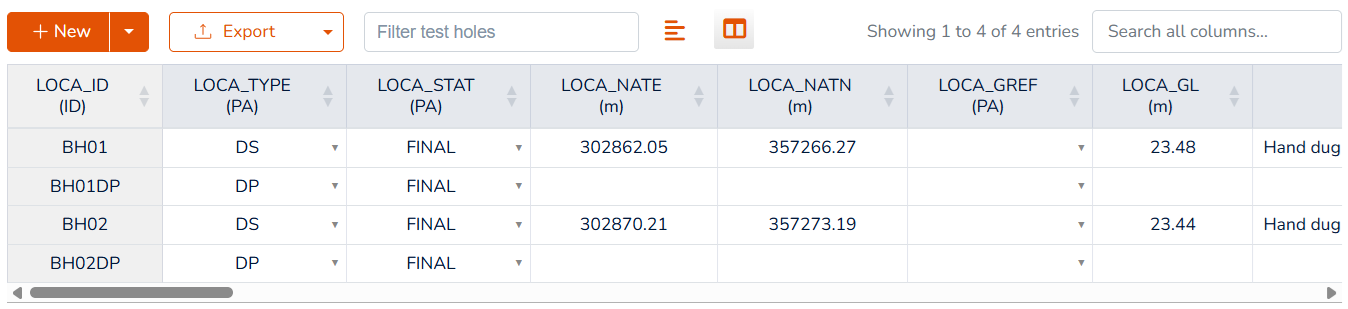
- To Navigate Between Cells: use the arrow keys to navigate between cells. Pressing Tab key navigates to the cell to the right. Column-headers show the standard AGS group name separated from the column name by _ character (e.g. LOCA_ID),
- To Add a New Record: press the +New button to add a row above or below the current record,
- To Edit a Cell: double click on the cell to edit the text, or start typing to replace the text,
- To Open a Dropdowns: navigate to the cell and Enter key to open the list, then select the desired option and press Enter to finish editing,
- To Select Multiple Items: some dropdowns support multi-selection (e.g. LOCA_TYPE). To select multiple items, select an item, then press + key, and select the next item from the list,
- To Delete a Cell: press Delete key,
- To Delete a Record: use the
 button at the right end of the row, or press Shift+Delete keys,
Search and Filter
To search for a text in all columns use the search box at the right end of the table toolbar. This will filter the records as you type:
To filter a table for a specific borehole, click the Filter Test Holes box and select the desired borehole from the list. This is only available on AGS groups with a LOCA_ID column.
Formatting Options
The following formatting options are available for all tables (through the top toolbar):
- Text Wrap: Toggle text wrapping option to automatically resize certain columns that carry long text (e.g. GEOL_DESC). This feature is designed for an optimum cell size to display the entire text, and
- Column Visibility: The column visibility feature allows you to hide / show columns in a table.
About Borehole Coordinates
In order to project borehole locations on the maps, RSLog uses project's Coordinate Reference System (CRS) to convert Easting and Northing of boreholes to Latitude and Longitude. To streamline this process, please note the following:
- If all boreholes have LOCA_LAT and LOCA_LON, then set the project CRS to Geographic. You can do so by going to the Projects List page and editing the project,
- If all boreholes have values for LOCA_NATE and LOCA_NATN:
- if the LOCA_GREF is set for the borehole, then set the project CRS to Projected and select the appropriate ESPG code.
- If the LOCA_GREF is not set for the borehole, then set the project CRS to UTM.
Exporting to AGS
To export project data to AGS 4.1.x, click the AGS Data Exchange button (at the top-right of the page) and select the Export AGS File option.