Photos
Photos can be uploaded for project (general purpose) or for any data entity under a test hole (e.g. sample, drill run, etc). The 'featured' photos can be added to the test hole log, while a collection of selected photos can be added to a Photo Report.
To benefit from geotagging features in RSLog please make sure the Location Services of your device camera is ON (read more).
Accessing Photos
There are different ways to upload or view the project photos in RSLog:
On the Photos Page
This page is accessed by going to the left-hand navigation menu and selecting Photos. To upload a photo, click Upload button.
On Specific Data Entry Page
For a Project: go to the left-hand navigation menu and select Projects List, then create / edit a project. On the dialog box that opens, click +Photo button in the footer of the page. Project photos typically cover pictures of the project site, excavation, subgrade review, pile installation etc.
For a Test Hole: to upload photos under a test hole, go to the left-hand navigation menu and select Test Holes. On this page, find the desired borehole from the list and click Edit button at the far right of that row. When test hole data is loaded, navigate to the Photos tab then click Upload button.
For a Data Entity Under a Test Hole: while on test hole edit page, switch to the specific tab e.g. Samples tab, Field Tests tab, etc. Then create / edit a record under that tab and click + Photo button in the footer of the dialog box (or use the Photos column in the table) to start uploading or previewing photos.
Uploading a Photo
The photo upload page comprises a data entry panel (on the left) and a preview of the photo (on the right):
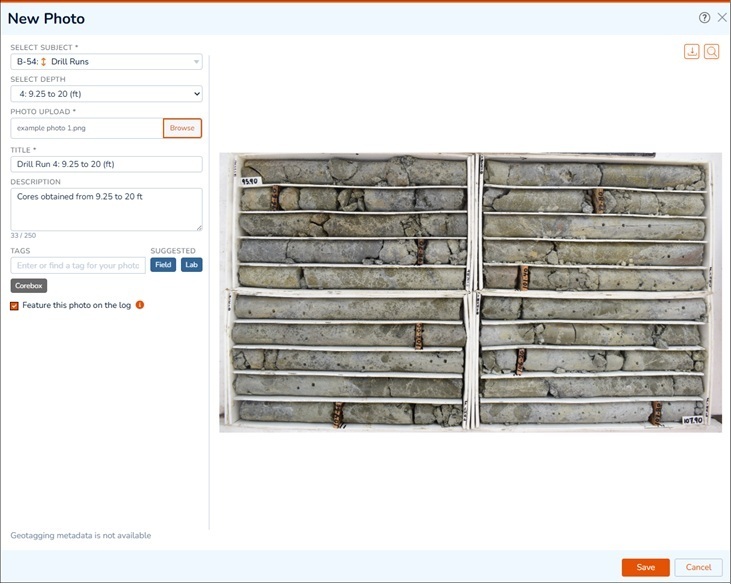
The 'subject' refers to the data entity to which the photo is assigned (e.g. test hole, sample, field test, drill run etc.). Once the subject is selected, the Select Depth dropdown populates with the list of existing records.
Photo Gallery
The uploaded photos are displayed in a photo gallery at the following pages:
- For a Project: all photos of a project can be accessed on the Photos page.
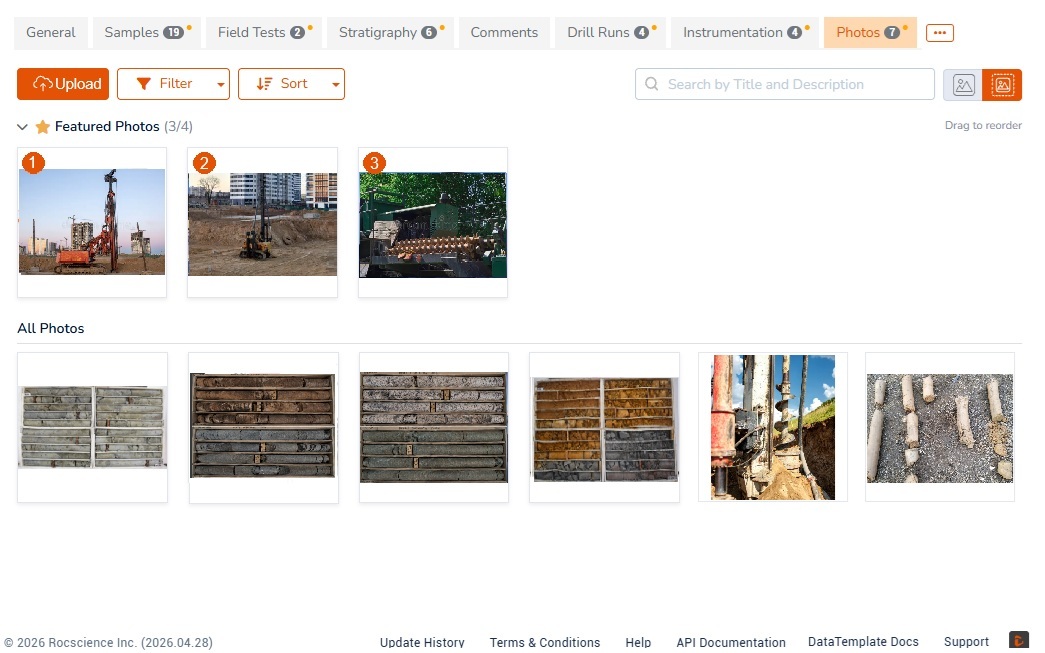
- For a Test Hole: to view all photos of a test hole, edit that test hole and go to the Photos tab (see screenshot below).
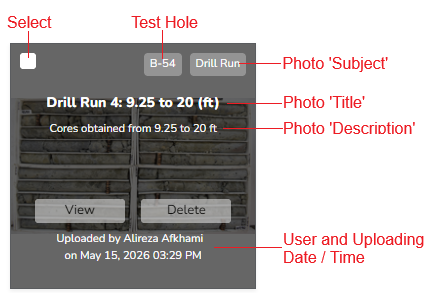
To view, edit or delete a photo hover over the photo and use the features described below:
Filtering Photos
Use the Filter button at the top-right of the photo gallery to filter photos:
- Filter by Subject: select the desired subjects from the list,
- Filter by Depth: enter the depth range to filter the photos,
- Filter by Custom Tags: select the tag(s) from the list of custom tags.
To remove the filter click Filter button and select Reset Filters just below the Filter button.
Sorting Photos
To sort photos by depth or upload date click Sort button at the top-left of the photo gallery. In addition, sorted photos can be grouped by their subject.
Searching for a Photo
To search for a photo by its title or description enter your search text in the search box at the top-right of the photo gallery.
Thumbnail Size
To select the thumbnail size click desired option at the top-right corner of the photo gallery.
Viewing a Photo
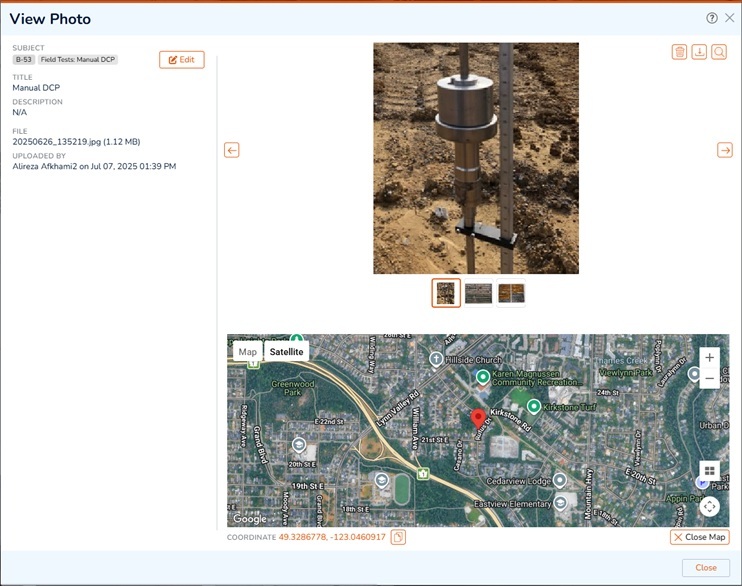
To view or edit photo details, hover over the photo and click View button or click anywhere on the photo card. This opens a separate dialog box showing a preview of the photo (see screenshot below):
- Edit Photo Details: to edit photo title or description click Edit button at the top-left portion of the page,
- Delete the Photo: to delete this photo click delete button at the top-right corner of the page,
- Download the Photo: to download the original photo click download button at the top-right corner of the page,
- Preview of Photo: the right portion of the page shows a preview of the photo. For a full-screen preview of the photo click the magnifier button at the top-right corner of the page,
- Location of the Photo: if the photo is geotagged, a map will be opened within the lower portion of the page showing the location where the photo was taken.
Geotagging
Geotagging is the process of adding geographical identification metadata such as latitude and longitude coordinates to digital media like photos. To ensure your photos are geotagged, you need to enable Location Services on your device's camera and ensure your GPS is turned on. Once enabled, the camera will automatically inject the latitude and longitude into the file's metadata (EXIF data) whenever you take a picture.
On iOS
- Go to Settings → Privacy & Security → Location Services,
- Make sure Location Services is toggled ON,
- Scroll down and tap Camera,
- Set it to While Using the App.
On Android
- Open your phone’s Settings,
- Tap Location and make sure it is toggled ON,
- Open your Camera app,
- Tap the Settings gear Icon and look for Location Tags or Save Location. Toggle it ON.
Featured Photos
Marking a photo as 'featured' makes it available for displaying on the borehole logs (see next section). To mark a photo as 'featured':
- For a new photo, during uploading the photo select the 'Feature this photo on the log' checkbox,
- For an existing photo, click on the photo to open the View Photo dialog box, then click Edit button at the top-left to enter edit mode. Then select the 'Feature this photo on the log' checkbox.
On test hole edit page → Photos tab the Featured Photos section just below the Filter and Sort buttons shows the list of test hole featured photos. Each test hole can have up to 4 featured photos, however, there is no limit on the number of featured photos for the intervals (stratigraphy, sample, drill run).
Showing Photos on the Log
To show a photo on the test hole log, it must be marked as 'featured' photo (see previous section). The following options are available for showing photos on the borehole log:
Photos of a Test Hole
Test hole photos (e.g. drilling or test pit investigation, site condition etc) can be shown either at the header/footer of the log, or at the bottom of the last page of the log.
On the Header or Footer of the Log
To show the featured photos of test holes on the header / footer of the log:
- edit the subject log template,
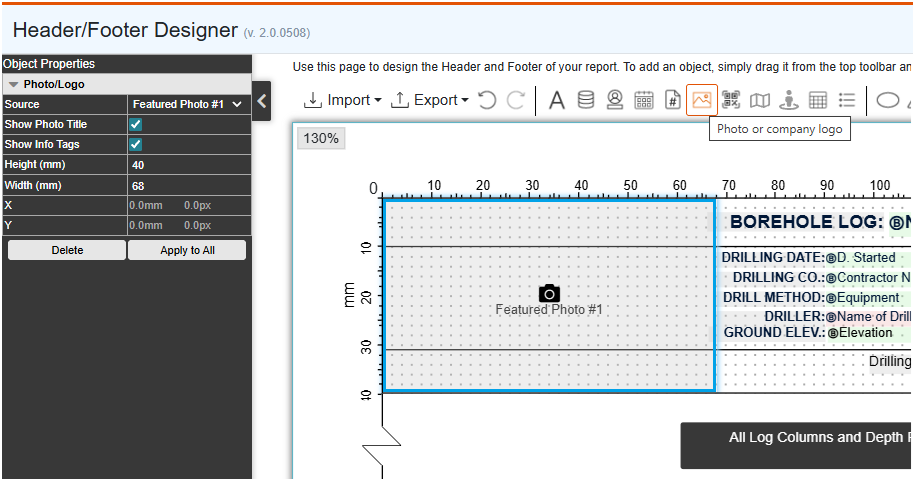
- click Customize Layout button to open the Header/Footer Designer page,
- from the top toolbar, add a Photo/Logo object to the header or footer area,
- from the left property panel select the Source property to link this object to any of the test hole featured photos,
- if the Show Photo Title is selected, the title of the photo will be printed below the photo on the log,
- if the Show Info Tags is selected, the custom tags of the photo will be printed on the photo.
At the Bottom of the Log
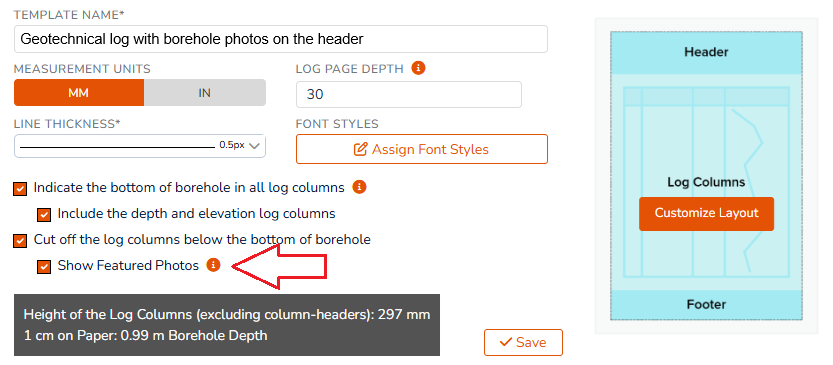
To show the test hole featured photos at the bottom of the last page of the log:
- edit the subject log template,
- select the Show Featured Photos checkbox.
Photos of Intervals
Featured photos of the intervals (stratigraphy, sample, drill run) can be displayed in the Photos log column. To do that, follow these steps:
- edit the subject log template,
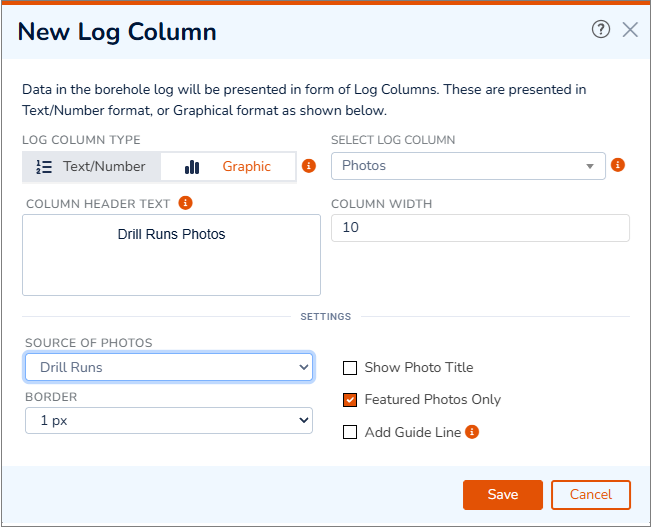
- scroll down to the list of log columns and add a new column of type Graphic → Photos,
- a new dialog box pops up (see screenshot below),
- within the Settings section, select the relevant options:
- Source of Photos: determines the type of interval you would like to show the photos for,
- Border: draws a box around the photo,
- Show Photo Title: if selected, title of the photo will be printed below the photo,
- Featured Photos Only: if selected, only the featured photo will be added to the log column,
- Add Guide Line: if selected, a line will be drawn at the top depth and bottom depth of that interval.
Televiewer Image
To add an acoustic or optical televiewer image for a borehole:
- edit the subject borehole and navigate to the Photos tab,
- click Upload button and select Televiewer option from the subject dropdown,
- upload the image and fill in the required data entry fields such as depth to top and bottom of the televiewer image,
- click Save to close the dialog box.
To display the televiewer image in the borehole log:
- edit the subject log template,
- scroll down to the list of log columns and add a new column of type Graphic → Televiewer,
- a new dialog box pops up (see screenshot below),
- select the televiewer image you would like to show and click Save.
Generating a Photo Report
Project photos can be summarized in a photo report. To generate a photo report:
- from the left hand navigation bar go to the Reporting → Other Reports → Photo Report,
- on this page select the photos you would like to include in the report. Utilize the filter, group and sort features (see Photo Gallery) or hover on a photo to add/remove it from the list of selected photos,
- from the Report Settings panel (right side of the page), select the figure template, figure title and other settings,
- click Generate Photo Report button.
This will open the report for the photo report in a PDF viewer with a download button at the right end of the toolbar.
Storage Plans
The free photo storage plan has a limit of 10 GB. To upgrade your storage space please contact our sales.