5 - Bored Pile Capacity
1.0 Introduction
This tutorial demonstrates how to analyze a single bored pile in multiple soil layers under various conditions in RSPile.
Topics Covered in this Tutorial:
- Multi-layer model
- Soil types for bored piles
- Pile properties
- Export data to Excel
- Report generator
Finished Product:
The finished product of this tutorial can be found in the Tutorial 5 – Bored Pile Capacity.rspile2 data file. All tutorial files installed with RSPile can be accessed by selecting File > Recent Folders > Tutorials Folder from the RSPile main menu.
2.0 Model
When the RSPile program is started, a new blank document is already opened, allowing you begin creating a model immediately.
2.1 PROJECT SETTINGS
The Project Settings is where you can change the analysis type, tolerance, number of iterations allowed, and the number of pile segments to be used in the analysis.
To open the Project Settings:
- Select Home > Project Settings
 (CTRL + J).
 - In the General tab, change the Program Mode Selection to Capacity Calculations.
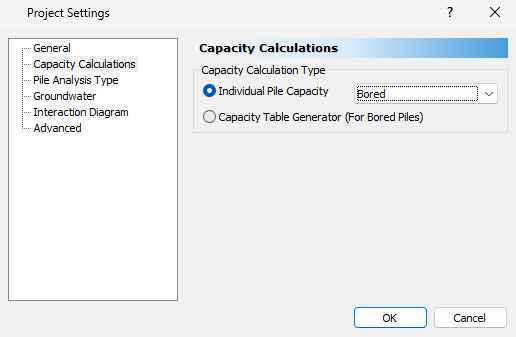
- Go to the Capacity Calculations tab and set Capacity Calculation Type to Bored.
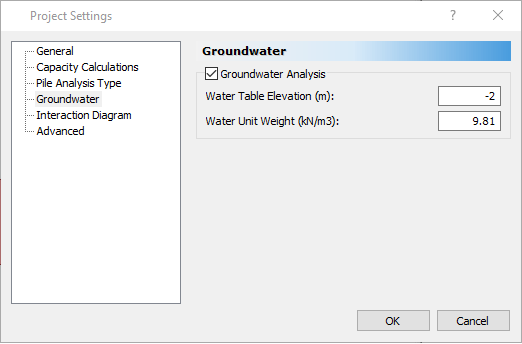
- Select the Groundwater tab. Check the box for Groundwater Analysis and enter a Water Table Elevation of -2m.
- Click on the Advanced tab. Change Pile Discretization to Custom, and then enter Pile Depth Increment (m)= 1 and Pile Segments = 50.
- Click OK to close the dialog.
2.2 SOIL PROPERTIES
- Select Soils > Define Soil Properties
 (CTRL + 8).
 - Define the material properties as shown below:
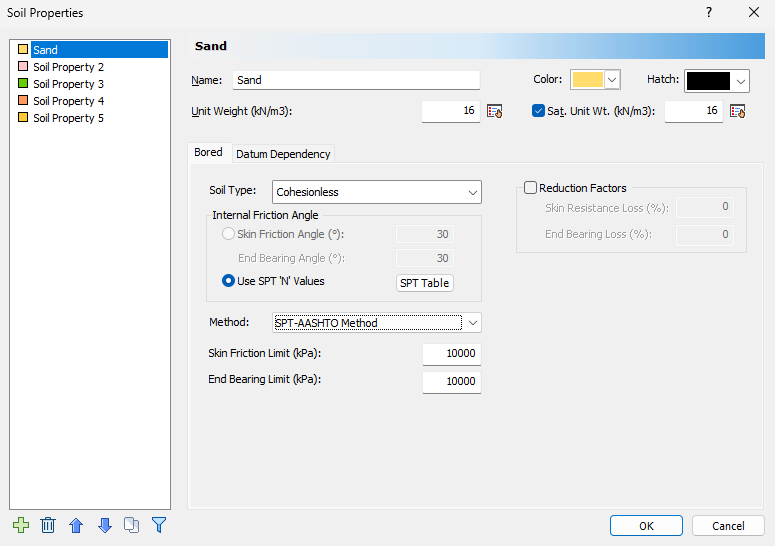
- Name = Sand
- Unit Weight = 16 kN/m3
- Sat. Unit Weight = 16 kN/m3
- Soil Type = Cohesionless
- Internal Friction Angle = Use SPT “N” Values
- Method = SPT-AASHTO Method
- Click on SPT Table.
- Enter the following data:
- Click OK to close the dialog.
- Name = Rock
- Unit Weight = 20 kN/m3
- Sat. Unit Weight = 20 kN/m3
- Soil Type = Weak Rock
- Unconfined Compressive Strength = 2,000 MPa
- Skin Friction Limit = 10,000 kPa
- End Bearing Limit = 100,000 kPa
- Skin Resistance
- Method = William and Pells
- Average RQD = 40%
- Tip Resistance
- Tomlinson and Woodward
- Internal Friction angle = 27 degrees
- Click OK to close the dialog.
In this dialog you can define the properties related to the Q-z, t-z, and p-y curves. There is a tab for the analysis type you selected in the Project Settings as well as for datum dependency. The Datum Dependency tab allows users to control linearly varying properties.
Soil Property 1:
Depth (m) | SPT N |
0 | 25 |
1 | 25 |
2 | 25 |
3 | 25 |
4 | 25 |
5 | 25 |
Soil Property 2:
Note:
- The end bearing limit for rock was set to 100,000 kPa because rocks naturally have higher end bearing capacities. To obtain the actual end bearing capacity and not the capacity limited by the concrete cylinder strength, the limit was raised.
- Unit weight and saturated unit weight are specified in the Soil Properties Dialogue here for both the sand and rock layer, but it will not affect the ultimate capacity calculations of the bored pile.
- To consider skin resistance or end bearing losses, the reduction factors option can be turned on by checking the Reduction Factors box and specifying the associated Skin Resistance Loss (%) and/or End Bearing Loss (%).
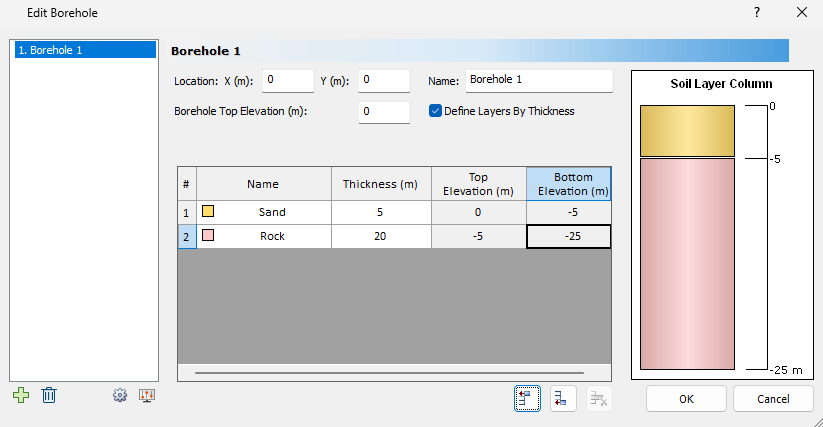
2.3 SOIL LAYERS
RSPile supports multiple boreholes and non-horizontal soil strata. When multiple boreholes are defined, the program will automatically interpolate between the boreholes. In this tutorial, we will model horizontal soil strata with a single borehole. To begin:
- Select Soils > Edit All
 to open the Edit Borehole dialog.
 - Click on Insert Layer Below to add another layer below the first. The name column will fill in by soil property sequence.
- Specify the following layer thicknesses:
- Click OK to save your input and exit the dialog.
The default soil column has a single layer and is located at (0, 0). To change the location, enter coordinates for X and Y. We will keep it (0,0) here.
Layers are defined by thickness by default, but may be defined by top and bottom elevation. This may be changed by toggling Define Layers by Thickness.
# | Name | Thickness | Top Elevation | Bottom Elevation |
1 | Sand | 5 | 0 | -5 |
2 | Rock | 20 | -5 | -25 |
2.4 OPTIONAL CAPACITY CONSIDERATIONS
- Select Home > Optional Capacity Consideration

- Under the Design Type of Soft Compressible Soil, you can specify a Depth of Soft Compressible Soil at the top of the soil profile. The skin resistance for the layer will be neglected for ultimate capacity calculations.
- The Consider Soil Resistance as Negative option will treat the skin resistance obtained for the layer as negative and is subtracted from the the total skin friction for ultimate capacity computations.
- Change the Design Type to Scourable Soil
- For short-term scour, the shear stress (skin friction) is reduced to zero until the scour consideration depth. Since no end bearing can be placed above this level, the end bearing is also reduced to zero.
- For long-term scour, the effective overburden stress is reduced to zero until the scour consideration depth. This would imply that skin friction and end bearing are also reduced to zero.
- If both short-term and long-term scour are being considered, RSPile will stack the effects of both scour types, with the long-term scour being considered first, followed by short-term scour considerations below in term of depth.
- We will keep the inputs for Optional Capacity Considerations as default. Click OK to close the dialog.
In the Optional Capacity Consideration dialog, you can define additional parameters that will affect the Ultimate Capacity Analysis.
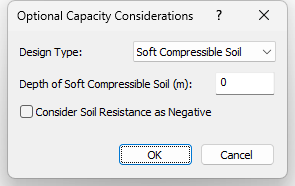

The design option of Scourable Soil allows for the consideration of short-term and/or long-term scour.
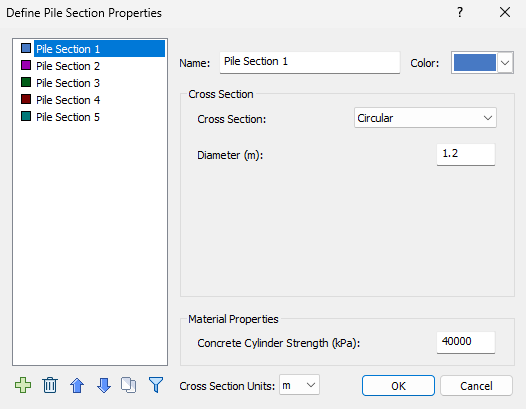
2.5 DEFINE PILE SECTION PROPERTIES
- Select Piles > Pile Sections
 to open the Define Pile Section Properties dialog.
 - Select Pile Section 1 and enter the properties displayed below:
- Pile Cross Section = Circular
- Diameter of Pile (m) = 1.2
- Concrete Cylinder Strength (kPa) = 40,000
- Click OK to close the dialog.
2.6 ADDING A PILE
The Add Single Pile dialog is where the pile elevation (depth of top of pile) and length are defined. To add a pile:
- Select Piles > Single
 to open the Add Pile dialog.
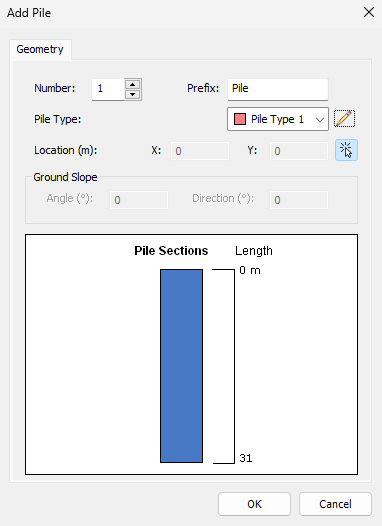
- Click on the Edit
 icon for the Pile Type and enter the Length (m) = 25 for Pile Type 1. Click OK to return to the Add Pile Dialog.
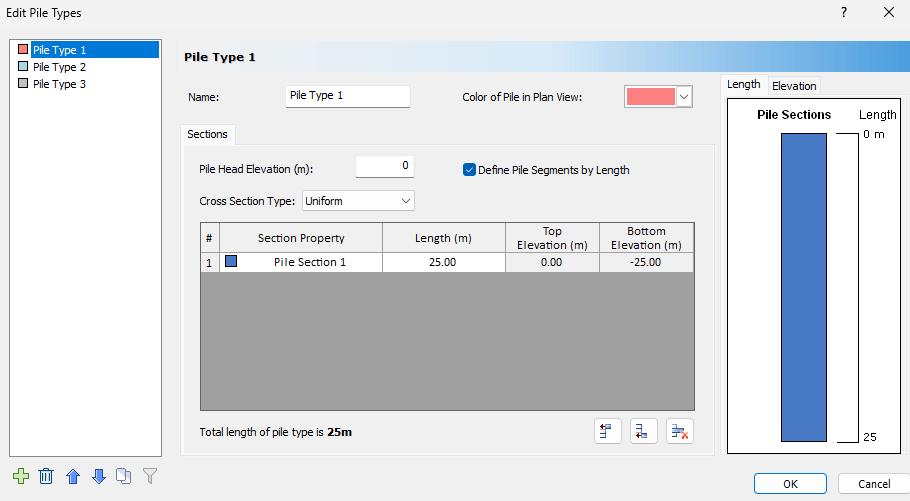
- Under the Location field, deselect the Mouse Selection
 icon to enter the (x,y) coordinates of the new single pile. We will keep the default location of (0,0).
 - Keep the rest of the properties as default.
- Click OK to close the dialog.
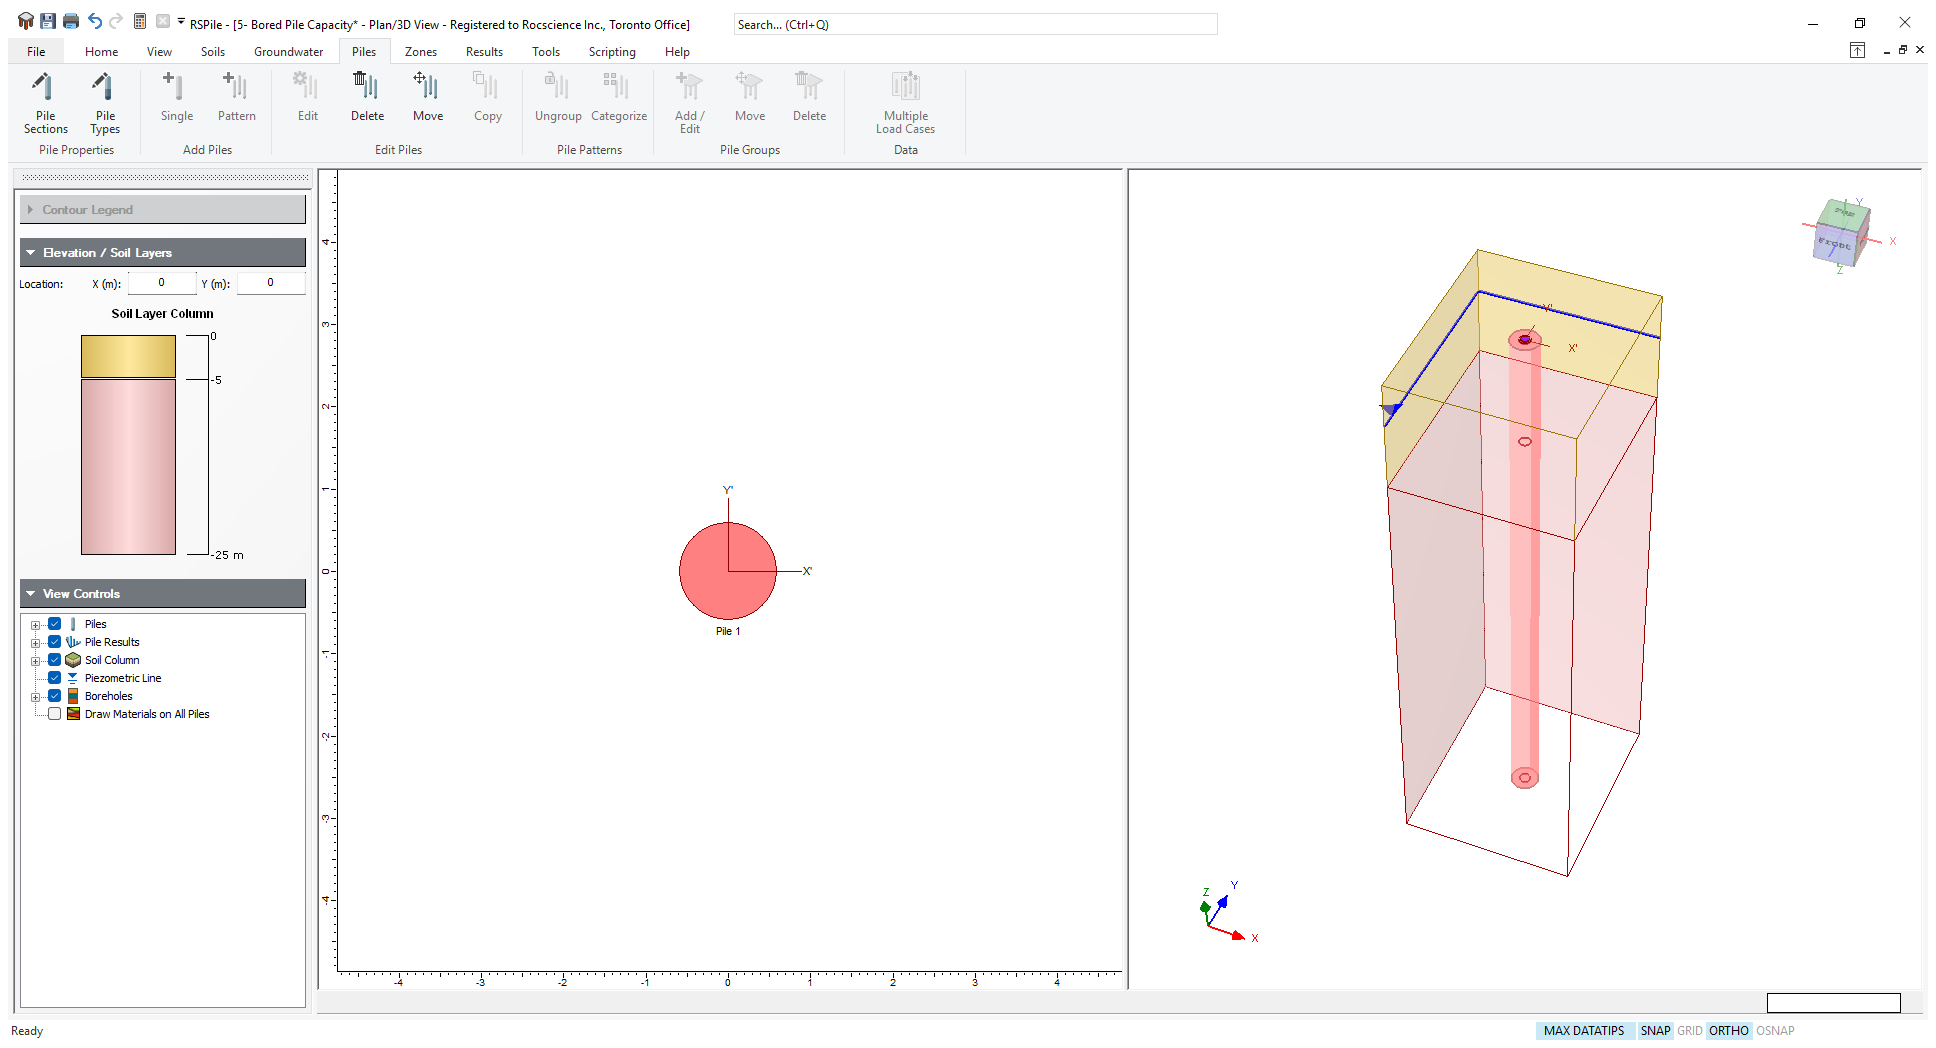
Notice that the soil column has now updated to reflect the strata.
3.0 Results
- Save and compute the file by selecting Results > Compute

3.1 RESULT VISUALIZATION
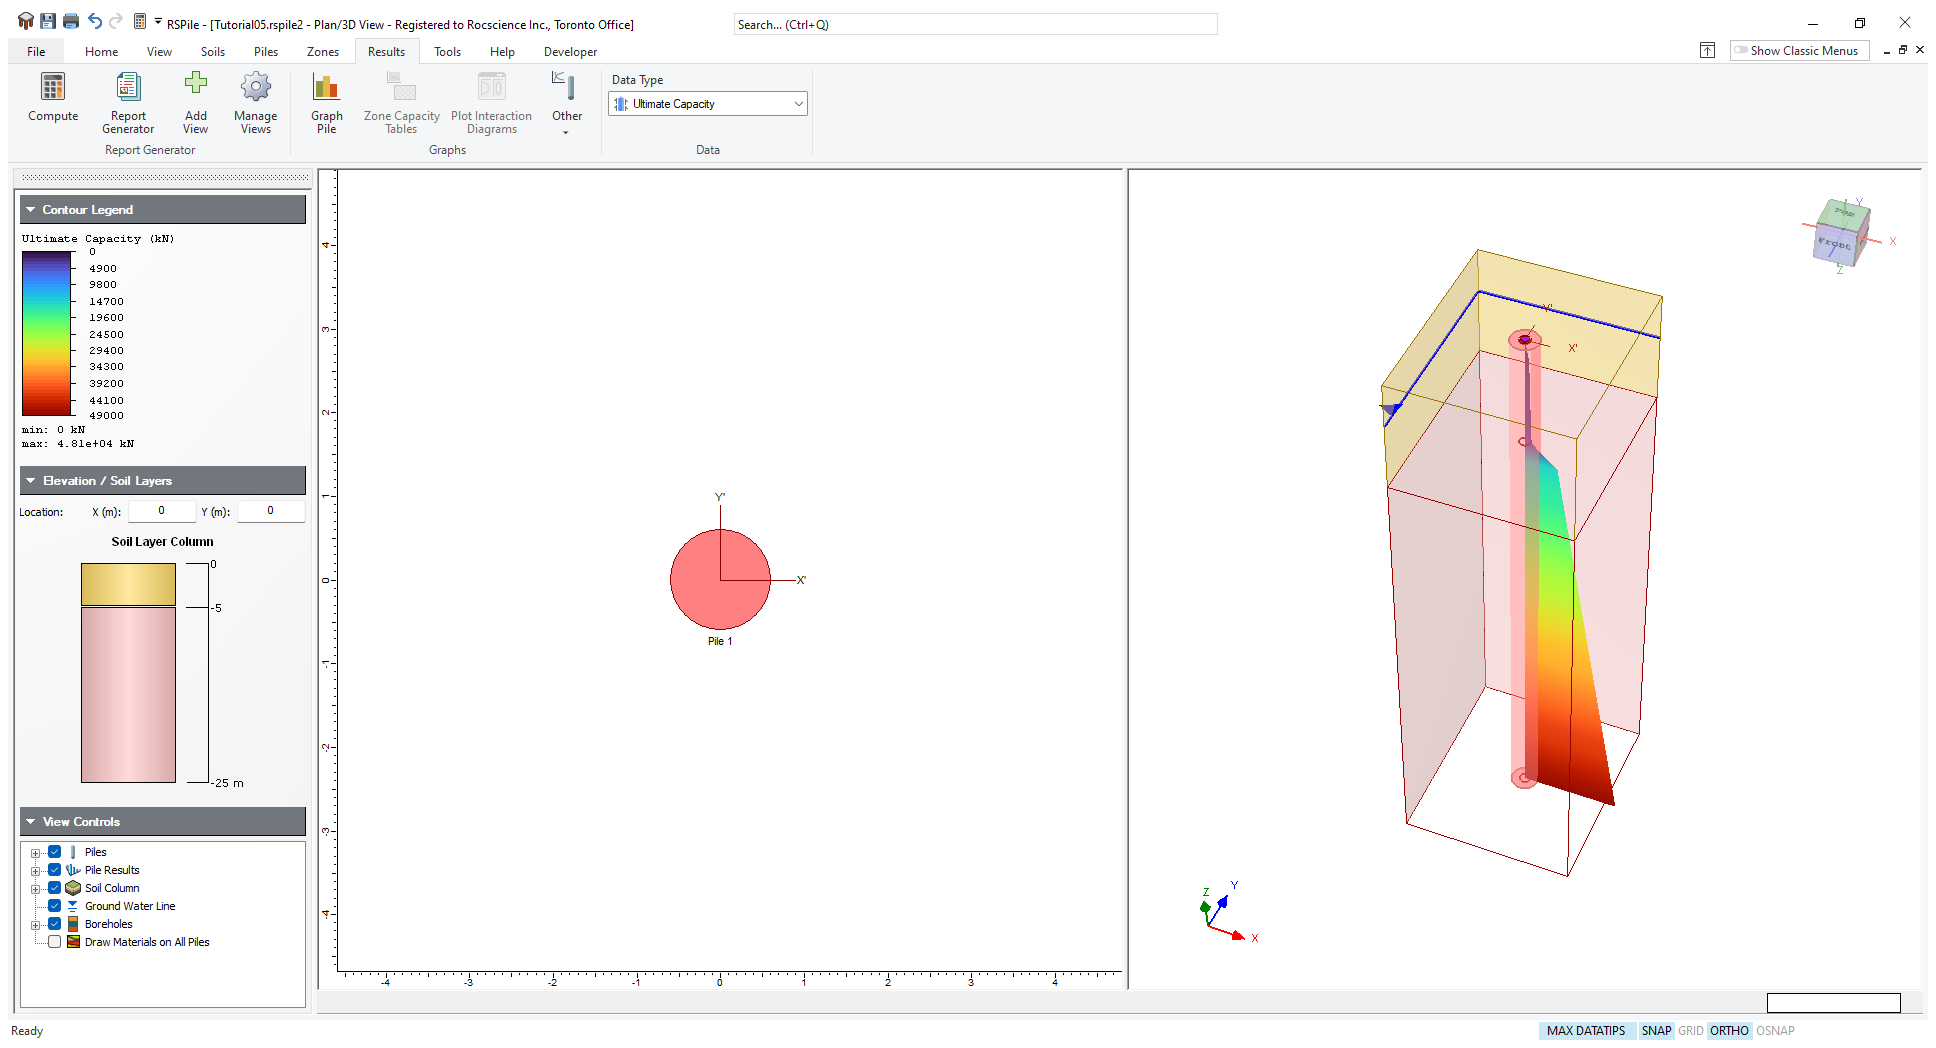
RSPile allows for the 3D visualization of results along the length of the pile. Use the Data Type dropdown to control what results are shown.

Pile Results may be toggled on or off using the View Controls in the sidebar.
3.2 CHARTS
- In the Plan View, right-click on the pile and select Graph Pile

The RSPile results section presents several default graphs and a table of results. You should see the following:
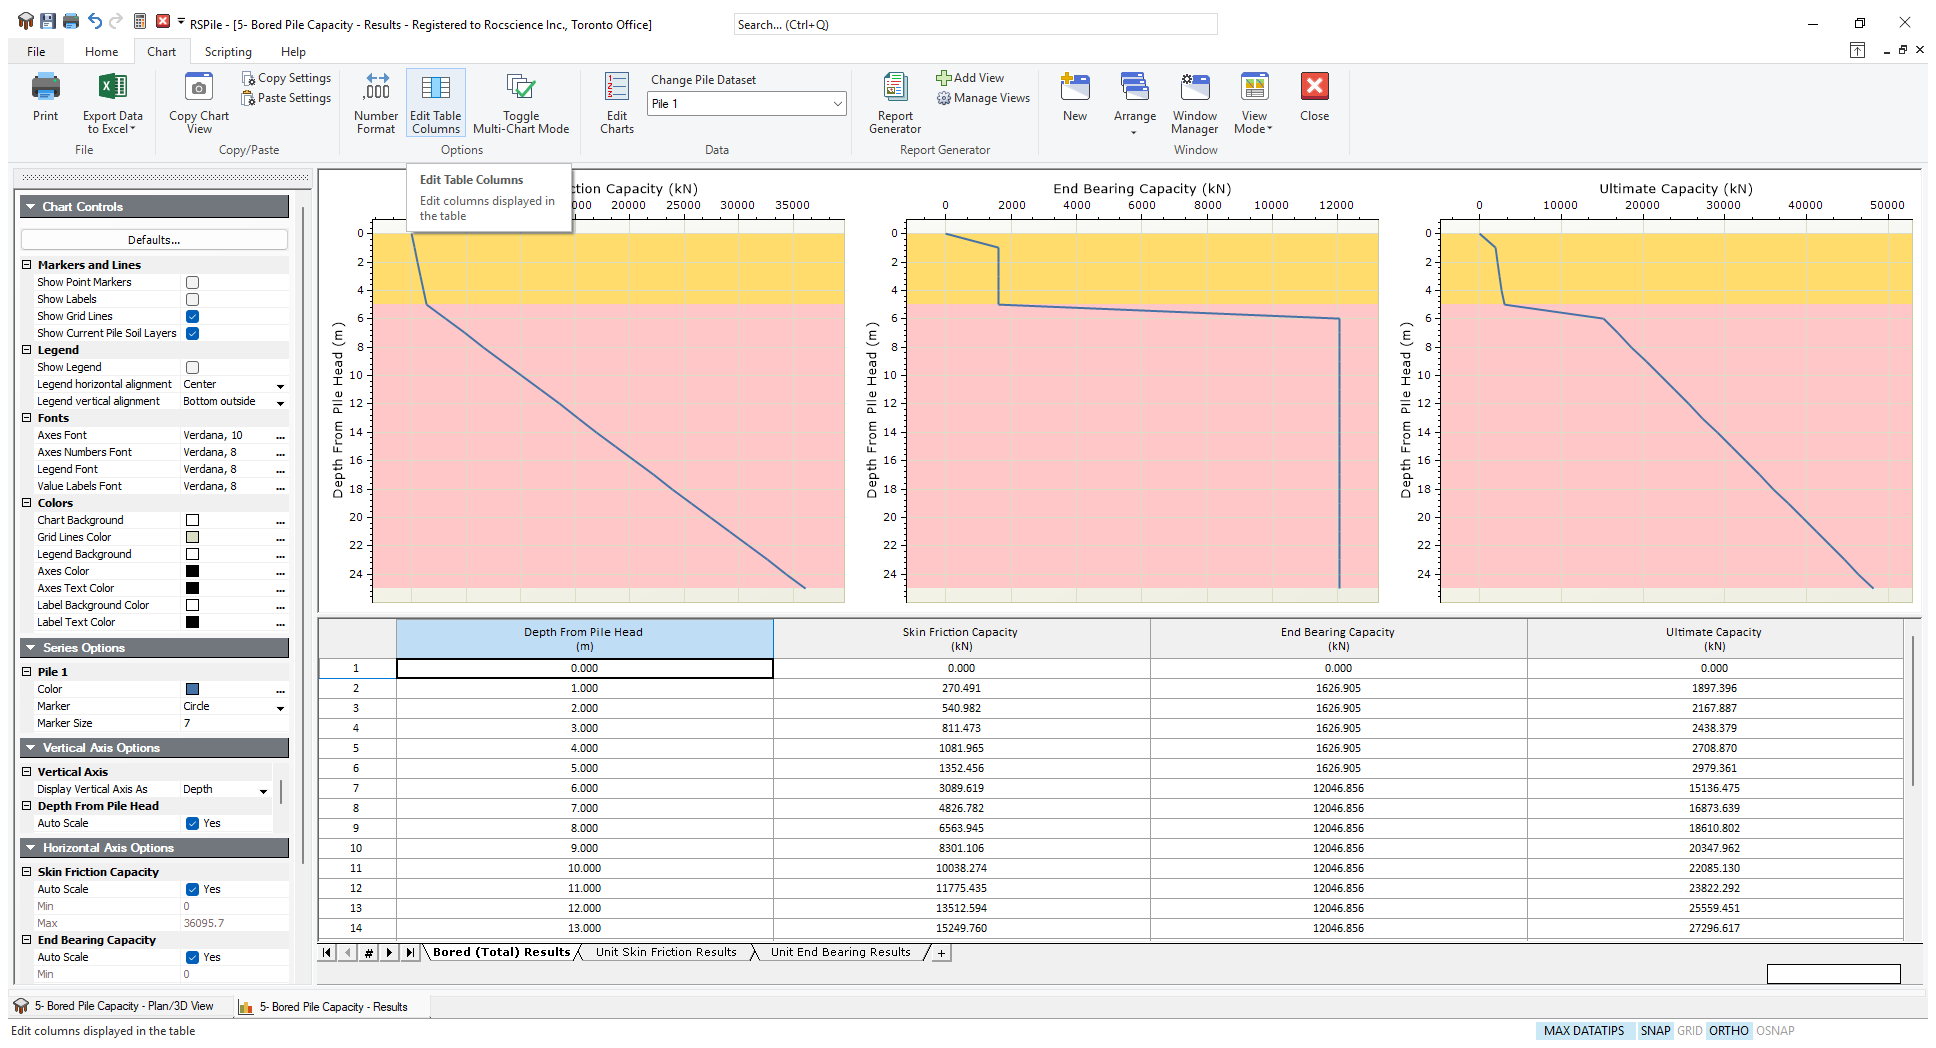
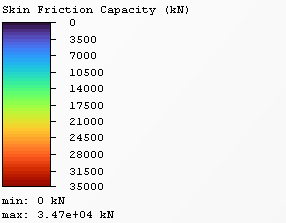
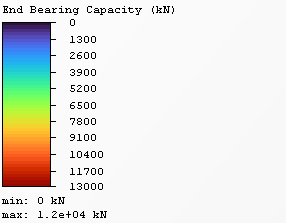
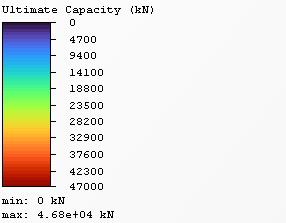
Bored pile analysis generates three graphs:
- Skin Friction Capacity vs. Depth
- End Bearing Capacity vs. Depth
- Ultimate Capacity vs. Depth
3.3 EXPORT TO EXCEL
From the Chart tab you can export your data to Excel. To do so:
- Click on the Export Data to Excel
 icon in the toolbar.
Each data type is exported to its own Sheet in the Excel file.
4.0 Report Generator
The Report Generator presents a formatted summary of input data and analysis results.
- Go back to the model view and select Results > Report Generator

The Report Generator contains a summary of the model input data:
- Project Summary
- Soil Layers
- Soil Properties
- Pile Section Properties
- Pile Types
- Pile Settings
The tool bar contains the Report Generator Controls, which allow you to select what information is displayed, and customize the appearance.
The data can be exported in a variety of ways: it may be manually copied, viewed in a browser, printed, or the information may be saved as a .pdf file. Prior to printing the file, results may be formatted to your specifications.
- Close the Report Generator window to return to the model view.
5.0 Further Analysis
From the computed results, it can be seen that there is a huge difference between the skin friction and end bearing capacities that of the sand and rock layers. Therefore, the ultimate capacities of the sand layer can be neglected.
To do this, change the values of the Skin Friction Limit (kPa) and End Bearing Limit (kPa) of the sand layer in the Soil Properties dialogue to zero and recompute the results.
You should get the following results:
This concludes the Bored Pile Analysis Tutorial. You may now exit the RSPile program.