Introduction to RS2
1.0 Introduction
This tutorial illustrates how to model a simple surface excavation, consisting of a trench located near a circular tunnel and a distributed load directly above the tunnel. The gravity field stress option will be used, and a staged analysis performed by excavating the tunnel in the first stage, the trench in the second, and adding the load in the third stage. Results will then be analyzed using RS2 Interpret.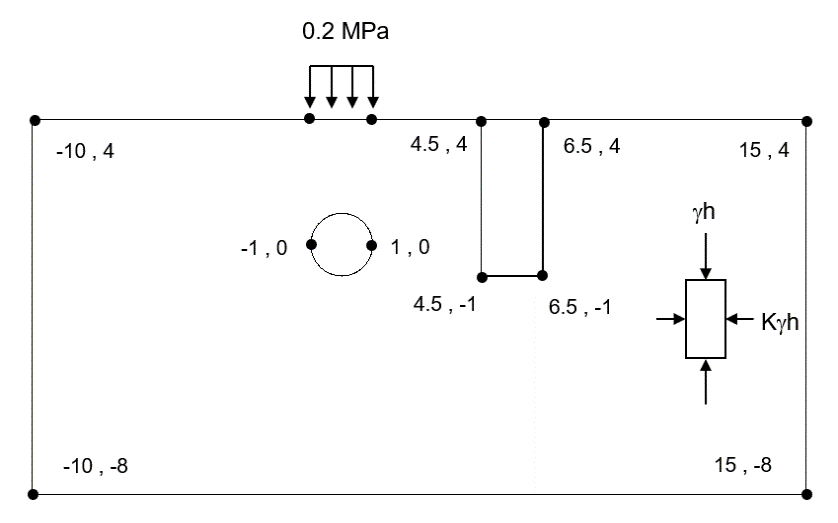
2.0 Constructing the Model
2.1 Project Settings
When creating a staged model, the first step is set the Number of Stages in Project Settings:
- Select: Analysis > Project Settings

- In the Project Settings dialog:
- Select the General tab. Ensure that the units are set to Metric, stress as MPa.
- Select the Stages tab and enter Number of Stages = 3.
- For the stage names, enter Excavate Tunnel, Excavate Trench, and Surface Load for stages 1, 2 and 3.
- Click OK.
2.2 Entering Boundaries

First, let's enter the external boundary.
- Select: Boundaries > Add External

- Enter coordinates: (15, 4), (-10, 4), (-10, -8), (15, -8) and press “c” to close.
- Press F2 to Zoom All.
Now, enter the circular tunnel:
- Select: Boundaries > Add Excavation

- Right-click the mouse and select the Circle option from the popup menu. The following dialog will appear:
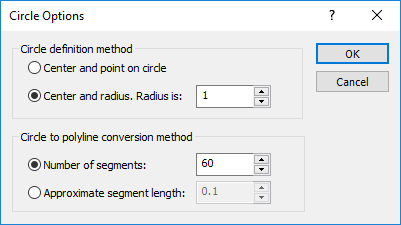
- Select the Center and radius option, enter Number of Segments = 60 and click OK.
- Enter (0, 0) in the prompt line and the circular excavation will be created.
Now enter the rectangular trench:
- Select: Boundaries > Add Excavation

- Enter coordinates: (4.5, 4), (4.5, -1), (6.5, -1), (6.5, 4) and enter “c” to close the boundary.
2.3 Assigning Properties

- Select the Materials and Staging workflow tab.
- Select: Properties > Define Materials

- With the first material selected, enter the following for Initial Conditions:
- Name = Till
- Initial Element Loading = Field Stress and Body Force
- Unit Weight = 0.02
- Under the Strength tab, enter the following:
- Friction Angle (peak) = 38
- Cohesion (peak) = 0.01
- Under the Stiffness tab enter:
- Type = Isotropic
- Poisson's Ratio = 0.25
- Young's Modulus (MPa) = 50
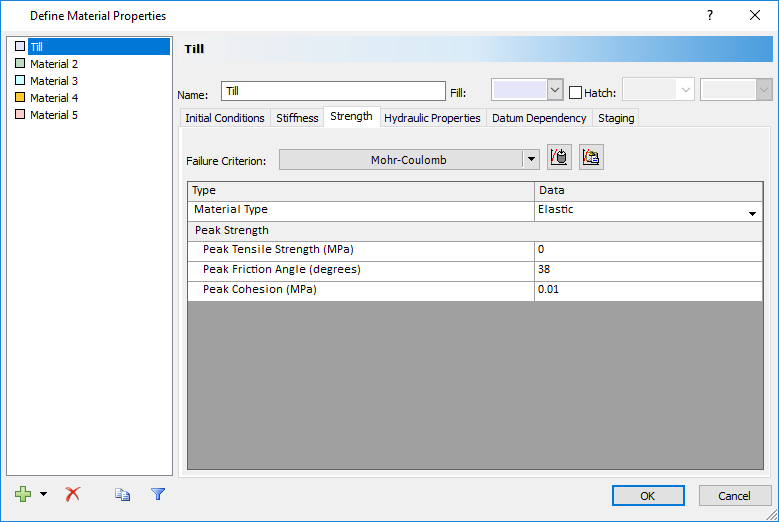

- The Unit Weight of the material is the same as the Unit Weight of Overburden entered in the Field Stress dialog.
- The modulus and strength values entered are those of a till with high frictional strength.
- For gravity field stress, the default setting for ‘Initial Element Loading’ (in the Define Material Properties dialog) is ‘Field Stress and Body Force’. Because the model represents a surface excavation and a gravitational stress field, the body force component of loading on each element is significant. (For a constant stress field, the body force component is usually not considered, and the default ‘Initial Element Loading’ is ‘Field Stress Only’).
- Since the properties were defined with the first material selected, they do not have to be assigned to the model. By default, RS2 automatically assigns the properties of the first material to all finite elements. However, the staging of the excavations must be assigned.
- Select: Properties > Assign Properties

The tunnel will be excavated in Stage 1 and the trench in Stage 2:
- Make sure the Stage 1 tab is selected.
- Select the “Excavate” button in the Assign dialog.
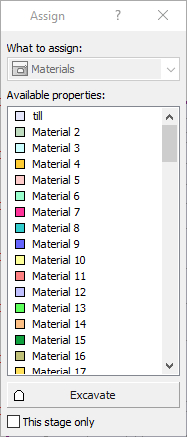
- Left-click inside the circular tunnel. The elements in the tunnel will disappear, indicating that the tunnel is ‘excavated’.
- Select the Stage 2 tab.
- Click the left mouse button inside the rectangular trench. The elements in the trench will disappear, indicating that it is ‘excavated’.
- Close the Assign dialog by selecting the X in the upper right corner of the dialog.
Verify the assignments by selecting each Stage tab in turn and inspecting the model:
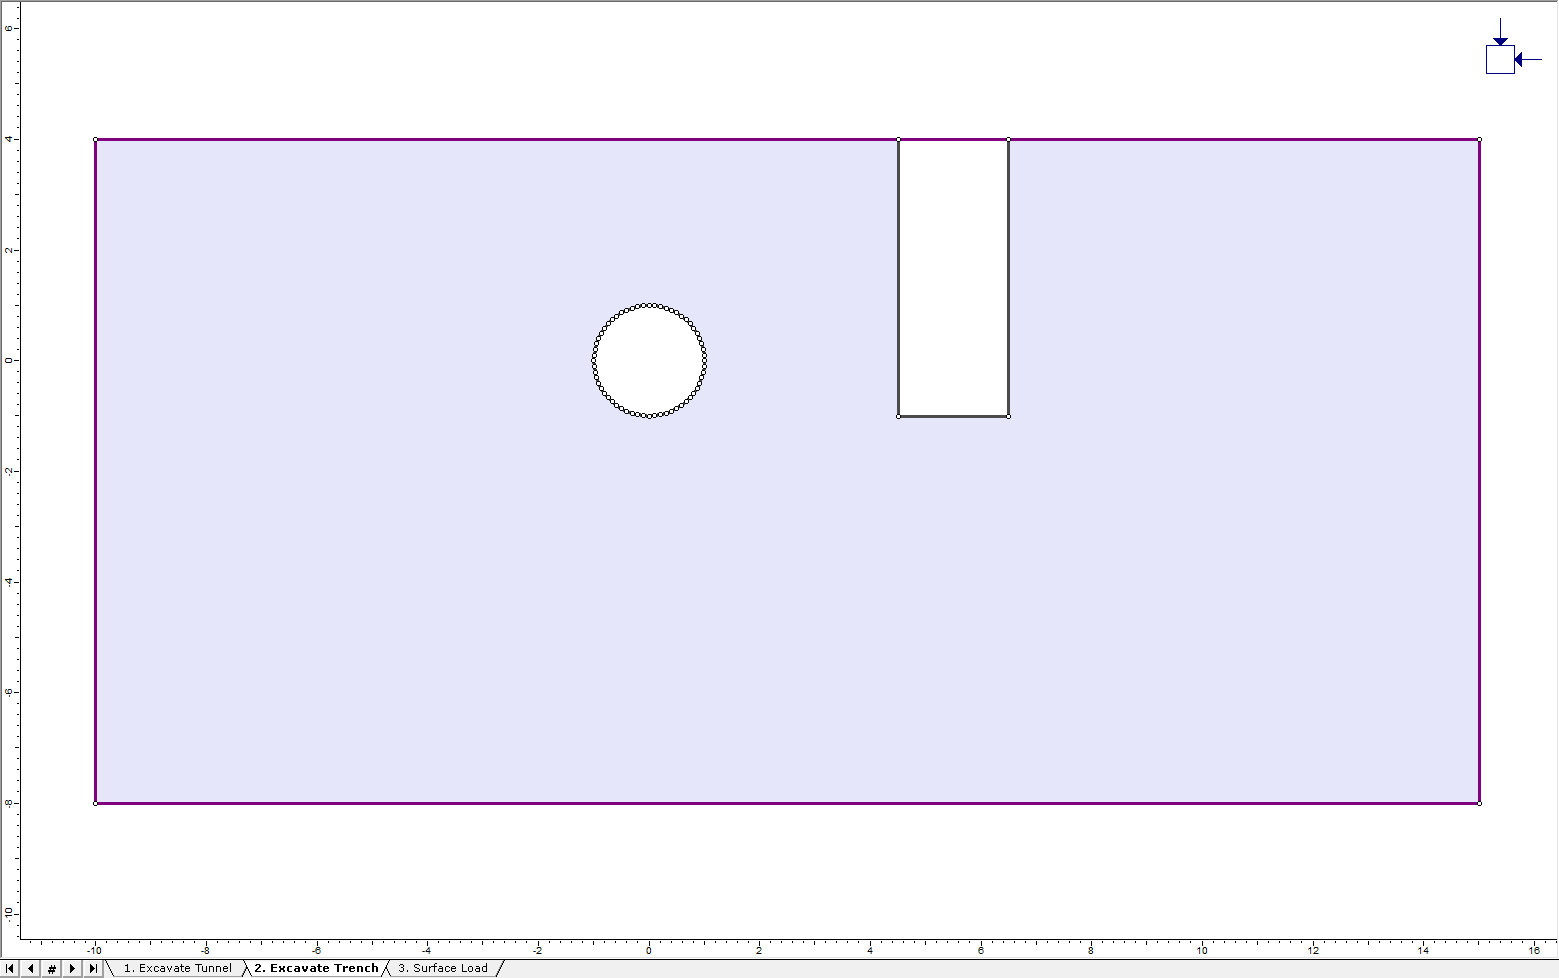
- Select Stage 1 – only the tunnel should be excavated.
- Select Stage 2 – both the trench and tunnel should be excavated.
The model with excavations should appear as below (Stage 2):
2.4 Adding a Distributed Load

Let’s add a uniform distributed load to the ground surface segment above the tunnel.
- Select: Loading > Distributed Loads > Add Uniform Load

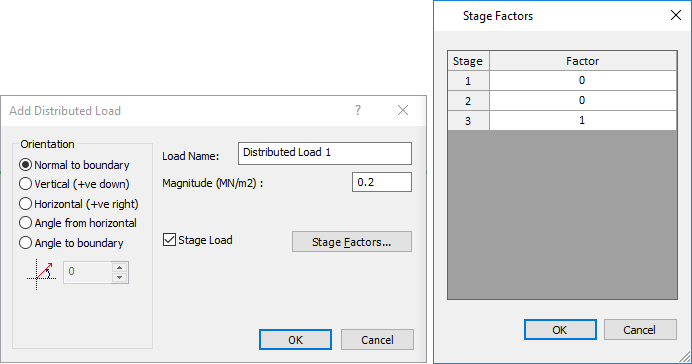
- In the Add Distributed Load dialog, enter a Magnitude = 0.2 MN/m2. Select the Stage Load check box and select the Stage Factors button.
- In the Stage Factors dialog enter Factor = 0 for Stage 1 and Stage 2, and Factor = 1 for Stage 3. Click OK in both dialogs.
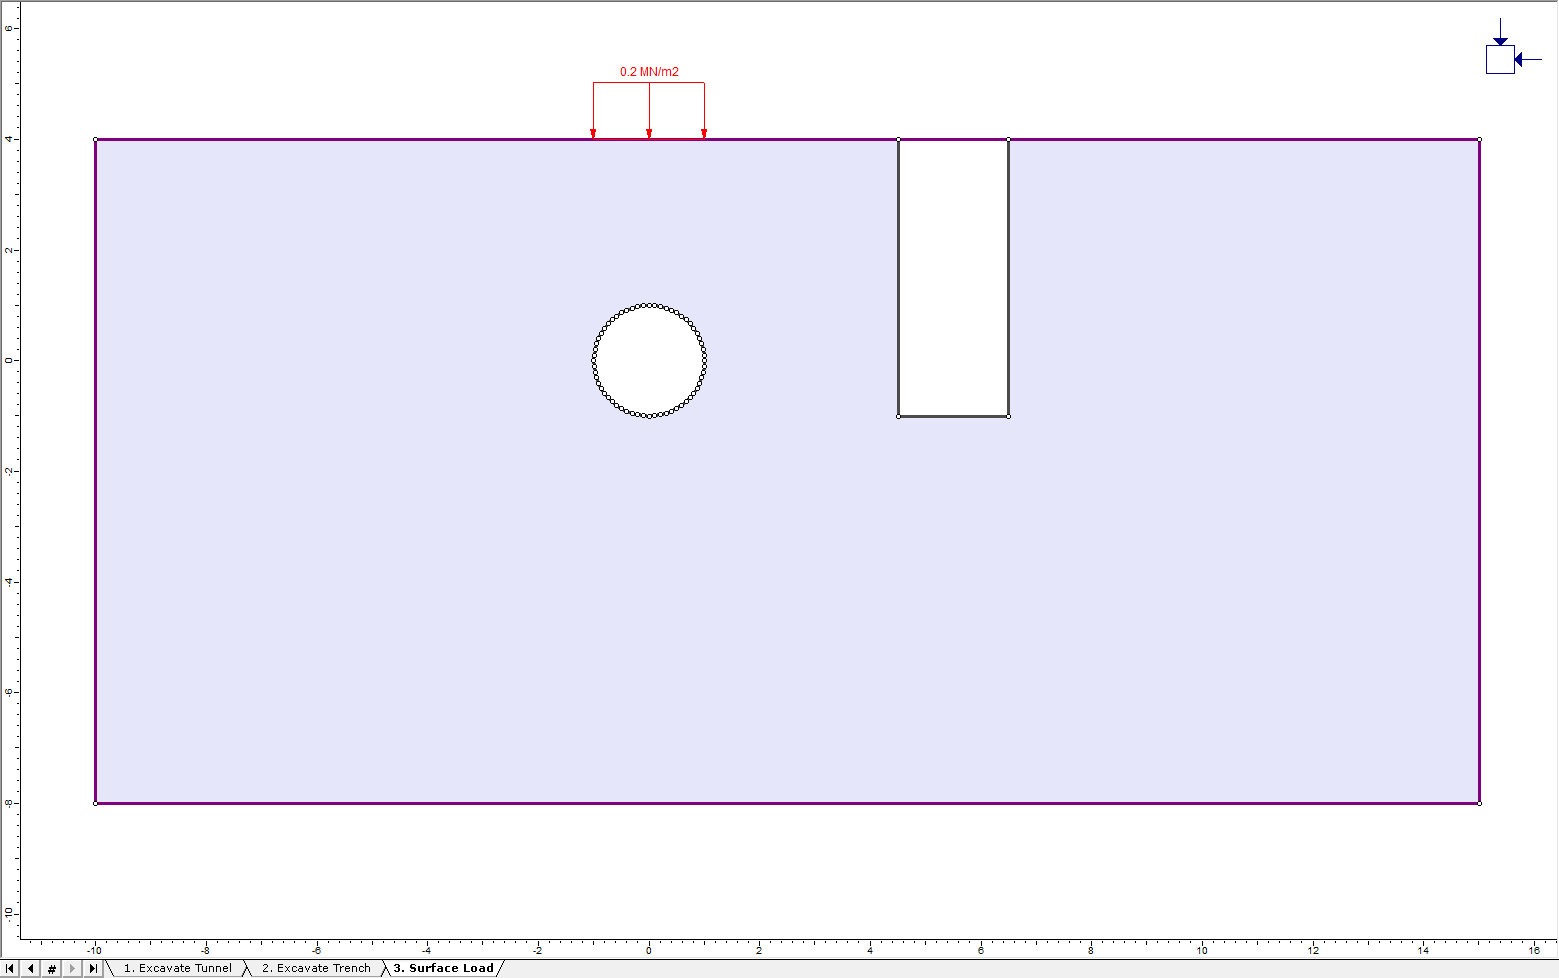
Because of the factors defined, the load will only be applied in the third stage of the analysis and will not exist in the first or second stages. Factor = 1 means the magnitude will be the same as entered in the Add Distributed Load dialog. Factor = 0 means no load will be applied at that stage. Other values of factor can be used to increase or decrease the magnitude of a load at any stage of a model.
Now, select the location of the load:
- Enter the points: (-1, 4) and (1, 4). The load will now be visible in Stage 3.
- If the load appears on the bottom side of the ground surface, press "f" in the prompt window to flip the orientation of the load.
Note that it is now possible to add loads in RS2 2019 without the use of vertices to create a line segment; the vertices were included in this example to facilitate the placement of the load in the correct location.
VIEWING THE LOAD
To view the load, select the Stage 3 tab. Since the load was only applied in Stage 3, it is only visible in Stage 3. For display purposes, the size of the load arrows can be scaled by the user in the Display Options dialog. This is left as an optional exercise. Since we are not finished modeling, select the Stage 1 tab again.
2.5 Field Stress
![]()
For most problems involving a ground surface, it is recommended to use a gravity stress field.
 Select: Loading > Field Stress
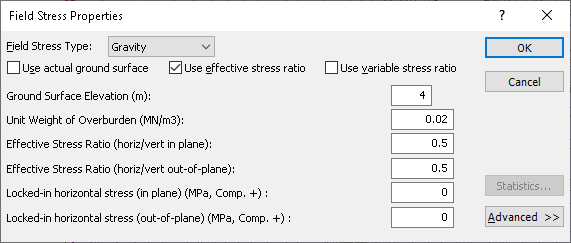
- Enter the above parameters and click OK.
- Field Stress Type = Gravity
- Use effective stress ratio = YES
- Ground Surface Elevation (m) = 4
- Unit Weight of Overburden (MN/m3) = 0.02
- Effective Stress Ratio (horiz/vert in plane) = 0.5
- Effective Stress Ratio (horiz/vert out-of-plane) = 0.5
- Locked-in horizontal stress (in plane) (MPa, Comp. +) = 0
- Locked-in horizontal stress (out-of-plane) (MPa, Comp. +) = 0
For a gravity field stress, the stress block reflects the in-plane horizontal/vertical stress ratio, which in this case is 0.5. The Unit Weight of Overburden indicates that our surface material is a soil, rather than rock.
Note that the Use actual ground surface option is unselected. This is to ensure the initial stresses in Stage 1 represent the in-situ conditions before excavation occurs. An alternative approach is to create a stage before Stage 1 that does not have the tunnel excavated. In this new initial stage, selecting or unselecting Use actual ground surface represents the same case. Use actual ground surface will be useful when you begin to try multi-layer models and complex ground surface geometry.
2.6 Mesh
![]()
- Select: Mesh > Mesh Setup

- Notice the Default Number of Nodes of All Excavation = 110. Click the Discretize button in the dialog.
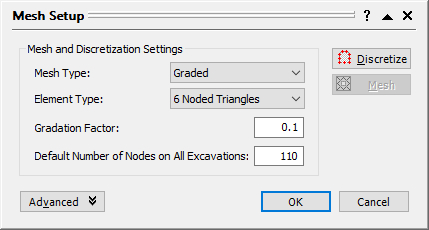
The model is discretized, and the status bar will indicate the actual number of discretizations created (Excavation: 136; External: 101)
Notice that RS2 automatically grades the discretization on the external boundary, according to the distance from excavation boundaries. The discretization on the ground surface is finer near the top of the trench and is gradually graded more coarsely towards the left and right edges of the model. The discretization along the left, right and bottom edges of the external boundary, is much coarser than along the top edge near the excavations.
Let’s generate the mesh:
- Click the Mesh button in the dialog and click OK.
- The mesh is generated based on the discretization previously created. The status bar will indicate the total number of nodes and elements in the mesh (ND: 2817; EL: 1301).
Note that the automatically graded discretization along the ground surface helps to create a smooth transition between the fine mesh at the top of the trench and the rest of the ground surface.
2.7 Boundary Conditions
![]()
- Select: Restraints workflow tab.
By default, when the mesh is generated, all nodes on the external boundary are given a fixed, zero displacement boundary condition. This is indicated by the triangular “pin” symbols at each node of the external boundary.
Since this is a surface excavation model, we must specify that the ground surface is a free surface. This is done using the Free option in the toolbar or Displacements menu.
- Select: Displacements > Free

- Select the boundary segments to free. Use the mouse to select the three segments representing the ground surface. When finished, right-click and select Done Selection, or press Enter.
The triangular pin symbols should now be gone from the ground surface indicating that it is free to move without restraint.
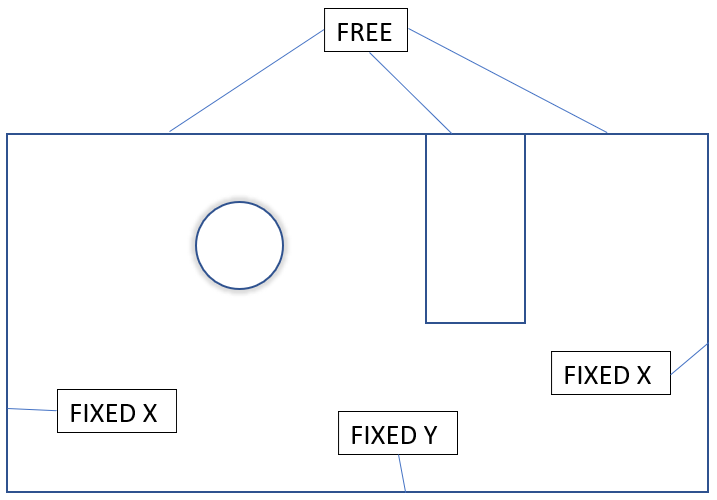
Let’s now specify the left and right edges of the external boundary as fixed in the X direction only (i.e. free to move in the Y direction) and the lower edge as fixed in the Y direction only (i.e. free to move in the X direction).
- Select: Displacements > Restrain X

- Select boundary segments to restrain in the X direction. Use the mouse to select the left and right edges of the external boundary. Right-click and select Done Selection, or press Enter.
- Select: Displacements > Restrain Y

- Select boundary segments to restrain in the Y direction. Use the mouse to select the bottom edge of the external boundary. Right-click and select Done Selection, or press Enter.
Next, the nodes at the bottom corners have rollers and they should be pinned:
- Select: Displacements > Restrain X,Y

- Right-click the mouse and select Pick by Boundary Nodes from the popup menu. This will change the mode of restraint application from boundary segments to boundary nodes.
- Select the lower left (-10, -8) and lower right (15, -8) vertices of the external boundary.
- Right-click and select Done Selection. Triangular pin symbols now replace the roller symbols at these vertices.
After applying restraints to boundary segments, always check that nodes at the end of segments have the correct conditions applied.
The finished model should appear as follows:
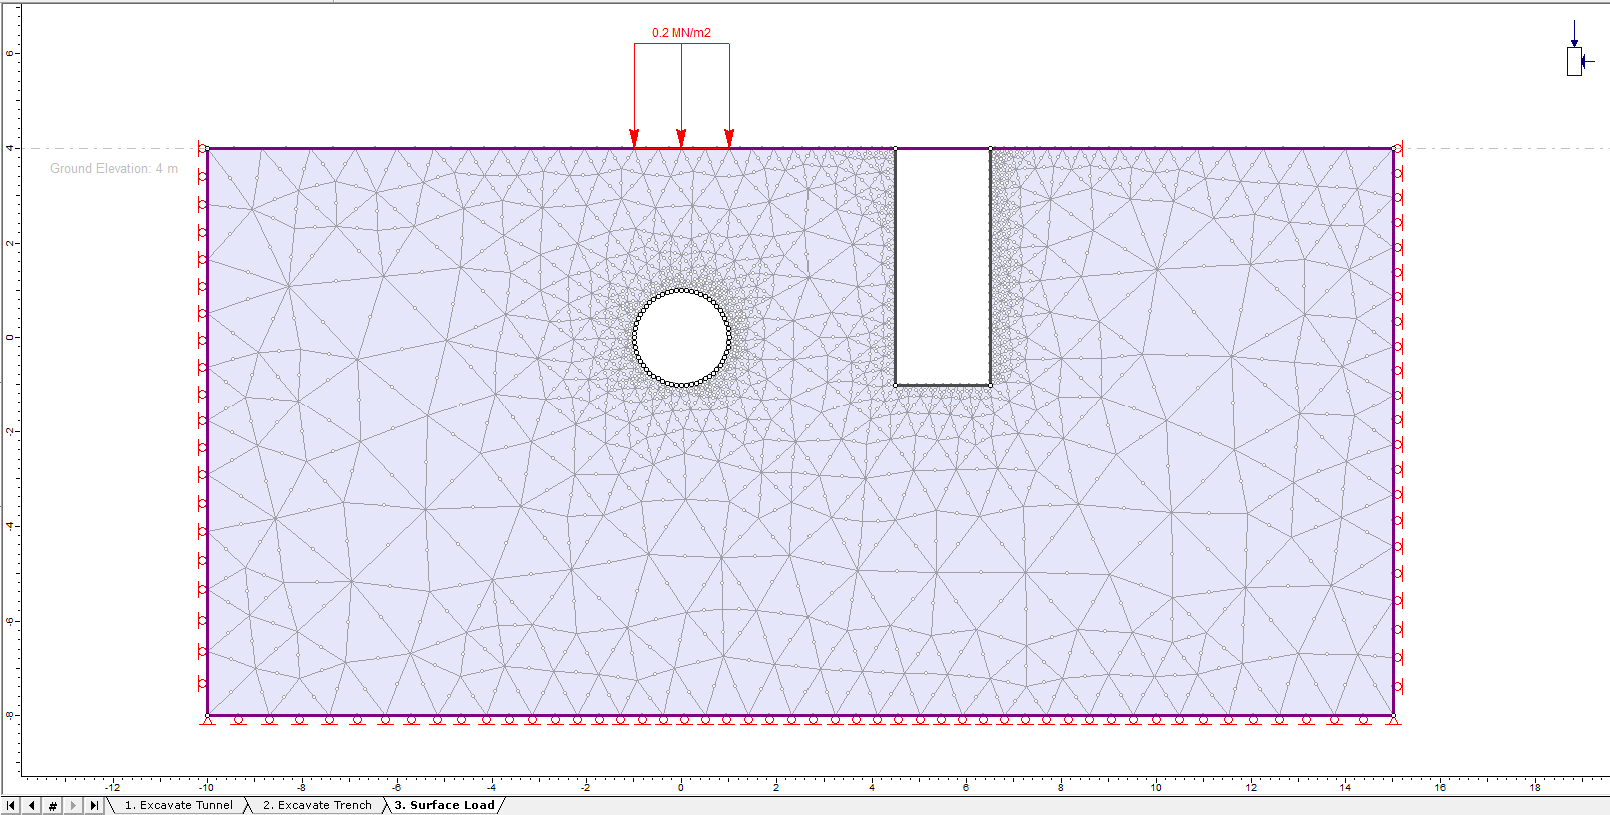
3.0 Compute
- Save the model, then select Analysis > Compute

4.0 Results and Discussion
- Select: Analysis > Interpret

4.1 Principal Stress (Sigma 1)
The Interpret window will open to the Sigma 1 contours for Stage 1.
- Select: Display Stress Trajectories

The gravitational stress field results in horizontal Sigma 1 contours, except where the contours are perturbed by the excavation. Overall, the major principal stress is vertical as can be seen by the ‘long’ axis of the stress trajectories – the horizontal/vertical stress ratio was set to 0.5 (in-plane and out-of-plane).
Now view the stress contours for Stage 2 and Stage 3 by selecting the stage tabs at the lower left of the view.
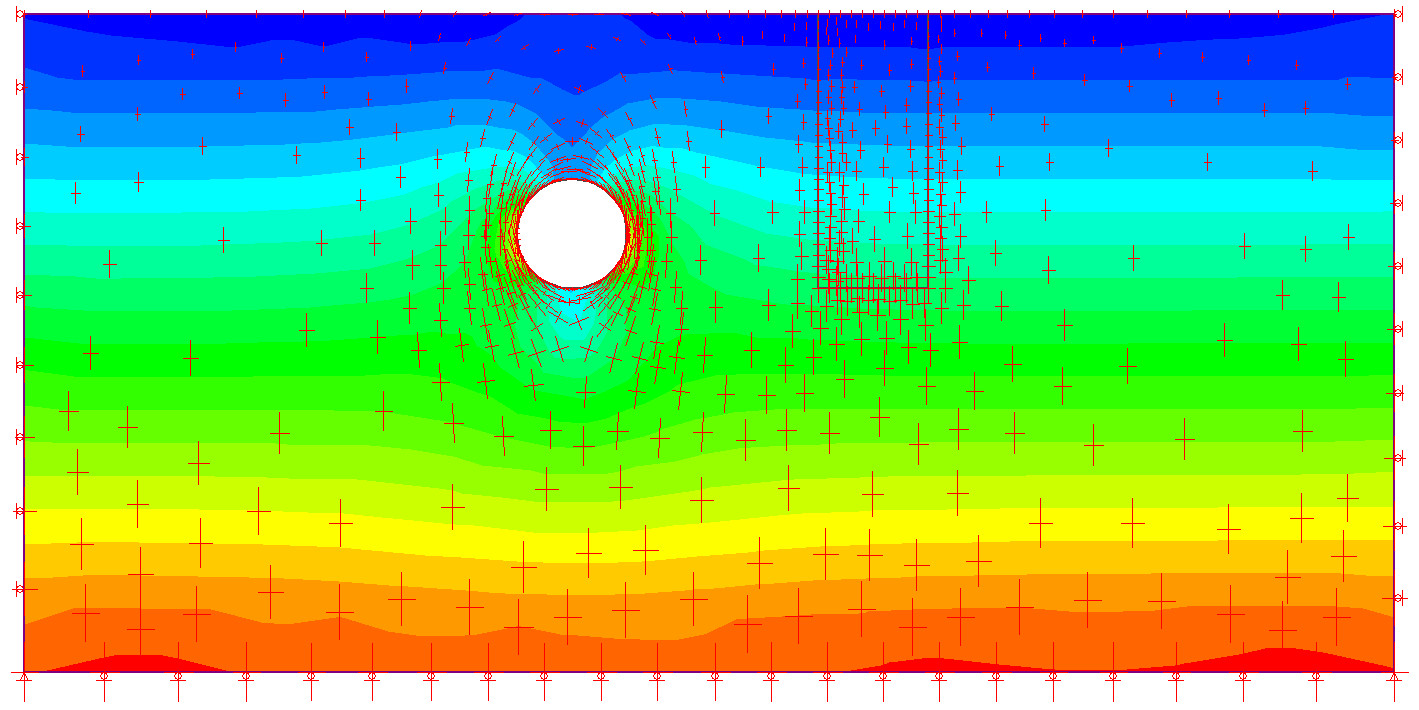
Toggle the display of stress trajectories off by re-selecting the Stress Trajectories ![]() toolbar button.
toolbar button.
Select the Stage 2 and Stage 3 tabs to view the changing stress distribution with excavation of the trench and loading.
4.2 Strength Factor
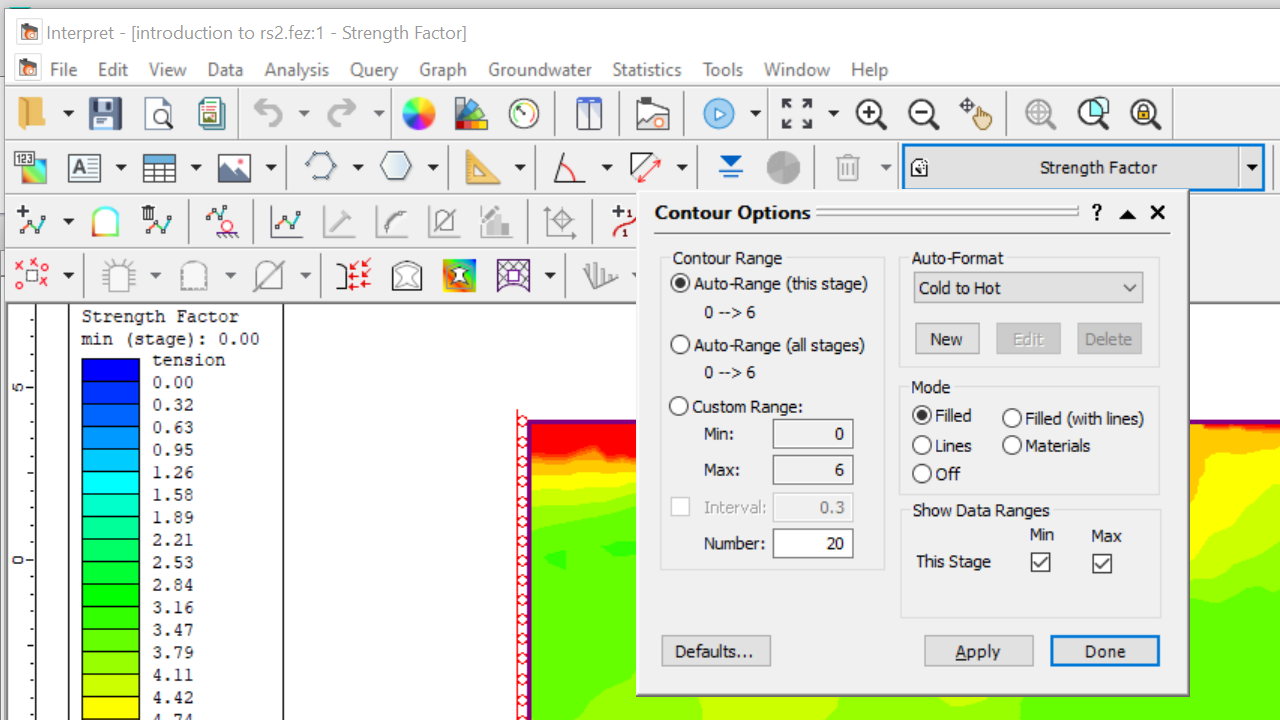
Change the data type to Strength Factor and change the number of Contour intervals to 7 in the Contour Options dialog.
- Select Strength Factor from the drop-down menu in the toolbar.
- Right click on the contour to see Contour Options. Under auto-format, change the setting to Cold to Hot.
Based on the Strength Factor contours at Stage 3, it is evident that this excavation would collapse without support. Keeping in mind that the analysis was elastic, notice the regions of failure around the tunnel and between the trench and the tunnel (i.e. contours with strength factor less than 1 in orange and tension zones in red.
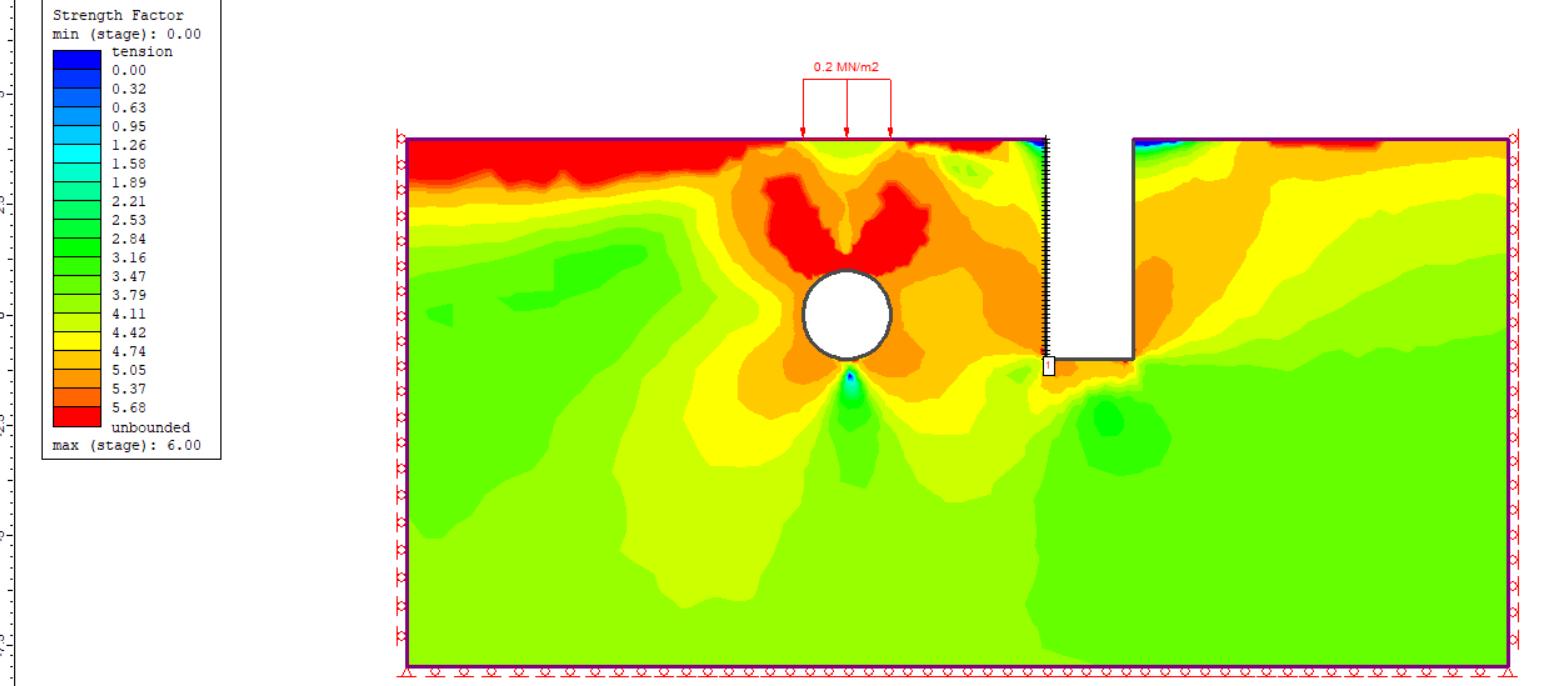
Strength factor contours at Stage 3, indicating collapse of material around excavations.
4.3 Displacement
Let’s look at displacements.
- Select: Displacement > Total Displacement from the drop-down menu in the toolbar.
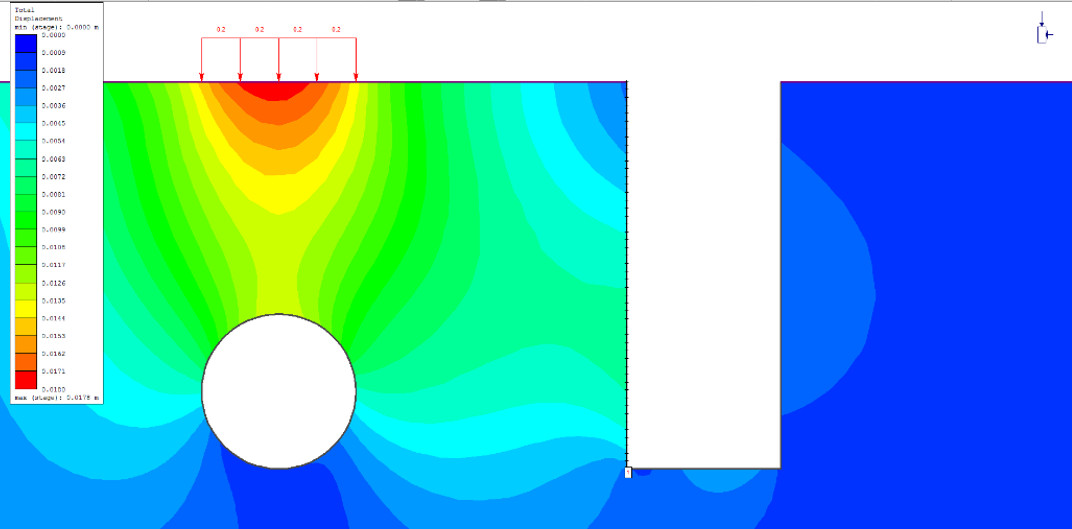
View the displacement contours at each stage by selecting the stage tabs. Observe the maximum displacement, displayed in the status bar, and where it is occurring on the model.
The Stage 1 maximum displacement, about 3 mm, is occurring at the bottom of the tunnel. The Stage 2 maximum displacement, about 4.7 mm, is occurring at the left side of the trench. The Stage 3 maximum displacement, about 18 mm, is underneath the distributed load.
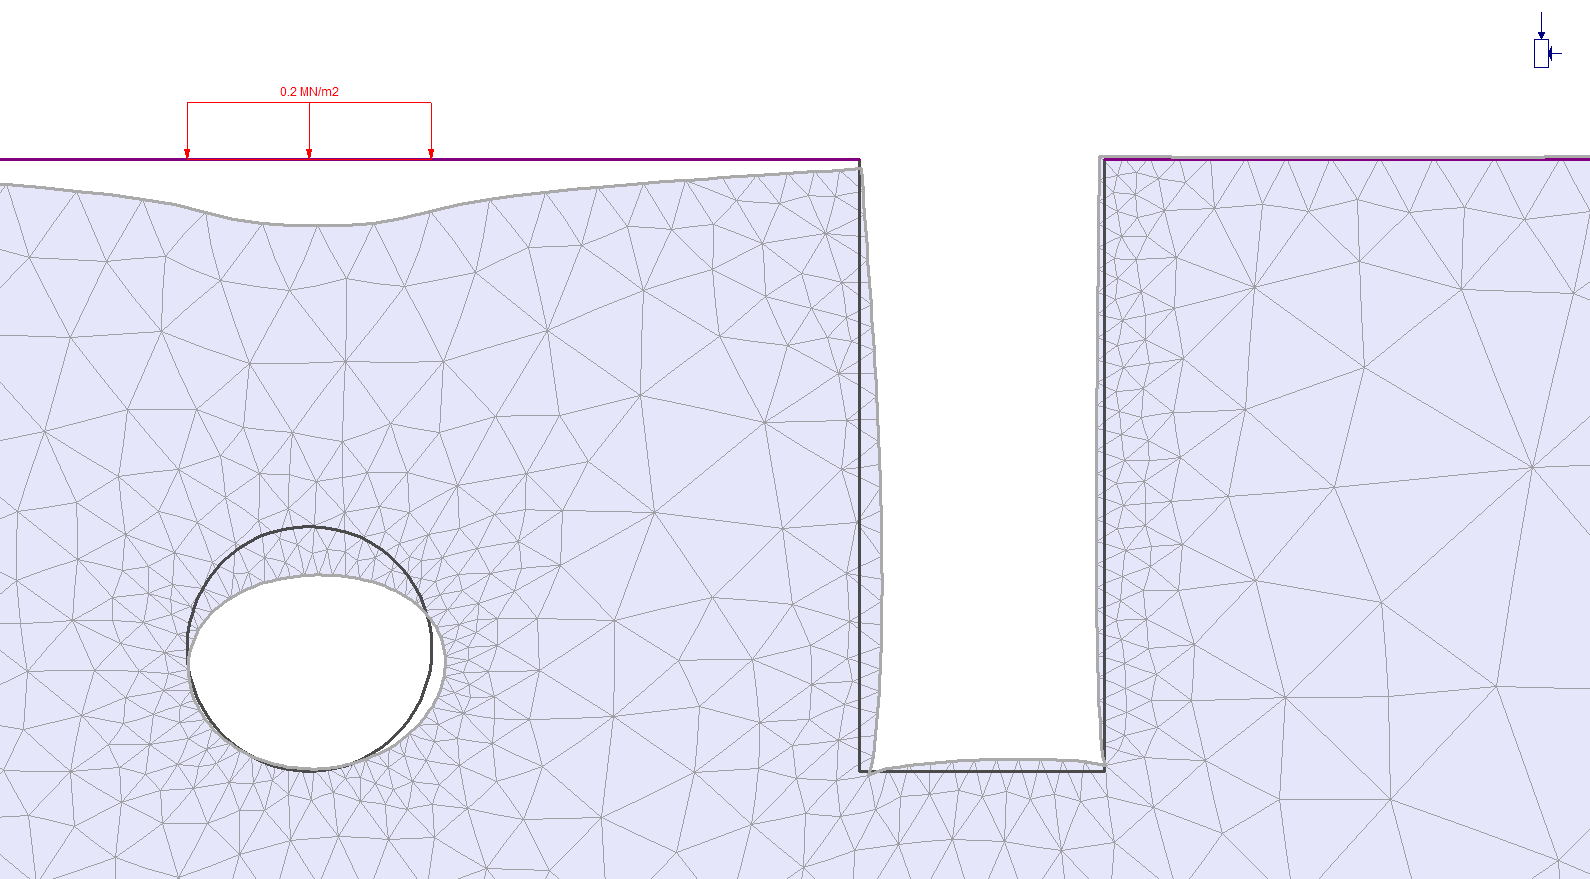
Now, turn off the display of the contours, and view the deformed shape of the boundaries and mesh, magnified by a factor of 100.
- Right-click the mouse and select: Contour Options.
- In the Contour Options dialog, set the Mode to Off, and select Done.
- Right-click the mouse and select Display Options.
- In the Display Options dialog, select Deform Mesh and Deform Boundaries, and enter a Scale Factor of 100. Select Done.
- Select: View > Zoom > Zoom Excavation (F6)
- Select the Stage 1 tab.
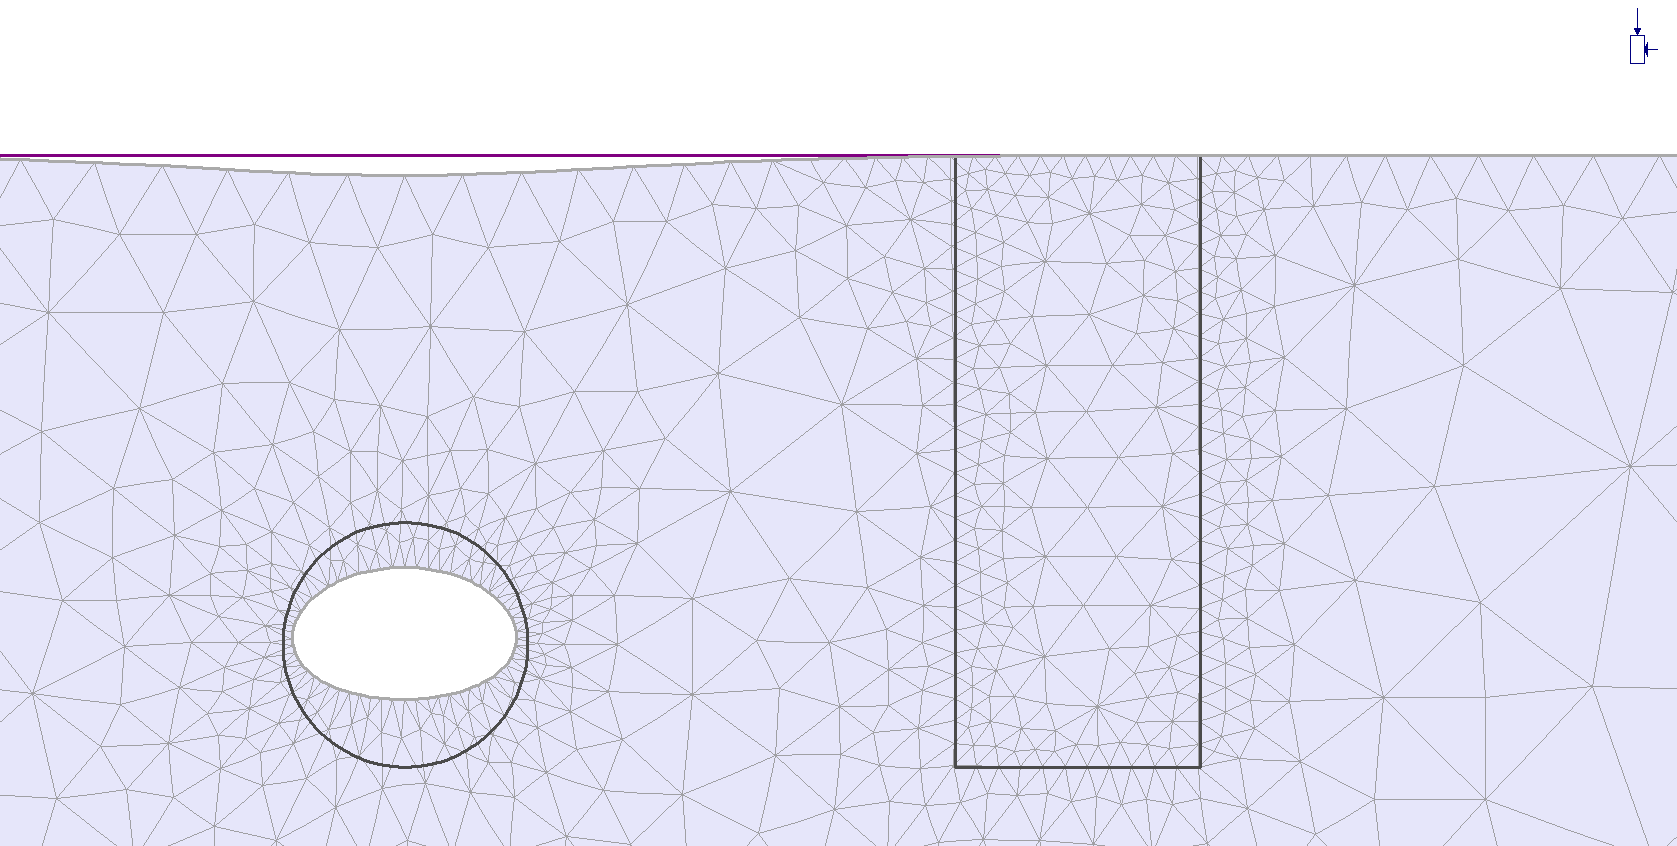
Notice the flattened shape of the circular tunnel and the subsidence of the ground surface above the tunnel. The bottom of the tunnel has displaced slightly more than the top. This is due to the gravity stress field, which of course increases with depth.
- Select the Stage 2 tab.
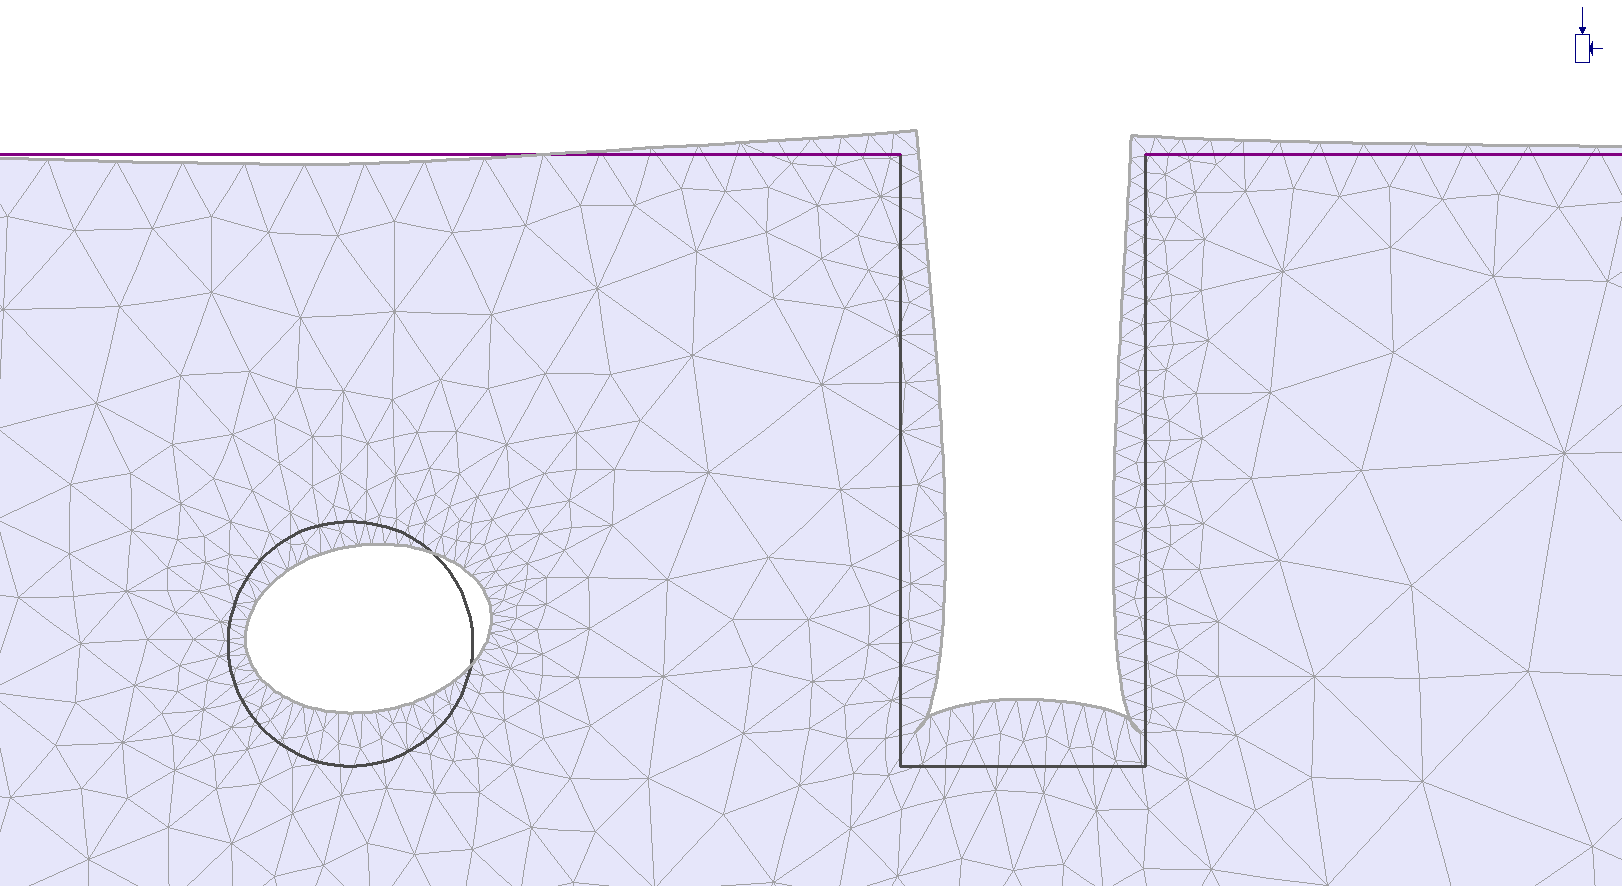
The deformation of the trench boundaries is clearly visible. Notice that the excavation of the trench has shifted the displacement of the tunnel towards the right.
- Select the Stage 3 tab.
The displacements are now dominated by the effect of the load. The maximum displacement is directly beneath the load. The overall displacement of the tunnel has been shifted downward, and the bottom of the tunnel is now almost in its original position.
Let’s “animate” the results. First, set the timing of the animation.
- Select: Data > Stage Settings
- In the Stage Settings dialog, set the Minimum Animation Time to 2 seconds.
- Click OK.
- Select: Data > Animate Tabs
The stage tabs are now automatically selected, giving the user an animated display of results at each stage.
- To exit the animation mode, press Escape.
Before moving on:
- Display the contours again. Right-click the mouse and select Contour Options. Set the Mode to Filled and select Done.
- Also turn off the display of the Mesh and Deformed Boundaries, by selecting the corresponding buttons in the toolbar. Or, select Defaults > Restore to original program defaults.
- Press F6 to Zoom Excavation.
4.4 Query Data
RS2 allows users to query data anywhere in the material to obtain values interpolated from the contour plots. These values can be displayed directly on the model, or graphed. A query can be a single point, a line segment, or any arbitrary polyline.
- Select: Query > Add Material Query

- Right-click the mouse and make sure Snap is enabled.
- When Snap mode is enabled, if the cursor is near a model vertex, a circle will appear around the vertex, indicating that clicking will “snap” to that location.
- Use the mouse to select the vertex at (4.5, 4) i.e., the upper left corner of the trench.
- Use the mouse to select the vertex at (4.5, -1) i.e., the lower left corner of the trench.
- Right-click the mouse and select Done. The following dialog should appear:
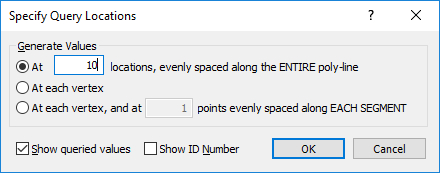
- 10 values along the left edge of the trench should now be visible, since 10 locations were entered in the Specify Query locations dialog.
The values correspond to the stage and the data type. Select the stage tabs and observe the change in the values.
Select different data types (e.g., Sigma 1, Strength Factor) and observe the change in values.
NUMBER OF DECIMAL PLACES DISPLAYED
The number of decimal places used to display the query values can be customized by the user in the Legend Options dialog.
- Switch back to viewing Total Displacement at Stage 2.
- If the Legend is currently displayed, right-click on the Legend and select Legend Options. (If the Legend is NOT currently displayed, then select View >Legend Options from the menu, and select the Show Legend check box in the Legend Options dialog).
- In the Legend Options dialog, select Number Format = Decimal and use the mouse to change the number of decimal places (click on the up or down arrows). Notice that as the number of decimal places is changed, the display of values on the query and the interval values in the Legend are immediately updated.
- Set the number of decimal places to 4 and select OK in the Legend Options dialog.
GRAPHING A QUERY
- Right click on the query (i.e., anywhere along the left edge of the trench), and select Graph Data from the popup menu.
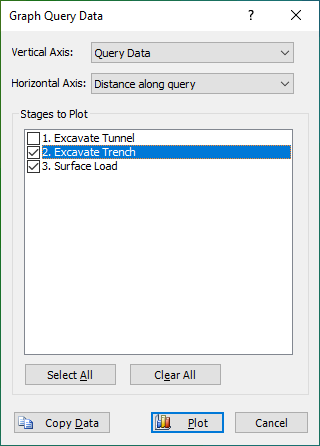
- The Graph Query Data dialog will appear:
- Select the Stages to Plot check boxes for Stage 2 and Stage 3.
- Select: Plot and a graph of Total Displacement along the query, for both Stage 2 and Stage 3, will be generated.
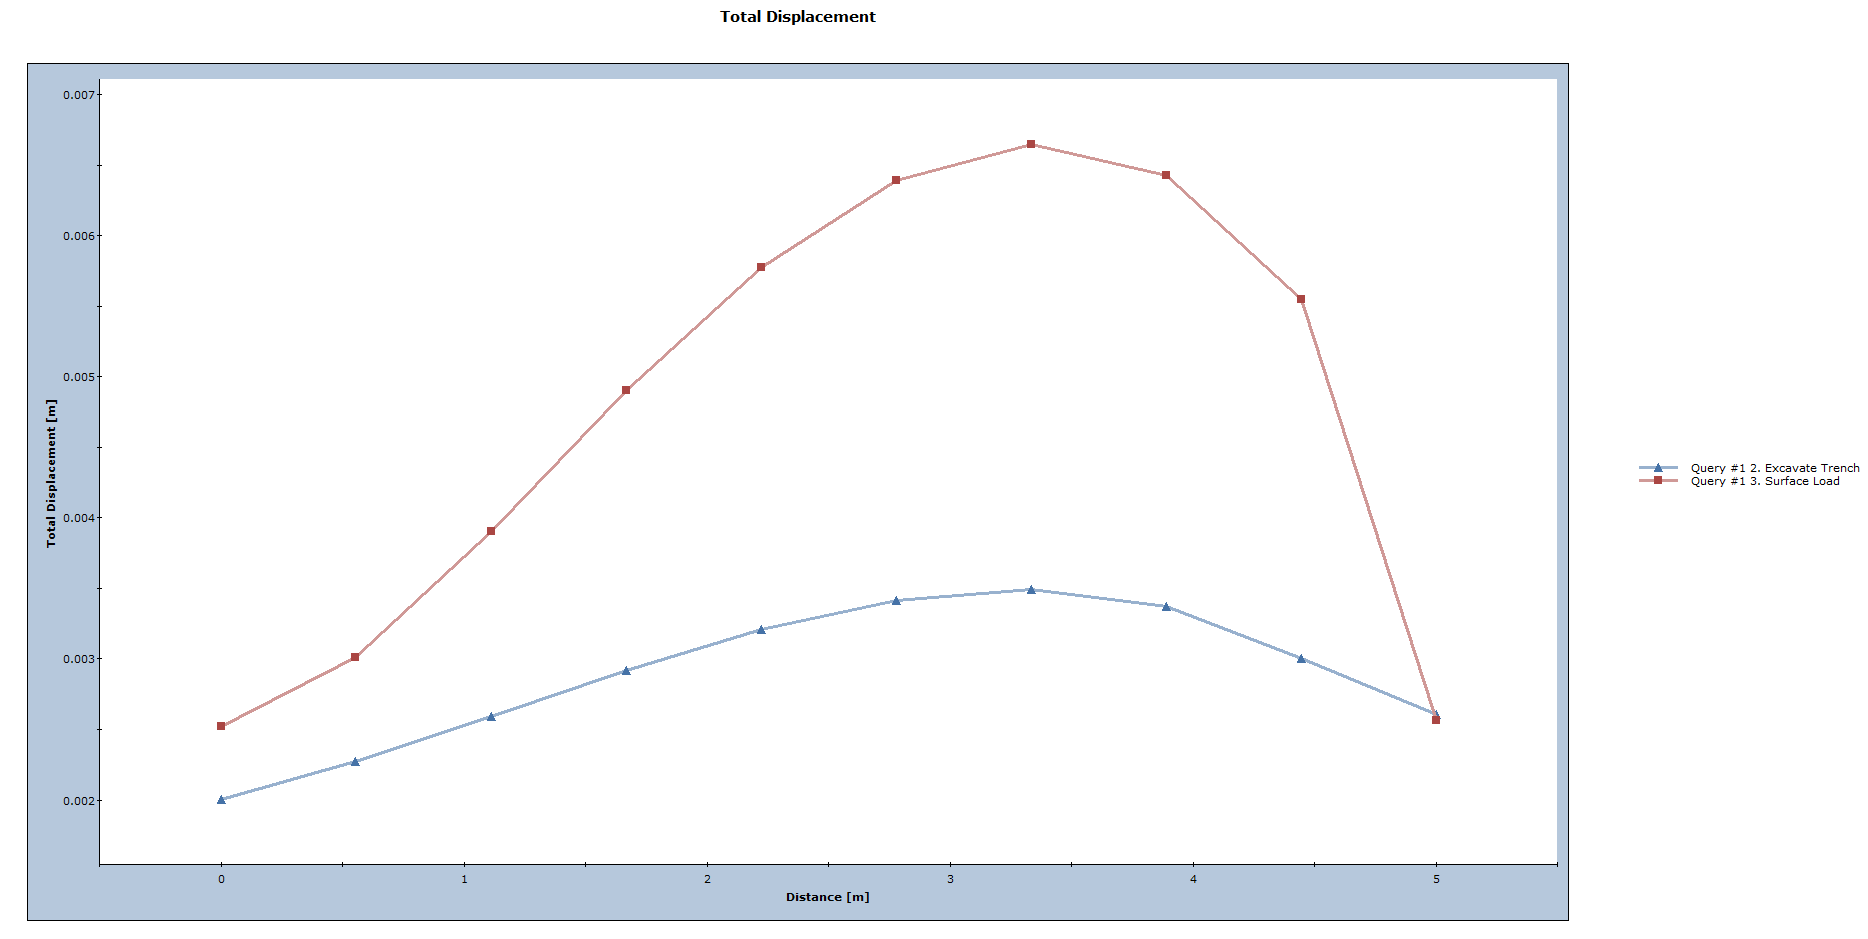
This graph shows the before and after effect of the distributed load on the displacement of the trench wall. The upper curve represents the Stage 3 results, and the lower curve represents the Stage 2 results. The maximum difference is about 3 mm, at about 3.3 meters below the ground surface.
Note that each curve on the graph has 10 points. This is because the query was created, 10 locations were specified at which to generate values in the Specify Query Locations dialog. It is possible to change the number of points to obtain a smoother graph. Close the graph. Let’s edit the query and generate a new graph.
EDITING A QUERY
- Right click on the query and select Edit Locations from the popup menu.
- In the Specify Query Locations dialog, number of locations = 50. Toggle off the "Show queried values” check box. Click OK.
Notice the values are no longer displayed on the model. Since the model is now querying at 50 locations, the numbers would not be readable without zooming in, so we decided to toggle them off.
Now repeat the steps outlined in the previous section (Graphing a Query) to obtain a new, smoother graph with 50 points on each displacement curve.
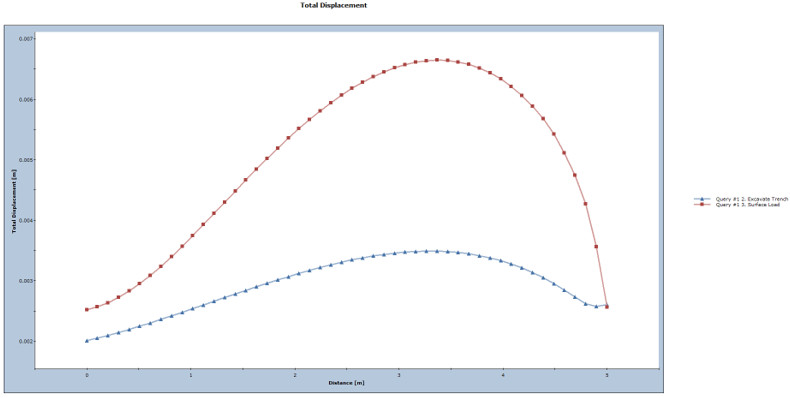
Finally, note that the axis ranges and titles can be modified by right-clicking on the graph and selecting Chart Properties. Many other chart options are also available in the right-click menu.
This concludes the Introduction to RS2: Surface Excavation Tutorial.