16 - DIPS Import Wizard
1.0 Introduction
This tutorial demonstrates the use of DIPS Import Wizard to automate the import of columnized Excel data into DIPS Traverse Infomation and Grid Data.
Topics Covered in this Tutorial:
- Import Wizard
- Traverse Information
- Grid Data
- Saving Import Settings Templates
- Loading Import Settings Templates
- Managing Import Settings Templates
Finished Product:
The finished product of this tutorial can be found in the Tutorial 16 Import Wizard.dips8 file, located in the Examples > Tutorials folder in your DIPS installation folder.
2.0 Model
If you have not already done so, run the DIPS program by double-clicking the DIPS icon in your installation folder or by selecting Programs > Rocscience > DIPS > DIPS in the Windows Start menu.
If the DIPS application window is not already maximized, maximize it now, so that the full screen is available for viewing the model.
To begin creating a new DIPS file:
- Select New
 from the toolbar or the File menu.
Before running the DIPS Import Wizard, it is beneficial to first review the topics for Traverse Information dialog and Grid Data view, which are the primary input options in DIPS. Get familiar with the input data types, as well as the rules and limitations (i.e., unique, numerical, non-blank, etc.) for each Traverse type and Grid Data column.
3.0 Import File Format
The Import Wizard is designed to read in Excel files with .xls or .xlsx extensions. These Excel files may contain any number of sheets. Within the Excel sheet, data must be organized into columnized headers, with one entry per row. For this tutorial, we will be importing:
- 6 Linear Traverses from 6 separate Excel files:
- Linear_Traverse (Dip DipDir) (1).xlsx
- Linear_Traverse (Dip DipDir) (2).xlsx
- Linear_Traverse (Dip DipDir) (3).xlsx
- Linear_Traverse (Dip DipDir) (4).xlsx
- Linear_Traverse (Dip DipDir) (5).xlsx
- Linear_Traverse (Dip DipDir) (6).xlsx
- Grid Data from 1 Excel file:
- Grid_Data.xlsx
The data contained within the above Excel files were collected along a linear scanline using Dip / Dip Direction format.
4.0 DIPS Import Wizard
To run DIPS Import Wizard:
- File > Import > Import Wizard from the menu.
- The DIPS Import Wizard dialog will appear.
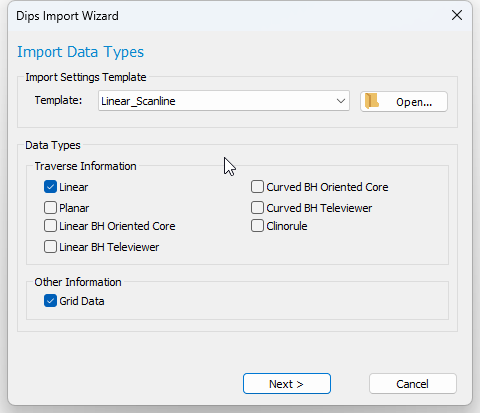
4.1 IMPORT DATA TYPES
In the first page (Import Data Types) of the DIPS Import Wizard dialog:
- Select the Linear checkbox from the Traverse Information groupbox. This will allow you to import data for the Linear Traverse Type into the Traverse Information dialog.
- Select the Grid Data checkbox from the Other Information groupbox. This will allow you to import data into the main Grid Data view.

Once at least one of the Data Types is selected, the Next button will be enabled. - Select the Next button to advance to the subsequent pages of DIPS Import Wizard.
4.2 TRAVERSE INFORMATION IMPORT
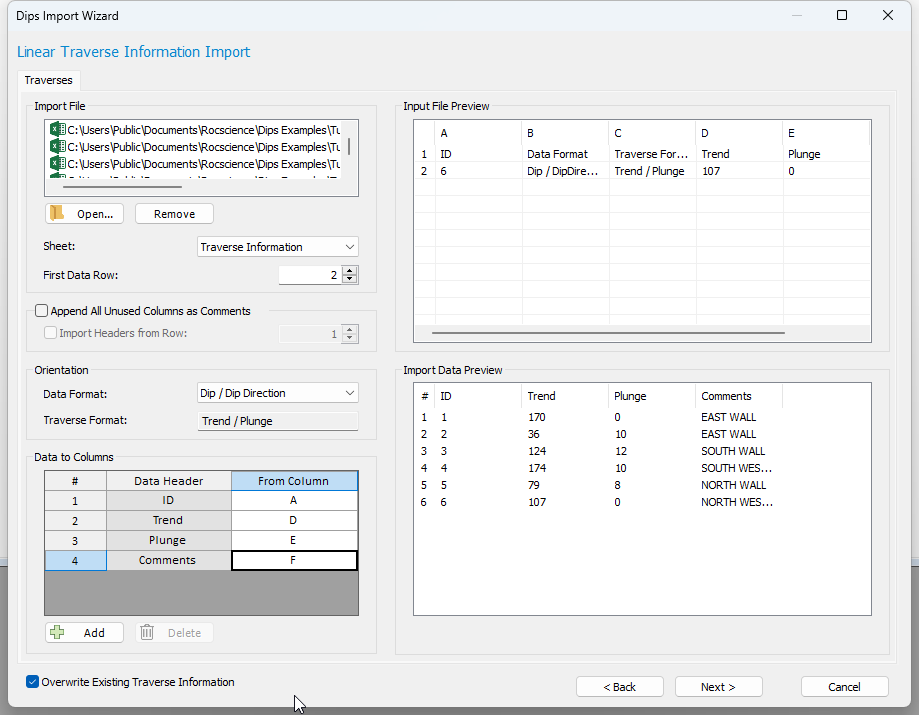
In the Linear Traverse Information Import page of the DIPS Import Wizard dialog:
- Click the Open
 button to add Excel import files to Import File list.
 - Open the 6 Excel files containing the Linear Traverse data:
- Linear_Traverse (Dip DipDir) (6).xlsx
- Linear_Traverse (Dip DipDir) (5).xlsx
- Linear_Traverse (Dip DipDir) (4).xlsx
- Linear_Traverse (Dip DipDir) (3).xlsx
- Linear_Traverse (Dip DipDir) (2).xlsx
- Linear_Traverse (Dip DipDir) (1).xlsx
- Click on any Import File to see the Input File Preview to the upper-right of the dialog.
- Each file contains 2 rows and 5 columns.
- Each file contains the following headers on the first row: ID, Data Format, Traverse Format, Trend, Plunge.
- Each file contains a single Linear Traverse entry on the second row.
- Under Import File:
- Select the Excel sheet to read from the Sheet dropdown. Within each of the 6 files, there is only 1 sheet called "Traverse Information" so Sheet = Traverse Information.
- Set the First Data Row = 2. This will tell DIPS to ignore the header titles in the first row and start reading in the data starting from the second row.
- Under Orientation:
- Select the data orientation format from the Data Format dropdown. This corresponds to the data format of the orientation measurements taken along the Traverse. Set the Data Format = Dip / Dip Direction to match the import data.
- The Traverse Format for a Linear Traverse in DIPS is always Trend / Plunge and cannot be modified.
- Under Data to Columns:
- Set the Data Header "ID" From Column = A to read in the ID data from column A of the Excel files.
- Set the Data Header "Trend" From Column = D to read in the Trend data from column D of the Excel files.
- Set the Data Header "Plunge" From Column = E to read in the Plunge data from column E of the Excel files.
- Set the Data Header "Comments" From Column = F to read in the Comments data from column F of the Excel files.
- Select Overwrite Existing Traverse Information checkbox if you would like to replace the existing entries in the Linear Traverses table of the Traverse Information dialog with the imported entries. If unchecked, imported entries will be automatically appended. By default, Overwrite Existing Traverse Information is checked. In our case it does not matter since we are starting from a new DIPS document anyway.
- Select the Next button to advance to the subsequent pages of DIPS Import Wizard.
Once at least one Data Header is assigned a From Column to read from, the Import Data Preview will display the first 100 rows of import data and the Next button will be enabled.
If you would like to import any additional information to the Comments data in the Traverse Information dialog, you may do so by either:
- Selecting Add
 button and specifing the Data Header name and From Column to read from; or
 - Select Append All Unused Columns as Comments checkbox to automatically import columns that were not assigned in any Data Header (i.e., From Column = None). You can optionally include the Data Header name along with your data by selecting Import Headers from Row checkbox, and specifying a row number.
This will be left as an optional excercise for the user to explore.
4.3 GRID DATA IMPORT
In the Grid Data Import page of the DIPS Import Wizard dialog:
- Select the Open button to add Excel import files to Import File list.
- Open the Excel file containing the Grid Data data:
- Grid_Data.xlsx
- Click on the Import File to see the Input File Preview to the upper right of the dialog.
- The file contains 378 rows and 6 columns.
- The file contains the following headers on the first row: Dip, Dip Dirextion, Traverse, Distance, JRC, STL.
- The file contains 377 entries starting on the second row.
- Under Import File:
- Select the Excel sheet to read from the Sheet dropdown. In this file, there is only 1 sheet called "Grid Data" so set Sheet = Grid Data.
- Set the First Data Row = 2. This will tell DIPS to ignore the header titles in the first row and start reading in data starting from the second row.
- Under Orientation:
- Select the global data orientation format from the Global Orientation Format dropdown. This corresponds to the data format of all orientation measurements in Grid Data not assigned to a Traverse. Set the Global Orientation Format = Dip / Dip Direction to match our data.
- Set the Declination = 0 deg for no declination correction to the data.
- Select the Distance Column checkbox to include a "Distance" Data Header entry (and corresponding Distance column in the Grid Data view).
- Select the Metric radio control since the Distance measurements are recorded in meters.
NOTE: You can always change the Global Orientation Format and Declination in Project Settings later on, if you made a mistake in the DIPS Import Wizard.NOTE: You can optionally change the Columns in Project Settings if you made a mistake in the DIPS Import Wizard.NOTE: You can always change the Units in Project Settings later on, if you made a mistake in DIPS Import Wizard. - Under Data to Columns:
- Set the Data Header "Orient1" From Column = A to read in the Dip data from column A of the Excel files.
- Set the Data Header "Orient2" From Column = B to read in the Dip Direction data from column B of the Excel files.
- Set the Data Header "Traverse" From Column = C to read in the Traverse data from column C of the Excel files.
- Set the Data Header "Distance" From Column = D to read in the Distance data from column D of the Excel files.
- Select Append All Unused Columns as Extra Column checkbox
- Select Import Headers from Row checkbox. This will import the JRC and STL data from columns E and F, respectively.
- Set the Row = 1, which is the header row of the Excel file. This will set the Extra Column headers in the Grid Data view to JRC and STL for imported data from columns E and F, respectively.
- Select Overwrite Existing Grid Data checkbox if you would like to replace the existing entries in the Grid Data view with the imported entries. If unchecked, imported entries will be automatically appended. By default, Overwrite Existing Grid Data is checked. In our case it does not matter since we are starting from a new DIPS document anyway.
- Select Next button to advance to the subsequent pages of DIPS Import Wizard.
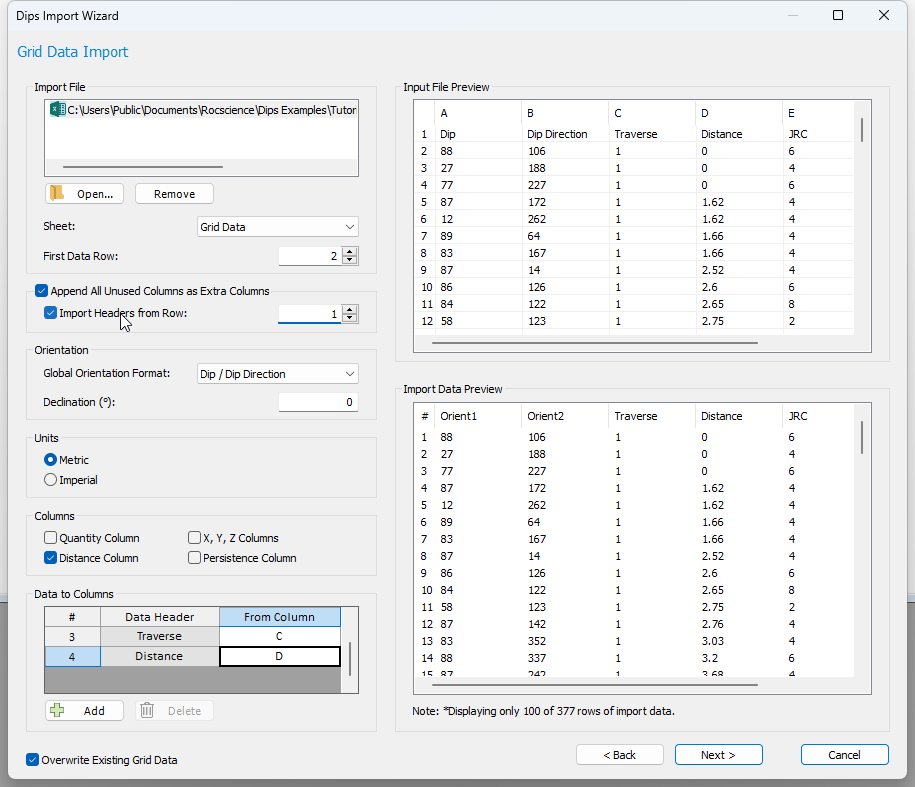
Once at least one Data Header is assigned a From Column to read from, the Import Data Preview will display the first 100 rows of import data and the Next button will be enabled.
Alternatively, if you would like to import specific Excel columns as Extra Columns of data in the Grid Data view:
- Select the Add button.
- Enter the Data Header name and From Column to read from.
This will be left as an optional excercise for the user to explore.
4.4 IMPORT SUMMARY
In the Import Summary page of the DIPS Import Wizard dialog:
- Inspect the Import Data Type and Status to see if you are overwriting or appending the data.
- Inpect the Warnings. If any errors exist, then you will have to navigate with the Back button to fix the import settings from preceeding pages. If "No errors found." then the Finish button will be enabled.
- Select Save Current Import Settings as a Template checkbox.
- Enter Template Name = Linear_Scanline.
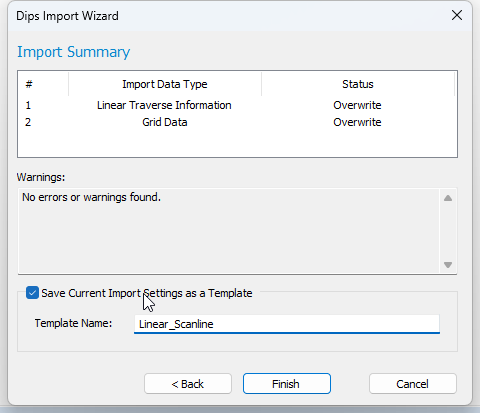
Any saved Import Settings Template will be stored on your local machine and will be available in a another DIPS document or when you relaunch the DIPS program. We will talk more about working with Import Settings Templates in the next section. - Select Finish to exit the DIPS Import Wizard and import the data into DIPS.
5.0 Import Results
Now let's inspect our DIPS file to verify that the data was imported correctly.
- Select Analysis > Traverses from the menu.
- Select Traverse Type = Linear.
- Navigate to the main Grid Data view.
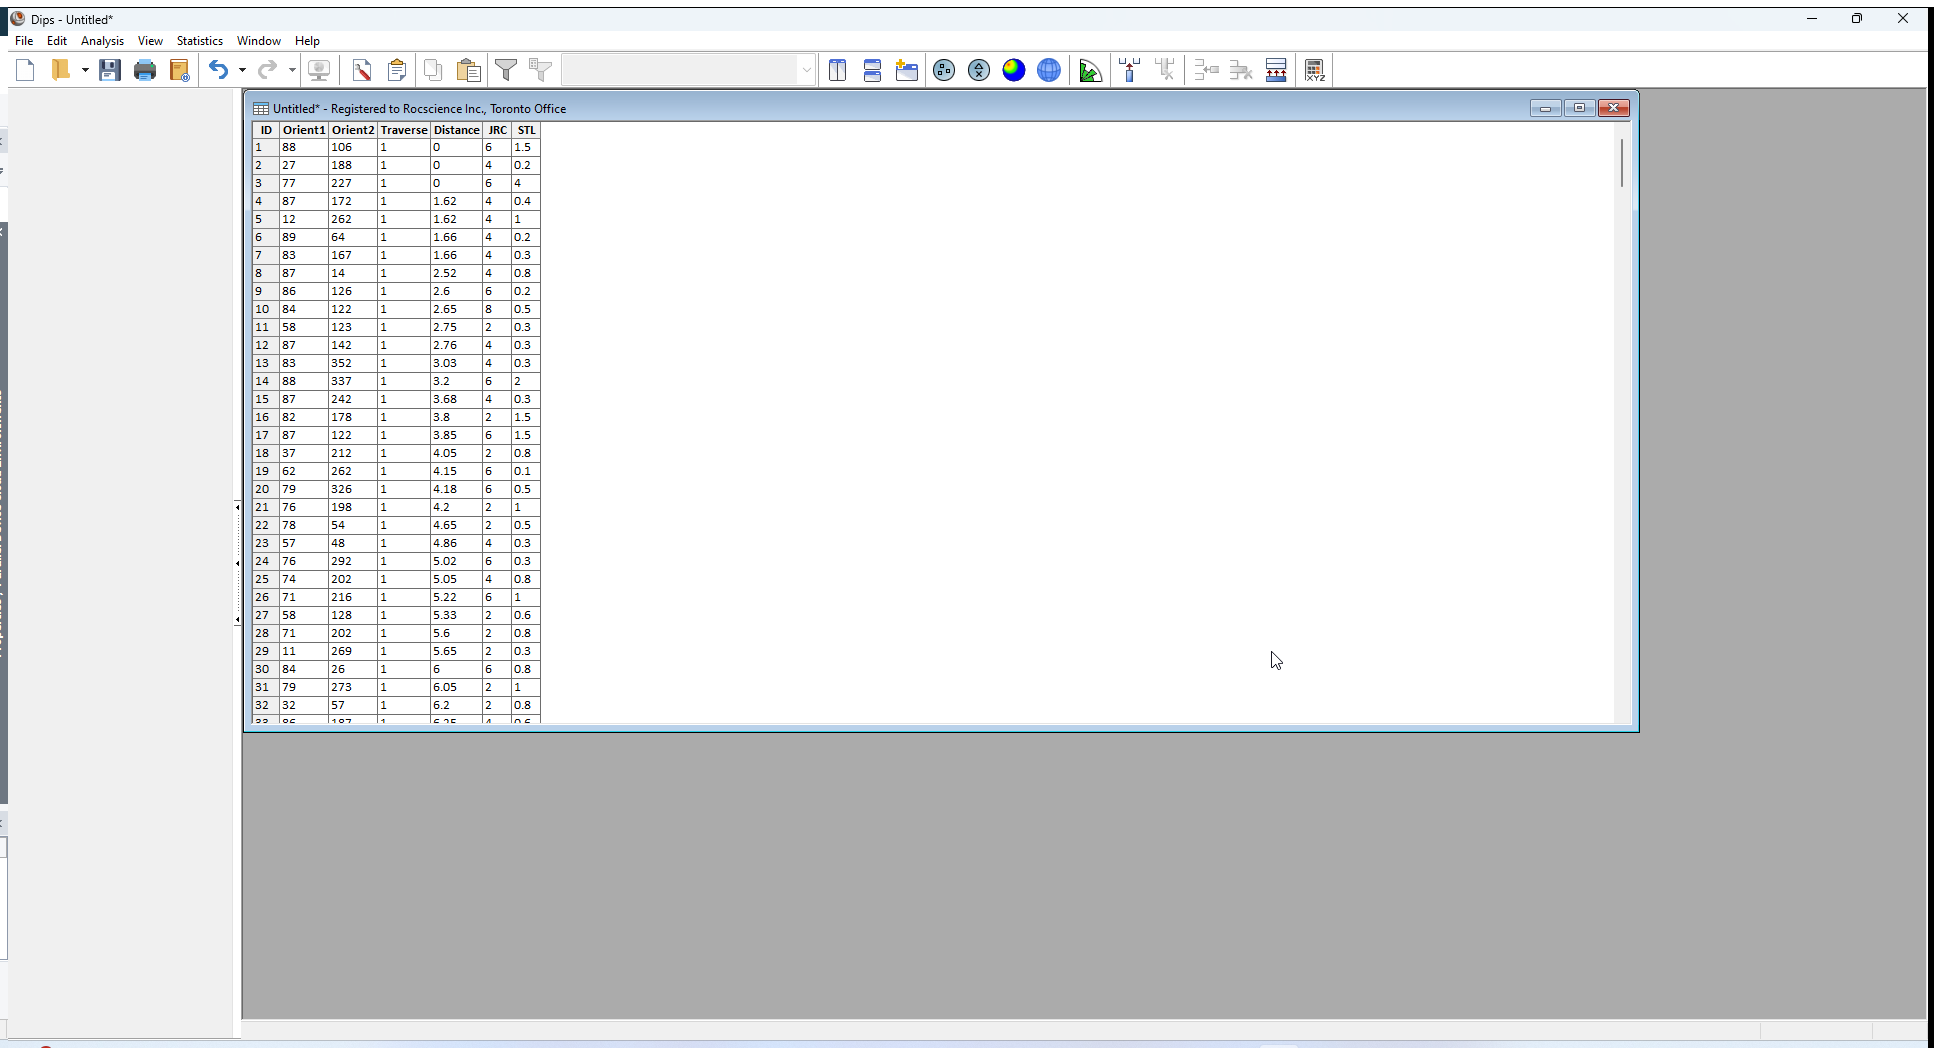
The data has been imported successfully in the Traverse Information dialog. The Traverse Information dialog should contain 6 Linear Traverses which were imported from the Excel files.

The data has been imported successfully in the Grid Data table. The Grid Data should contain 377 rows of data, with a Distance column, and 2 Extra Columns.
6.0 Import Settings Templates
Recall that we saved an Import Settings Template earlier with the name "Linear_Scanline". We can apply an Import Settings Template when running the DIPS Import Wizard. The Import Settings Template makes the process of importing the same format of data extremely efficient, as we do not need to reselect the various controls within the DIPS Import Wizard dialog.
To demonstrate the use of the Import Settings Template, we will start with a new DIPS document and import the same data as before.
6.1 APPLYING AN IMPORT SETTINGS TEMPLATE
- Select New from the toolbar or the File menu.
- Select Import > Import Wizard from the File menu.
- The DIPS Import Wizard dialog will appear.
- In the first page (Import Data Types) of the DIPS Import Wizard dialog:
- Select Template = Linear_Scanline (Import Settings Tempate saved earlier) from the dropdown.
- Once template is selected, the Linear and Grid Data checkboxes are set in accordance to the template settings.
- Select Next button to advance to the subsequent pages of DIPS Import Wizard.
- In the Linear Traverse Information Import page of the DIPS Import Wizard dialog:
- Select the Open button to add Excel import files to Import File list.
- Open the 6 Excel files containing the Linear Traverse data:
- Linear_Traverse (Dip DipDir) (1).xlsx
- Linear_Traverse (Dip DipDir) (2).xlsx
- Linear_Traverse (Dip DipDir) (3).xlsx
- Linear_Traverse (Dip DipDir) (4).xlsx
- Linear_Traverse (Dip DipDir) (5).xlsx
- Linear_Traverse (Dip DipDir) (6).xlsx
- All selections are set in accordance to the template settings.

- Select Next button to advance to the subsequent pages of DIPS Import Wizard.
- In the Grid Data Import page of the DIPS Import Wizard dialog:
- Select the Open button to add Excel import files to Import File list. Select the Excel file containing the Grid Data data:
- Grid_Data.xlsx
- All selections are set in accordance to the template settings.

- Select Next button to advance to the subsequent pages of DIPS Import Wizard.
- In the Import Summary page of the DIPS Import Wizard dialog:
- Inspect the Import Data Type and Status to see if you are overwriting or appending the data.
- Inpect the Warnings.
- Select Finish to exit the DIPS Import Wizard and import the data into DIPS.
The data should be imported just as before.
As demonstrated, you can import the data with only a few clicks when when using an Import Settings Template in conjunction with DIPS Import Wizard. The Import Settings Template takes out the repetitive manual selection of various settings as you progress throught each step. Creating and reusing Import Settings Templates is helpful for importing data of the same format over and over again. The only manual selections involved are:
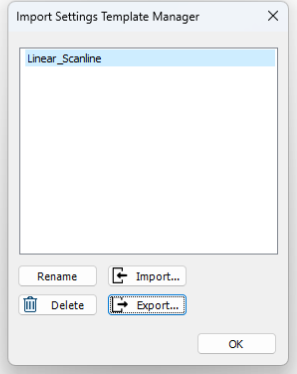
6.2 MANAGING IMPORT SETTINGS TEMPLATES
The Import Settings Template Manager allows you to rename, delete, import, or export any user-defined Import Settings Template.
To manage Import Settings Templates:
- Select Import > Manage Templates from the File menu.
- The Import Settings Template Manager dialog will appear.
- The Linear_Scanline Import Settings Template saved from earlier appears in the list.
- Select an Import Settings Template from the list to Rename, Delete, or Export.
- You can Import an Import Settings Template from another directory on your local machine for use with DIPS. The Import Settings Template files have a . dipsiws extension.
- Select OK.
This concludes the tutorial.