Moving the Wedges
For display purposes, the wedges can be graphically "moved" from their default positions around the excavation, in the 3D Wedge View, the Multi Perspective View, the End Wedge View or the Front, Perspective View.
- The wedges can be moved into, or away from the excavation.
- Individual wedges can be moved, or all wedges can be translated simultaneously.
- The direction of movement is always the sliding direction for each wedge.
There are several different ways in which the user can interactively move the wedges, as described below.
Wedge Translation Option
In the Sidebar for the 3D Wedge View (and other views listed above), is the Wedge Translation option. This consists of a slider control which can be clicked on, or dragged with the mouse. By default, the slider control is centered, which represents the default (zero displacement) wedge position. To move the wedges, click anywhere on the slider control, or drag it with the mouse.
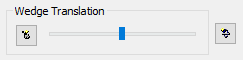
- If the Wedge Translation control is moved to the left, the wedges will move out of the excavation.
- If the Wedge Translation control is moved to the right, the wedges will move into the excavation
- To reset the wedge movement to the default positions, you can select the Reset Wedge Movement button
 to the left of the Wedge Translation slider control.
When you use the Wedge Translation option, all wedges are translated simultaneously, and move the same (relative) distance into or away from the excavation.
Mouse Wheel + Shift / Ctrl
If you have a mouse with a mouse wheel, the wedges can also be moved by rotating the mouse wheel while holding down the SHIFT or CTRL keys on the keyboard.
- If you hold down the SHIFT key and rotate the mouse wheel, the wedge movement will be larger.
- If you hold down the CTRL key and rotate the mouse wheel, the wedge movement will be smaller.
- Rotating the mouse wheel forward moves the wedges into the excavation. Rotating the mouse wheel backward moves the wedges out of the excavation.
- To reset the wedge movement, you can double-click the mouse wheel (or middle mouse button).
When you use the mouse wheel option, all wedges are translated simultaneously, and move the same (relative) distance into or away from the excavation.
Moving Individual Wedges ( Left Mouse Button )
Wedges can also be moved individually, or all together, with the left mouse button, as follows:
- Position the cursor over any wedge (see notes below), in the Perspective View (3D Wedge View, Multi Perspective view, etc.), or the Top, Front or Side views of the model (3D Wedge View).
- When you see the cursor change to a vertical, two-way arrow symbol
 , then click and hold the left mouse button, and drag the mouse.
 - As you move the mouse, the wedge will move along its sliding direction. Moving the mouse in the sliding direction will give the maximum rate of movement.
- If you hold down either the SHIFT or CTRL keys, while carrying out the above steps, then all wedges will move together.
Each wedge can be moved independently, with this option.
NOTE: There must be a direct line of sight to the wedge (or part of the wedge), for the view in which the cursor is positioned, in order for the cursor to change to the two-way arrow symbol, allowing you to move the wedge. If a wedge is completely "behind" the excavation, in a given view, then it cannot be moved from within that view, even if the wedge is visible "through" the excavation.
NOTE: Also, if the direction of movement for a wedge is exactly perpendicular to a view, then you cannot move the wedge from within that view. For example: you cannot move a falling roof wedge from within the Top orthogonal view, because the falling direction is exactly perpendicular to the viewing plane.
Reset Wedge Movement
If you have moved the wedges, they can quickly be restored to their default position around the excavation, as follows:
- Select the Reset Wedge Movement button from the Sidebar, OR,
- Right-click in any wedge view and select Reset Wedge Movement from the popup menu, OR,
- Double-click the middle mouse button or mouse wheel, in any wedge view, OR,
- Press t on the keyboard, while the focus is in any wedge view.
Any of these options will reset the wedges to their default positions.