Adding Bolts
Rock bolts are modeled in RocTopple as simple end-anchored bolts with a user-defined capacity, length, angle, location, and out-of-plane spacing. You can add any number of bolts to a model. Each bolt in the two-dimensional model represents a row of equally spaced bolts when considering the out-of-plane dimension of the model. Bolts can be added anywhere along the slope face or upper slope, on the exposed upper edges of the toppling blocks.
To add a rock bolt:
- Select Add Bolt
 on the toolbar or the Support menu.
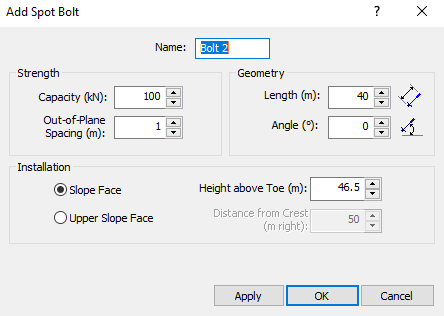
- In the Add Spot Bolt dialog, enter the following:
- Name
- Strength Capacity
- Strength Out-of-Plane Spacing
- Geometry Length
- Geometry Angle
- Installation (Slope Face or Upper Slope Face)
- Click OK to add the bolt to the model and close the dialog.
After a bolt has been added, it can easily be moved, edited, and deleted.
Bolt Strength Capacity
The Strength Capacity is the maximum tensile strength of an individual bolt. The capacity is entered as a force, with the units corresponding to the selected Units in the Project Settings dialog.
Bolt Strength Out-of-Plane Spacing
The Strength Out-of-plane spacing is the spacing between individual bolts in the out-of-plane dimension. Each bolt in the 2-dimensional view of a RocTopple model, actually represents a row of equally spaced bolts when considering the out-of-plane dimension (i.e. perpendicular to the 2-dimensional cross-section of the slope).
The bolt Strength Capacity and Strength Out-of-Plane Spacing determine the effective support force of each row of bolts per unit distance in the out-of-plane dimension. For example: if the bolt capacity = 10 tonnes and the out-of-plane spacing = 2 meters, the effective support force = 10/2 = 5 tonnes/meter.
Bolt Geometry Length
The Geometry Length is the distance between the installation point of the bolt on the slope surface and the anchor point of the bolt within the slope.
NOTE: By default, bolts must cross the base plane of the toppling blocks in order to act as support elements. See Overview of Support in RocTopple for more information.
Bolt Geometry Angle
The Geometry Angle is specified with respect to the horizontal. Only kinematically feasible bolt angles are allowed (e.g. bolts must dip into the slope at an angle not greater than the dip angle of the toppling blocks).
Bolt Installation
Bolts can be applied on the slope face or upper slope face of a RocTopple model. When you initially add a bolt, the installation location is specified as follows:
- Slope Face - The location of the bolt is specified as the vertical height from the toe of the slope
- Upper Slope Face - The location of the bolt is specified as the horizontal distance from the crest of the slope (even if the upper slope surface is not horizontal)
When a bolt is added, RocTopple automatically determines the exact location of the bolt on the toppling block surface corresponding to the number you have entered. If the bolt does not appear where you intended, you can edit, move or delete the bolt and modify your input accordingly.
Bolt Statistics
If you are carrying out a Probabilistic analysis, the bolt Strength Capacity and Strength Out-of-Plane Spacing can be defined as random variables. See Support Statistics in a RocTopple Probabilistic Analysis for more information.
Bolt Display
Bolts are displayed in both the 2D View and the 3D View. In the 3D View, a symbolic face plate and anchor are drawn on each bolt. It should be noted that in the 3D view, only a single bolt is displayed in the center of the slope. The out-of-plane spacing of bolts is NOT represented graphically in the 3D View, but keep in mind that each bolt does represent a row of equally spaced bolts when considering the out-of-plane dimension.