4 - Freehand Set Window
1.0 Introduction
This tutorial covers the addition of Sets in Dips. The Add Set Window (Freehand) method of creating sets is discussed. The Add Set Window (Freehand) option is offered as an alternative method of creating Set Windows. You may find it useful for selecting irregular data clusters. For a given grouping of poles, you should get identical results using either the freehand or 4-sided Set Windows.
Topics Covered in this Tutorial:
- Add Set Window (Freehand)
- Wrapped Set Window
- Delete All Sets
Finished Product:
The finished product of this tutorial can be found in the Tutorial 04 Sets (Set Window Freehand).dips8 file, located in the Examples > Tutorials folder in your Dips installation folder.
2.0 Model
If you have not already done so, run Dips by double-clicking on the Dips icon in your installation folder. Or from the Start menu, select Programs > Rocscience > Dips > Dips.
If the Dips application window is not already maximized, maximize it now, so that the full screen is available for viewing the model.
Dips comes with several example files installed with the program. These example files can be accessed by selecting File > Recent Folders > Examples Folder from the Dips main menu. This tutorial will use the Example.dips8 file to demonstrate the basic plotting features of Dips.
- Select File > Recent Folders > Example Folder
 from the menu.
 - Open the Example.dips8 file. Since we will be using the Example.dips8 file in other tutorials, save this example file with a new file name without overwriting the original file.
- Select File > Save As
 from the menu.
 - Enter the file name Tutorial 04 Sets Tutorial (Set Window Freehand) and Save the file.
You should see the stereonet plot view shown in the following figure.
If you do not see the plot below, then use the Sidebar Plot Options to view pole vectors and contours on the Stereonet Plot View.
3.0 Adding Sets
A Set as defined in Dips is a grouping of poles created with one of the following options in the Set menu:
- Add Set Window

- Add Set Freehand

- Add Set Circular
- Sets from Cluster Analysis

Sets are created for the purpose of obtaining Mean Set Plane orientations and Set Statistics of data clusters.
3.1 ADD SET WINDOW (FREEHAND)
It is important to note that, for a given group of poles, the Mean Set Plane and Set Statistics should be identical, regardless of which type of Set Window is created. We will quickly discuss this option and compare results with the Set Windows created in Tutorial 03 - Sets (Set Window).
- First return to the Tutorial 03 - Sets (Set Window) file with the 3 Set Windows.
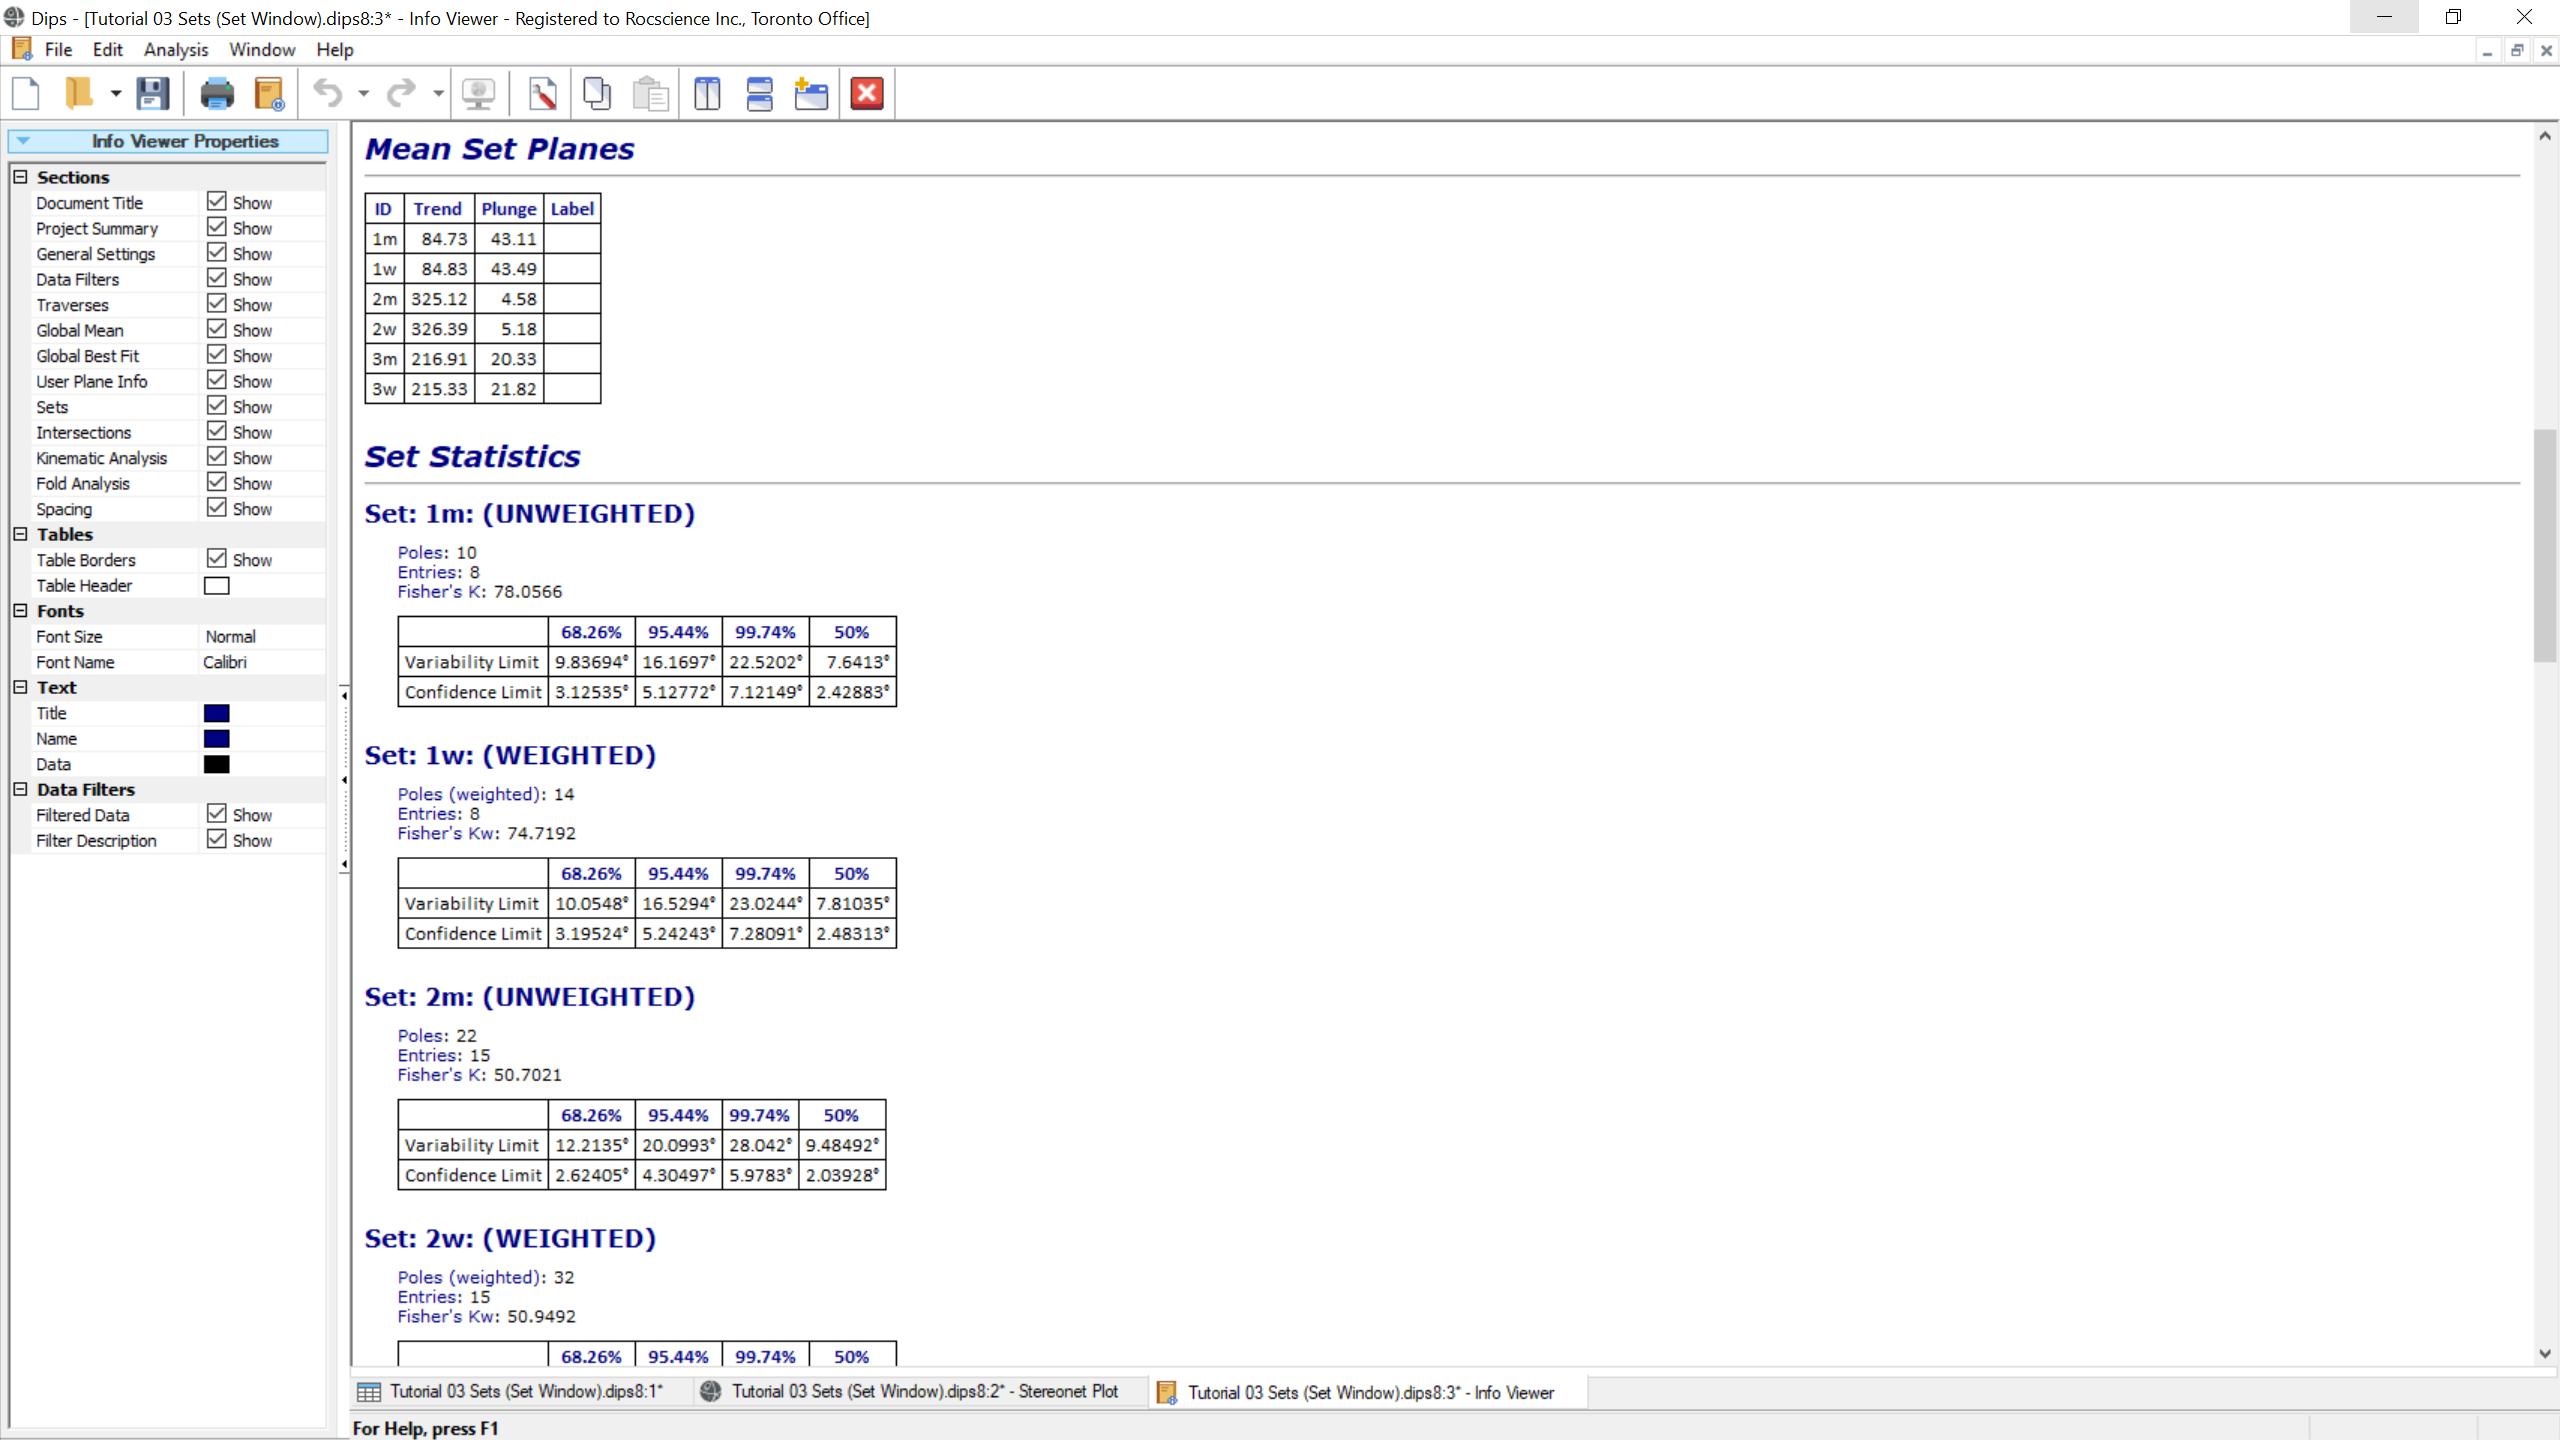
- Go to the Info Viewer and record the Mean Set Plane orientations.
Note that the Info Viewer data can be copied or saved using various options in the right-click menu.
Another option which can be used to create Set Windows is the Add Set Window (Freehand) ![]() option. You may find this useful for irregularly shaped data sets which cannot be easily enclosed by 4-sided Set Windows created with the Add Set Window option.
option. You may find this useful for irregularly shaped data sets which cannot be easily enclosed by 4-sided Set Windows created with the Add Set Window option.
To recreate the first set:
- Select Add Set Freehand option from the toolbar or the Sets menu.
- Draw a freehand Set Window around the data cluster at the right side of the stereonet (i.e., the previous Set 1 data).
- Right-click and select Done
 .
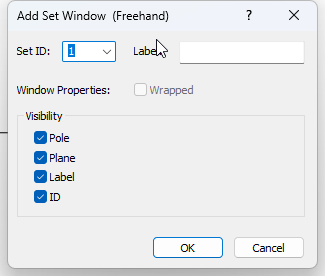
. - In the Add Set Window (Freehand) dialog:
- Leave the default Set ID = 1 as is.
- Leave the default Visibility settings as is.
- Select OK.
Now to recreate Set 2 (the wrapped data cluster) with the Add Set Window (Freehand) option, you have to do the following:
- Select Add Set Window (Freehand) option from the toolbar or the Sets menu.
- Draw a window around the data cluster at the upper left of the stereonet.
- Right-click and select Done .
- In the Add Set Window (Freehand) dialog:
- Leave the default Set ID = 1 as is.
- Leave the default Visibility settings as is.
- Select OK.
- Select Add Set Window (Freehand) option from the toolbar or the Sets menu.
- Draw a window around the 3 poles on the opposite side at the lower right of the stereonet.
- Right-click and select Done .
- In the Add Set Window (Freehand) dialog:
- Change the Set ID = 2
- Make sure the Wrapped data checkbox is selected.
This will ensure that the 2 freehand Set Windows which define Set 2 are treated as a Wrapped Set, so that the Mean Set Plane and Set Statistics are correctly calculated.
- Leave the default Visibility settings as is.
- Select OK.

To recreate the third set:
- Select Add Set Freehand option from the toolbar or the Sets menu.
- Draw a freehand Set Window around the data cluster at the lower left of the stereonet (i.e., the previous Set 3 data).
- Right-click and select Done .
- In the Add Set Window (Freehand) dialog:
- Leave the default Set ID = 3 as is.
- Leave the default Visibility settings as is.
- Select OK.

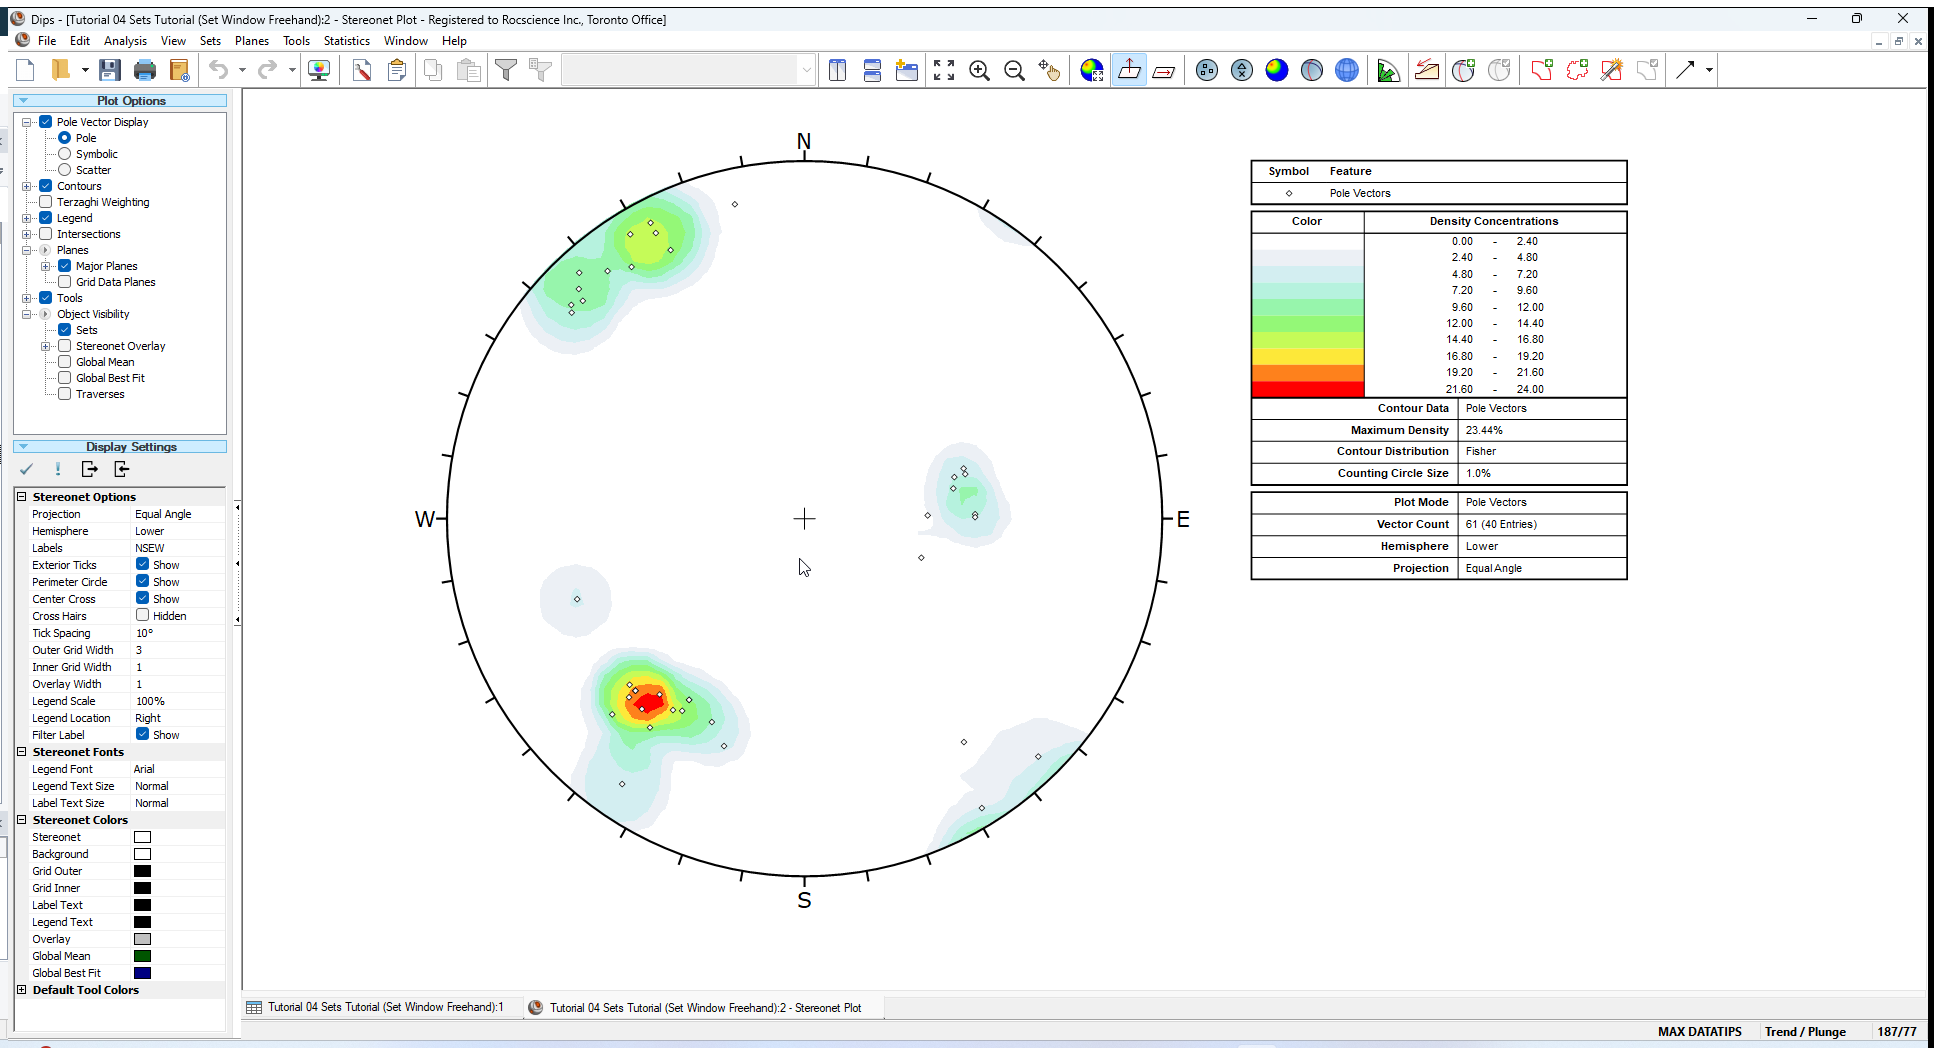
The screen should look similar to the following figure.

Now look at the Info Viewer ![]() and check the Mean Set Plane orientations. They should be exactly the same as the mean orientations determined from the curvilinear 4-sided windows created earlier in this tutorial. If they are not, check that you have selected all of the intended poles, particularly for Set 2 (the wrapped data set).
and check the Mean Set Plane orientations. They should be exactly the same as the mean orientations determined from the curvilinear 4-sided windows created earlier in this tutorial. If they are not, check that you have selected all of the intended poles, particularly for Set 2 (the wrapped data set).
If you would like to delete all the Sets from the stereonet:
- Select Delete All Sets from the Sets menu to delete all 3 current sets.
This concludes the tutorial. You are now ready for the next tutorial, Tutorial 05 - Sets (Sets from Cluster Analysis) in Dips.