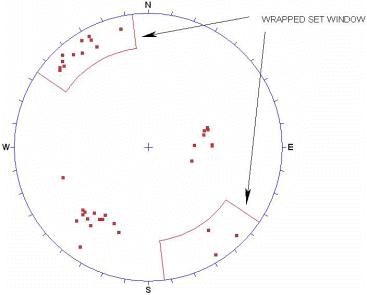
Wrapped Set Windows
After you have selected the FIRST corner of a Set Window with the Add Set Window option, you will notice that if the cursor moves beyond the stereonet perimeter, it will "wrap around" and re-appear on the opposite side of the stereonet, with the window still attached.
This allows data near the perimeter, on opposite sides of the stereonet, to be selected as one Set, as illustrated below.
Wrapped Set Window
Mean Vector Calculation for Wrapped Set Windows
The mean vector calculation for Sets created with a regular (i.e., non-wrapping) Set Window, is simply vector addition of all of the poles within a window, which is then normalized to the sphere boundaries.
WARNING: When pole vectors are clustered near the equator, and plot on opposite sides of the stereonet, a mean orientation calculated from the Lower Hemisphere alone will be incorrect!
The Wrapping Set window capability of Dips automatically accounts for this situation. The poles within a Wrapped Set Window that plot on the opposite side of the stereonet, are incorporated into the vector addition as negative poles (i.e., plunge = -plunge, trend = trend + 180), so that the mean will be correctly calculated.
NOTE: If you are using MULTIPLE WRAPPED WINDOWS FOR A SINGLE SET, all windows must "wrap" in the same direction, so that the mean is correctly calculated.
Creating Curved Wrapped Set Windows
To create Wrapped Set Windows using Curved Set Windows:
- Select Add Set Window
 option from the Sets menu or toolbar.
 - Select the first corner of the Set Window.
- Move the cursor beyond the stereonet perimeter until the Set Window "wraps around" and re-appears on the opposite side of the stereonet.
- Select the second corner of the Set Window.
- You can adjust the First Corner, Second Corner, and Visibilty settings in the Add Set Window dialog. Select OK.
Creating Freehand Wrapped Set Windows
- Select Add Set Window (Freehand)
 option from the Sets menu or toolbar.
 - Draw around the cluster of poles on one side of the stereonet perimeter and press ENTER. This is the first portion of the Wrapped Set Window.
- You can adjust the Visibilty settings in the Add Set Window (Freehand) dialog. Before exiting the dialog, take note of SetID. Select OK.
- Select Add Set Window (Freehand) option from the Sets menu or toolbar.
- Draw around the cluster of poles on the opposite side of the stereonet perimeter and press ENTER. This is the second portion of the Wrapped Set Window.
- In the Add Set Window (Freehand) dialog:
- Change the Set ID to match the Set ID of the previous Freehand Set Window that you would like to formed a Wrapped Set Window with.
- Ensure that the Wrapped checkbox is selected.
- Select OK.